S3P1 Writeup
This may be a little surprising to you all, it certainly was to me! Let's just say that after the first four games, I thought this would be what a wise man would call a "roflstomp"...
Overview
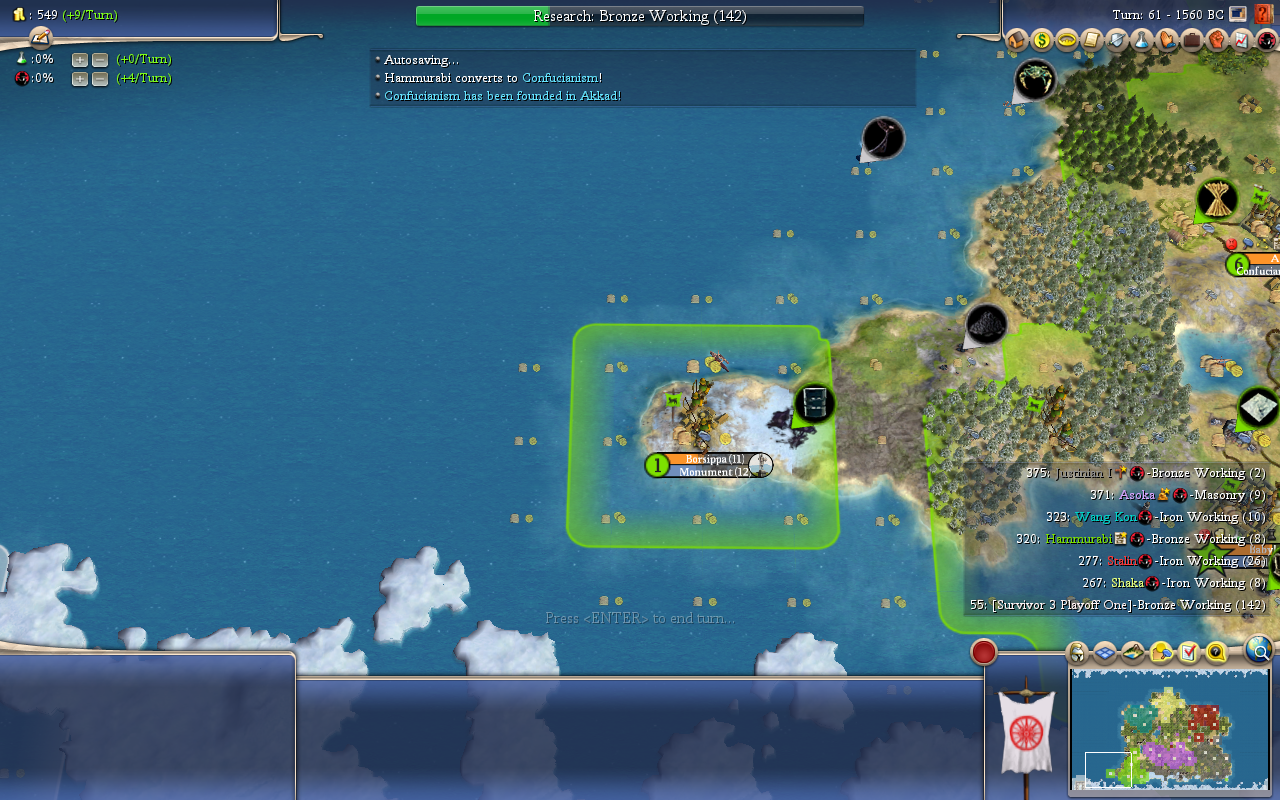
Every indication from the first four games was that this would be a Justinian stomp a.l.a. Mansa’s Opening Game Five Alternate Histories. But then, the next sixteen games completely flipped the script, suggesting a wild and unpredictable setup in which the four corner leaders – Stalin, Justinian, Hammurabi, and Wang Kon – were all meaningful contenders in this map. In hindsight, this was not an unreasonable result. One could draw a line from the NW to the SE corner to divide the map into two equally sized triangles, the bottom/left one being occupied by the “Jedi” and the top/right one occupied by the “Sith”. Each faction had one leader (Asoka for the Jedi, Shaka for the Sith) who had drawn the short end of the stick, getting placed in a central position right in between the crossfire and thus have almost no prospects of winning.
Map Dynamics
Whichever faction came on top in these galactic showdowns
solely hinged on Asoka’s ability to resist the Death Star that was pointed towards him at all times. In fact,
Turn 200 was ALWAYS the critical inflection point of the game. I know only a Sith deals in absolutes, but this absolute statement was no exaggeration: Justin or Stalin won
every single game where Asoka died before T200, while Wang Kon or Hammurabi otherwise won if Asoka survived for more than 200 turns - in particular the Troll King’s four wins all came with Asoka standing tall. The one exception (Game 17), where Stalin came up victorious despite Asoka making it to Turn 241, was that which proves the rule: the low peaceweights uncharacteristically ganged up early on Hammurabi instead, therefore knocking out a Jedi by Turn 200 and paving the way for the Empire to strike back.
The Jedi, to their own detriment, could be baited into hastening Asoka’s demise. Tempting, the dark side is!
If Asoka collapsed early, then his amazing land would fuel his Sith conqueror, where he could keep pace with the Western leaders in tech and win with his superior fighting abilities. Conversely, if Asoka held on by, then by T200 the Jedi would be advanced enough in tech that they could turn the tide of war. To their credit, the Good leaders did not sit idly in these games, frequently attempting and succeeding in their own conquests. In particular, their trust in the Force brought them their own weakling to pick on: Shaka. The Zulu king, who had the double whammy of a central position and awful land, was the Sith counterpart to Asoka in this galaxy far, far away, and a Jedi won every single game in which Shaka was First To Die, partially because that meant Asoka could hold strong.
Asoka dying early did not necessarily spell doom for the high peaceweights. To give some examples, there was Game 11, where Justin went on to secure dominion of the South while Wang Kon became Grandmaster of the North before launching a premature attack to cede Domination to the Byzantines, and Game 16, where Hammurabi was the tech leader but Stalin was able to clutch a UN victory before he fell too far behind.
Furthermore, both Jedi and Sith were prone to infighting, the former due to religious differences (all three leaders liked to found religions), and the latter due to, well, betrayal being a core Sith tenet; there was a reason Darth Bane eventually created the Rule of Two. Betrayal led to varying degrees of success for each faction. In Game 6, Stalin backstabbed Justinian while the Byzantine army was deep in Babylon and pulled off one of the greatest tactical maneuvers I have ever seen from an AI: he chased Justinian’s troops into the Soviet borders, then, with the help of the Babylonian forces, encircled his foe and wiped out his entire stack of doom, leaving the Byzantines defenseless and easy pickings. Meanwhile, in Game 18, untimely barbarian city spawns caused Wang Kon to have an unusually weak game. Hammurabi took advantage by conquering Korea for the earliest elimination of the set and snowballing from there, while Asoka did his job as the sacrificial lamb and held on for long enough. Better Hammurabi got that territory than Shaka or Stalin. Betrayal did backfire for both sides, however. In Game 5, Stalin backstabbed Justinian before the Byzantines could make any noticeable progress on Asoka, and although Justinian straight up crushed both of his enemies in the 2v1, it took long enough that the Hammurabi-Wang Kon duo had become tech runaways. For the Jedi, the mandate was this:
DO NOT, UNDER ANY CIRCUMSTANCES, ATTACK ASOKA.

In Game 11, for example, Hammurabi turned to the dark side and helped the Sith devour Asoka, before they then turned on the Babylonians.
Leader Dynamics
There were four viable leaders, which meant there were four ways these games could generally go. The most standard archtype was the Justinian/Stalin (or occasionally Shaka)/Asoka FTD game. The script was as such: Stalin and Justinian become brothers in the faith and overwhelm Asoka with sheer force of numbers, Justinian getting the emperor’s ransom. Justin could then easily coast to victory while Stalin dutifully played the role of enforcer. In these games, Shaka could sometimes kill Wang Kon early which gave him a chance to supplant Stalin as the enforcer (Games 3, 10).
Next, there were the Stalin/Shaka ticket games. These games saw Stalin instead get most of the spoils from the partitioning of Asoka. With the Byzantine leader shunted into a corner, he did not fare well in these games, as he would eventually be on the receiving end of Stalin's Cossacks. This left Shaka to fill the void; only two there are, after all. Overall, the low peaceweight games generally exposed the military weaknesses of the high peaceweight leaders. The issue with the Jedi stemmed not so much from their innate fighting abilities, but more from their preparedness for war. It was not uncommon for a Jedi to delay crucial military techs or to be trying to build every wonder under the sun while in the middle of an all-out war.
Among the high peaceweight games, the most common was the Wang Kon/Asoka/Shaka FTD one, which took place four times. These games saw Wang Kon mow down Shaka early with Hwatchas while Asoka held on long enough to use his excellent land to vault himself to the Championship round. Unfortunately for the Indian leader, the neverending fighting would leave him so exhausted that Wang Kon, whose wars were much more rewarding and less destructive, would leverage his Financial trait and amazing post-Iron Working land (especially with those gems resources) to victory. A common feature of these games was the weakness of Justinian's would-be enforcers, as Shaka and/or Stalin would over-expand, ignore culture for too long, and ruin their economies, leaving them too ineffective to be of any help to Justinian. These games also tended to see Sith infighting mar the Evil Empire's plans. Interestingly, Hammurabi flailed around in the Wang Kon games, suiciding into the Koreans in Games 8 and 14, throwing away a potential Championship Game spot in Game 19 with a foolish UN vote, and requiring the UN to save him in Game 20, where
Asoka was running him over. These games accounted for every single one of Asoka's Championship appearances, and he was only ever on pace to win in Game 19 until the Troll King acted upon his usual shenanigans.
The fourth and wackiest game archetype was the Hammurabi game. Although these three games were among the strangest of the set, there were two patterns: 1) a weak Wang Kon, whether it was due to poor expansion or his inability to handle Shaka, and 2) an Asoka who, while eventually dying, would hold out long enough that Hammurabi was too far ahead by the time the Death Star reached his orbit.
There were a couple of hybrid games, that being Games 11 (Justin/WK) and Games 16 (Stalin/Hammurabi) - I had gone into some detail about those games.
Overall, the tech pace was average, as although this was not the most inspiring group of techers (I was especially surprised at how mediocre Justinian's econ was), the land overall was quite nice and there were significant conquest opportunities to aid snowballs. Religion played a significant role in these games, ensuring the inevitability of the Justinian-Asoka and being the primary sower of discord between the Jedi. Religion was also a double-edged sword for Justinian, as his zealotry sometimes blinded him to the untrustworthiness of his fellow Sith or caused him to choose suboptimal targets for war.
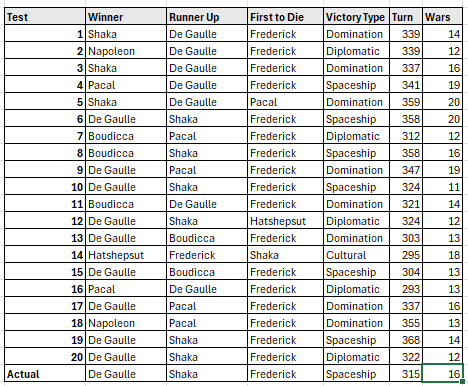
Spaceship and Domination were the only realistic ways a game could finish, with the Sith generally opting for Domination and the Jedi winning by Space. There were two Diplomatic finishes, but they were questionable. Stalin deserves some credit for his Game 16 win, as he had brute forced his way from a bad start to become the land and score leader, but Hammurabi was far enough ahead in tech that he would have won had Justinian not elected Stalin as World Leader. As far as Wang Kon’s Game 19 win went, well, stay tuned. There was one Cultural finish, but it stemmed from the game stretching long enough that Hammurabi won without ever turning up the slider.
How Typical Was The Actual Game?
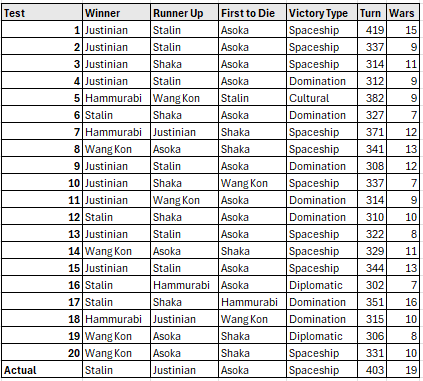
4/10. In many facets, the livestream game played like a standard Justinian game... except 1) Justin launched a foolish cross-map attack on Wang Kon, and 2) Stalin somehow got the vast majority of the spoils of war despite Justin doing most of the work. Stalin winning with Justin coming in 2nd place was an unusual result - a Stalin victory required a crippled Justinian - and furthermore, he actually earned his wins with good play, rather than being at the right place at the right time. Game 1 was very similar to the livestream game, being a 400+ turn slog with endless bloody warring, and it was a representation of how the Actual Game should have ended.
Analyzing the individual leaders:
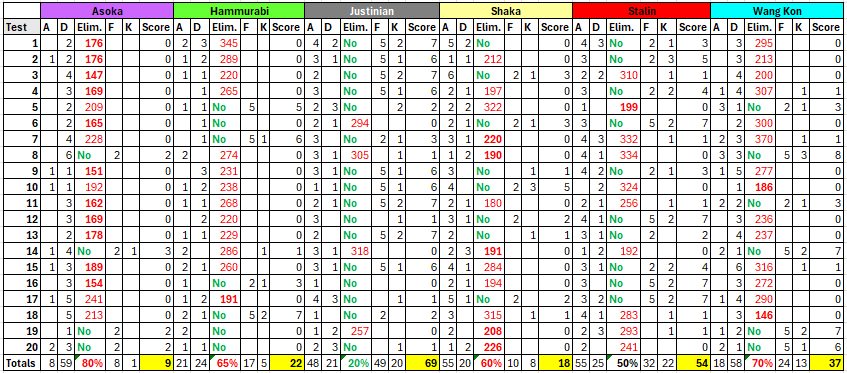
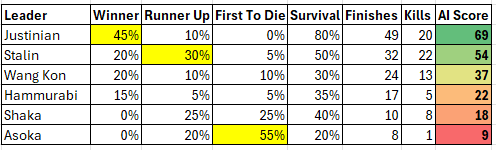
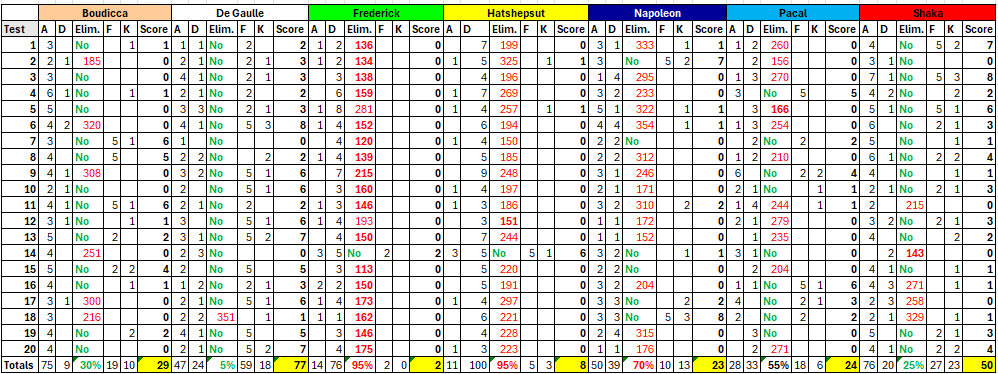
Justinian of Byzantium
Offensive Wars: 48
Defensive Wars: 21
Survival Rate: 80%
Finishes: 9 Wins, 2 Runner Ups (49 Points)
Kills: 20
Overall Score:
69
Justinian was essentially the Emperor in this setup, the most powerful and feared man on the map. However, I had a feeling that his insane start, where he won the first four games, was a tad flukey, as I observed some truly terrible play from the high peaceweights that greatly aided him in the first four games. The next sixteen games revealed two major flaws that prevented Justinian from completely distinguishing himself from the rest of the field. To start, he only had one pathway to victory: kill Asoka ASAP. Fail to do so, and he was out of contention. There really was no other way; a Jedi won the two games where Justin instead killed Stalin early (5, 14), as by doing so, he gave the good guys too much time to develop while also not having his best enforcer to do the dirty work (Shaka was a poor replacement).
Justin's other flaw was that he had a difficult time spreading his religion all over, as he had too many enemies who would never give him Open Borders. This ensured that he could not rely on shrine income nearly as much as he normally does. His only consistent religious ally was Stalin, who was not the most faithful to say the least. Nevertheless, Justinian’s results speak for themselves here: as the most balanced leader with the best access to the softest target on the map, he was able to find the most success of all the leaders here. It also spoke volumes that Justinian was the only leader in this setup who could reliably survive if he did not get a top two spot, although his survival rate was deceiving – there were at least two games where he was on his way out when a victory triggered. Justin showcased his pedigree, but this was not the easiest setup for the Byzantine leader.
Best Performance: Game 13, where Justinian brute forced his way through Asoka and snowballed from there.
Worst Performance: Justin foolishly tried to continue his conquest of Babylon in Game 6 while facing an existential threat from Stalin, and getting tactically outmaneuvered to his doom.
Sitting Bull Award:
Stalin of Russia
Offensive Wars: 55
Defensive Wars: 25
Survival Rate: 50%
Finishes: 4 Wins, 6 Runner Ups (32 Points)
Kills: 22
Overall Score:
54
The burning question for all readers: how much of a fraud was the Season Three Champion? So far, Stalin’s Opening Round AHs were a major disappointment (albeit he had some bad barbarian luck), but what about his playoff set? With a 50% advancement rate and four mostly legitimately earned victories (even his semi-troll Diplo Game 16 was somewhat deserved), these results should quiet naysayers for the time being. Stalin’s path to victory was simple: take most of India, shunt his Justinian into his corner, and then turn on his former master, becoming the Sith Emperor himself with Darth Shaka as his apprentice. Stalin may be a bit of a meme champion, but one cannot deny his military prowess.
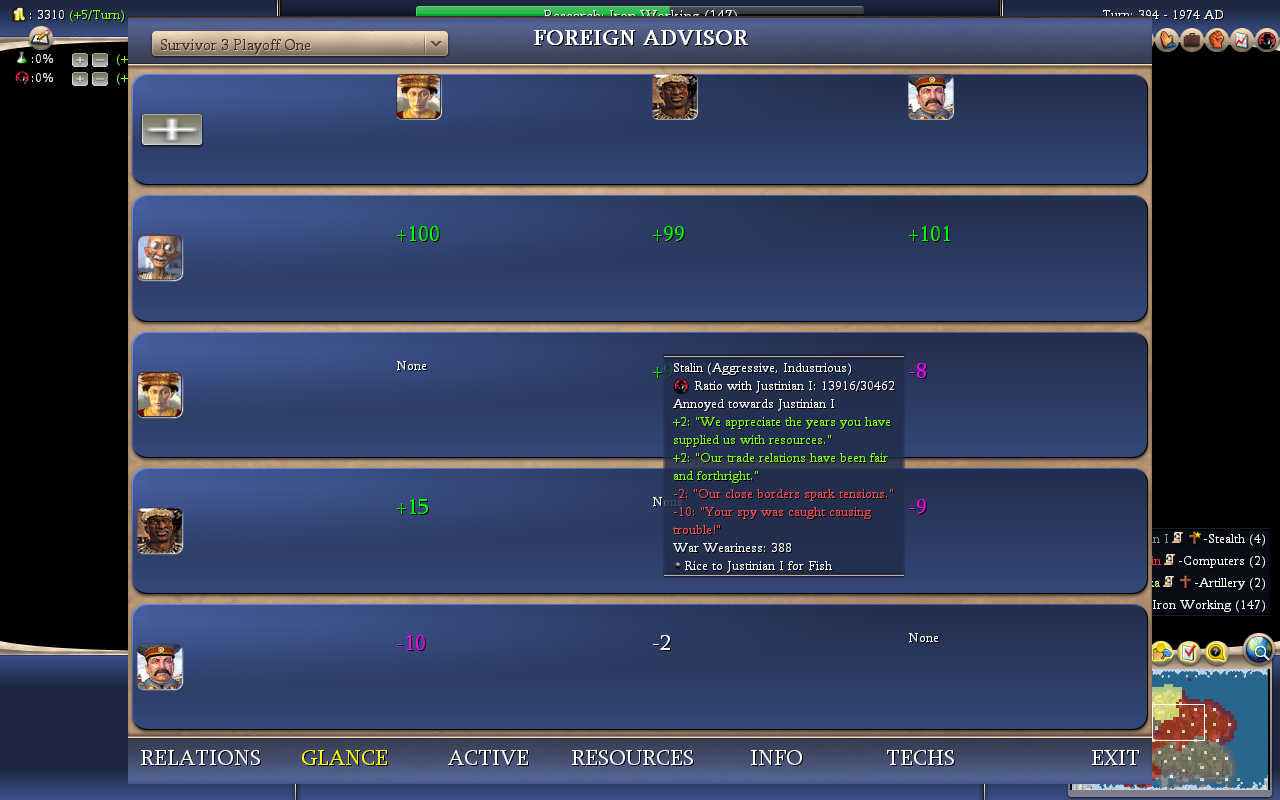
Stalin did have a binary set of outcomes, however, dying in the other 50% of games. There were generally three scenarios in which Stalin could falter. First, he could have a bad early game due to his infamous propensity to avoid culture, exacerbated by the removal of Deity starting techs. Admittedly, his culture avoidance was not always a bad thing, as it allowed him to zig while his cultural and religious competition zagged. Nevertheless, there was a concerning number of games where Stalin was irrelevant by Turn 100 because too many of his cities had lost control of their first ring tiles. Second, if Shaka knocked out Wang Kon early, Stalin could find himself in between two large leaders, eventually getting squeezed out of contention. The Rule of Two made itself apparent here, as Darth Shaka would overthrow Darth Stalin and replace the Soviet dictator as Justinian’s apprentice. Finally, Stalin was just screwed if the Jedi had a good game, as he would fall behind in tech and become a steppingstone in the quest to bring balance back to the Force. Although Stalin was only First To Die once, he came exceedingly close to another one in Game 14, going out one turn after Shaka. Stalin's strengths and weaknesses were on full display in these games. Nevertheless, this set offers some evidence in favor of the legitimacy of his S3 run, one that leaves him a Pool One leader to this day (post S8).
Best Performance: Game 12 saw Stalin build up well, run over Asoka, and even get a strong economic performance to boot. The cherry on top: in a late game Defensive Pact triggered war, Stalin destroyed Shaka and Justinian at the same time, even though their borders surrounded his territory.
Worst Performance: His one First To Die flameout in Game 5 was extremely embarrassing, getting run over despite being on the right side of a 2v1.
A Million Deaths Is a Statistic Award:
From Stalin’s Game 6 victory.
What Happens When All Of Your Advisors Mysteriously Disappear Award:
So much for the glorious worker’s revolution.
Wang Kon of Korea
Offensive Wars: 18
Defensive Wars: 58
Survival Rate: 30%
Finishes: 4 Wins, 2 Runner Ups (24 Points)
Kills: 13
Overall Score:
37
Wang Kon was the light side counterpart to Justinian, down to the game-changing unique unit, and his presence was essential for the success of the high peaceweight leaders due to his above average aggression rating and his resilient fighting. Wang Kon’s success may seem surprising at first, as the Troll King was squeezed into a jungle-choked corner with Shaka as a neighbor. Making matters worse was that Wang Kon lacked Copper, leaving him even more exposed to the Zulu hordes.
Stop building Chariots! You are Protective!

As it turned out, however, Wang Kon’s land was really, really good once he had chopped down the jungle and unlocked plantations. More importantly, Wang Kon could fight his way out of his corner utilizing his Protective trait and his Hwatchas, a criminally underrated unit perhaps due to the unwillingness of human players to play Protective leaders. (I am unsure if Wang Kon would be nearly as successful here without his unique unit.) The Korean leader maximized his expansion opportunities, fitting cities into every nook and cranny he could find and quickly seizing the barbarian cities that frequently sprouted nearby.
Much hinged on the location of Wang Kon’s border cities. Sometimes, he would settle them on flat ground, a strategic error that made his empire much more difficult to defend, leading to his worst games. However, if he settled his border cities on hills, it was extremely difficult for Shaka to break through, even if the Koreans lacked metals. Time was on Wang Kon's side; the longer he held, the more likely it was that he would conquer the Zulus. From there, he could shine as the best economic leader in the field, Financial/Aliving his way to success. Admittedly, he needed some luck to break his way, namely for Asoka to also hold tall against the might of the Evil Empire. Although Wang Kon is most infamous for his trolling antics (especially in this season’s Opening Round), this set told the story of a leader capable of finding some success if he can corral his self-sabotaging tendencies – a big if, of course.
Best Performance: Game 20 was his best military and economic performance, and it was also one that did not rely as much on outside map factors – Wang Kon just earned it.
Worst Performance: While I can excuse his Game 18 elimination as stemming from ill-timed barb city spawns, he just absolutely wilted in Game 10 to Shaka.
Trollbi Wang Konobi Award: In true Troll King fashion, Wang Kon ended Asoka’s only shot at victory in Game 19 by being elected World Leader, even though everyone was only Pleased with him.
Hammurabi of Babylon
Offensive Wars: 21
Defensive Wars: 24
Survival Rate: 35%
Finishes: 3 Wins, 1 Runner Up (17 Points)
Kills: 5
Overall Score:
22
If Wang Kon was the master, Hammurabi was his most talented apprentice. The Troll King may have been too good of a teacher, however, as Hammurabi was an unstable Jedi, prone to turning to the dark side and ruining the best laid plans of the good guys. This set only strengthened my belief that Hammurabi might be the most poorly designed leader in Civ IV, both in human and in AI hands. One cannot expect a guy to do well when he beelines Radio before Rifling and yet has Spaceship as his default win con and traits that lend themselves towards aggression.
As implied above, all of Hammurabi’s victories saw him turn on one or more of his fellow Jedi at some point. Sometimes, like in Game 18, such betrayals were shrewd moves, as his friends were dead meat in those games and it was too dangerous to allow their lands to fall into the hands of the Evil Empire. In other cases, Ham’s culture-monging created border tensions that sparked his fall to the dark side in the late game, like in Game 7 when Hammurabi steamrolled Wang Kon after launching his spaceship. Hammurabi’s wins did feel lucky, however, and many of his backstabs completely backfired, whether it was from blowing up Asoka, his one safeguard from the Death Star (Game 11) or from Wang Kon showing him who the true master of trolling was (Games 8, 14), and there is a possibility that these results overstated his true strength. In most games, Ham was an afterthought due to his inability to be prepared for war when the Eastern leaders inevitably came calling, learning too late that it was not the time to get distracted by Biology and Sistine Chapel when Justinian had 150 Cataphracts chomping at the bit. Ham could also just be plain stupid with his military decisions, launching pointless cross map excursions against Stalin or Justinian. His one First To Die performance in Game 17 stemmed from such insanity. Altogether, this was a strange set from a strange leader.
Best Performance: Game 18 was probably the only game in which Hammurabi played like an intelligent Civ IV leader.
Worst Performance: Other than his flat out silly First To Die game, Ham was embarrassingly bad at teching and fighting in Game 1, still sporting a Medieval army in 1800 AD.
Troll Padawan Award: Everything about Game 5 was peak troll. First, Ham converted his master Wang Kon out of his self-founded religion. Later on, Ham used the UN to stop the Koreans from finishing off Shaka. Then, when Wang Kon declared what should have been a suicidal invasion of a much stronger Justinian, the Troll King still won because the bulk of Justinian’s army
WAS STUCK IN A ONE TILE CITY IN THE MIDDLE OF BABYLON, as Ham would not sign Open Borders. The cherry on top: Ham just won the game by doing nothing, as his culture-monging had given him three legendary cities on Turn 386, without using the slider at all. Learned well, have you, young Hammy!
Real Poverty Point Award:
Shaka of the Zulu
Offensive Wars: 55
Defensive Wars: 20
Survival Rate: 40%
Finishes: 0 Wins, 5 Runner Ups (10 Points)
Kills: 8
Overall Score:
18
Unfortunately for the fan favorite warmonger, he had the worst spot in the game and no easy targets. Of his three neighbors, Wang Kon was a Protective leader with good defensive terrain, Stalin was too powerful, and Asoka had so many enemies that the Zulus could only get so much from the partition. Moreover, he had little space, the land he did have was rather dry, and his overall economic capabilities were not good enough to get him out of this pickle. Shaka’s best hope for the championship was to kill Wang Kon early and ride that to a Runner Up finish behind Justinian or Stalin, and this happened five times. Otherwise, he was either a steppingstone for Wang Kon or Stalin or an impediment to the Empire’s plans. That’s all she wrote – this was an unremarkable set from a normally interesting leader.
Best Performance: In Game 10, Shaka murdered the Troll King early and snowballed… into a 2nd place finish.
Worst Performance: Failing to take down a three city Wang Kon in Game 2.
Darth Troaul Award: In Game 12, Shaka dragged Justinian into a Defensive Pact triggered war against a runaway Stalin. This ended up pulling Justinian from clear cut 2nd place into a one city rump state, paving the way for a very undeserving Shaka championship appearance.
Asoka of India
Offensive Wars: 8
Defensive Wars: 59
Survival Rate: 20%
Finishes: 0 Wins, 4 Runner Ups (8 Points)
Kills: 1
Overall Score:
9
A major reason why I felt that this set overestimated Justinian’s strength in this setup: in the first four games, Asoka's economic mismanagement ranked among some of the worst I have ever seen from a high peaceweight leader. In all those games, the Indian leader had crashed his economy from overexpansion and bad research priorities and was lacking essential techs like The Wheel and Pottery on Turn 100. He also lost a city to the barbarians in Game 1. It was no accident that Justinian majorly cooled off once Asoka finally relearned how to play Civilization IV. In a typical game, Asoka was always one of the three strongest leaders after the early game. However, Asoka still chose questionable spots for city settlements, leaving him with a difficult to defend empire. In particular, he liked to settle one of his border cities next to Justinian in a flood plain site on the Byzantine side of the river, and that city was often the first to fall once the New Romans came calling. As it turns out, the high ground matters more than you think.
Facing invasion after invasion after invasion (his 59 defensive wars felt quite low considering how much fighting he did), Asoka was in an impossible position. There were multiple games where Asoka was able to hold off one leader, only for the next wave of enemies to cause the whole house of cards to collapse. Like his western counterpart, Asoka was a bit too stubborn about his cultural pursuits, leaving him even more vulnerable. However, if Asoka could hold on for 200 turns, his outlook became much rosier. For whatever reason, he still died in the Hammurabi games (I think a strong Hammurabi tended to mean a weaker Asoka), but in the Wang Kon games, Asoka served as the perfect Padawan for the Troll King, holding the bad guys at bay while the Koreans brought balance to the Force. In fact, all four of his second-place finishes came behind Wang Kon - he was too exhausted from fighting to be anything more. This gave him the unique distinction of either dying or getting 2nd place, certainly an interesting binary. Favoring a peaceful strategy yet also bordering three enemies (sometimes four if one of the Western leaders adopted a different religion) would be a tough task for any, and considering his position, he did about as well as he could. Ultimately, this was a gutsy set from someone perhaps unfairly marked as a lesser Gandhi.
Best Performance: As I had mentioned, Asoka should have gotten his revenge and won Game 19, but the Master of Troll just had to Troll.
Worst Performance: Asoka was beyond useless as a meat shield in Game 9. That game in general was a doozy for the Jedi, who wasted time on pointless cross map excursions.
Taking The Rejection Of Possessions Too Seriously Award:
Enlightened Monty Award:
Conclusions
Considering the surprising viability of the high peaceweight leaders, this was an interesting "what could have been" regarding Mansa's chances at winning his first title. We all know the hopeless diplomatic position he was placed in the official Championship game. Things would have certainly been a lot more interesting had Wang Kon and Asoka occupied Justinian's and Stalin's spots.
This was an incredibly fun set to run, one that rekindled my passion for AI Survivor. I admit, after the first four games, I could feel myself getting a tad burnt out, but then the rest of this chaotic set took place, and I was back to being hooked. I particularly enjoyed the good vs. bad guy dynamics of this map.
")

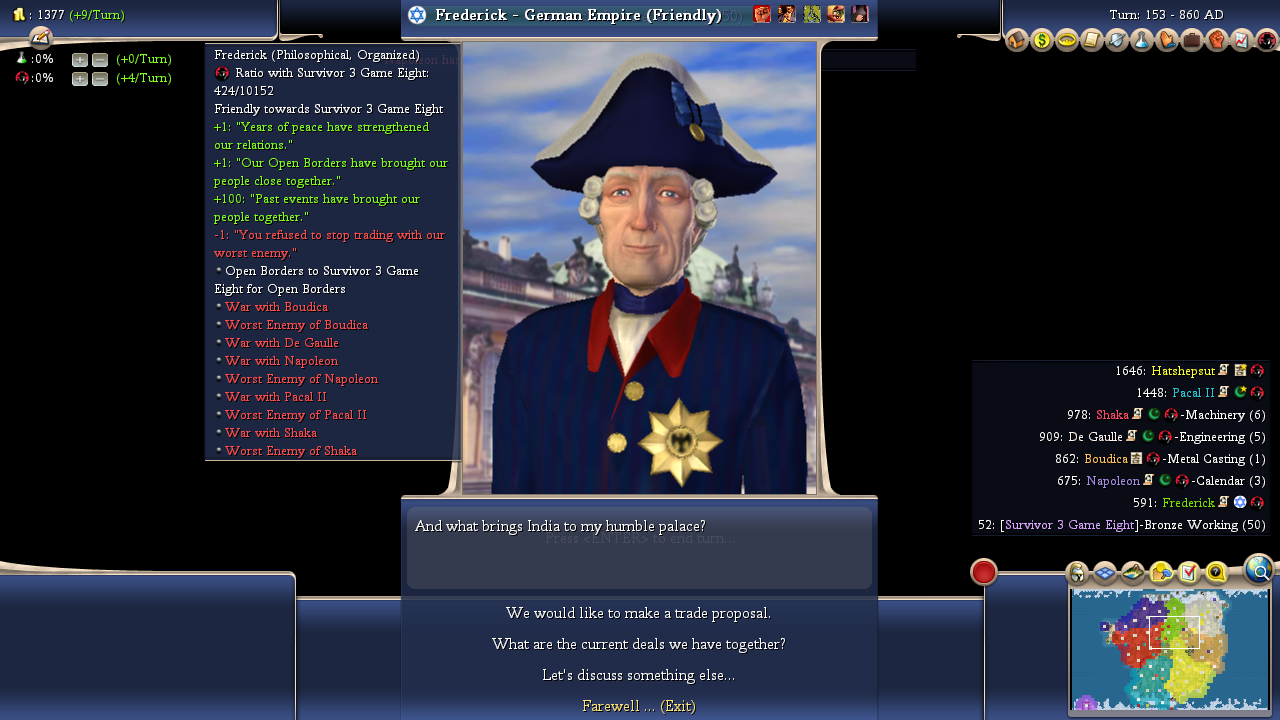
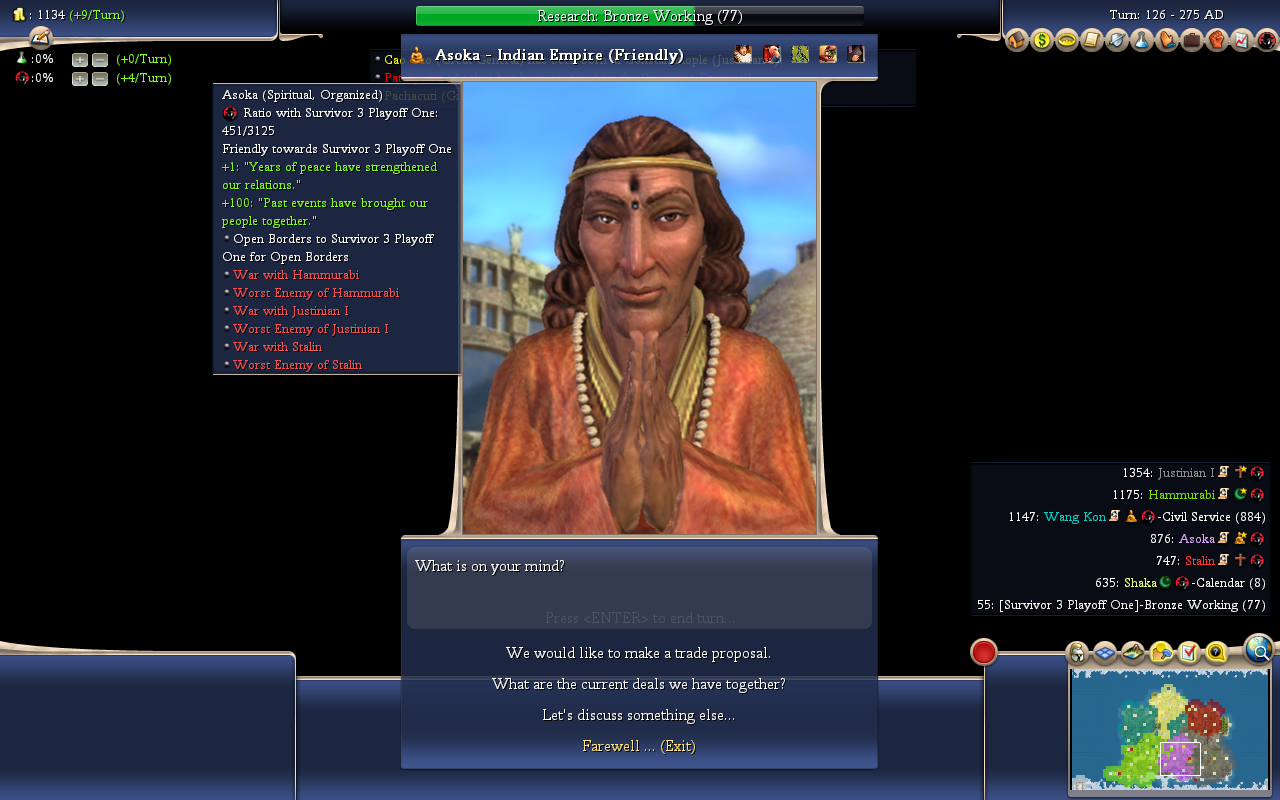
 It was literally love at first sight – these two leaders were Pleased the instant they met and were thus hardwired to never betray each other. As time went on, some combination of religious bonds and mutual military struggles would further strengthen the bond between the two lovers, with the result that DE GAULLE AND BOUDICCA NEVER FOUGHT. I must emphasize this: there were nearly 300 wars over the course of these twenty games, yet not a single one was between De Gaulle and Boudicca, despite the two being neighbors. This was a massive advantage for the two, as they were the only leaders to have a reliable ally in this setup.