I'm going to show here unit creation process with ready-made Blender animated unit. All free softwares and files essential for unit creation are attached below. Attached blend file was tested under Blender 4.0 and Win 10 and 11.
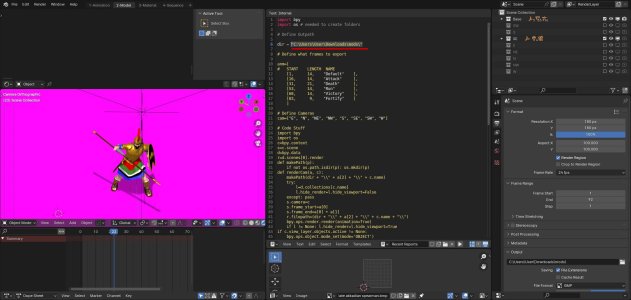
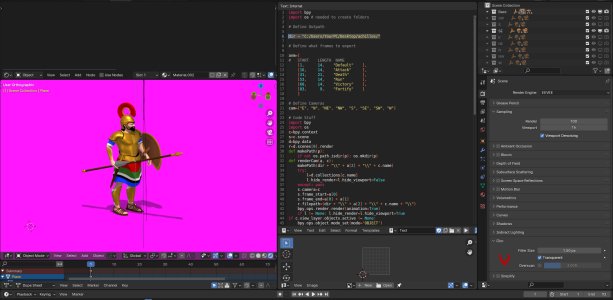
achilles.blend it's a finished and animated Blender unit with a script which during rendering will export all 6 animations (default, attack, death, run, victory and fortify) to eight direction folders, you need to only change a highlighted path leading to the folder on your pc and start render... and then you will see all unit frames rendered for later process. Remember - the highlighted path dir = "C:/Users/YourPC/Desktop/achilles/" needs to have slash "/" not backslash "\" as default windows path will produce like this C:\path\file. It is crucial here in order to run the script.

The unit is ready for render, use default render settings. The only thing you can experiment with is a filter size which default settings are set to 1.50px. Value lower than default gives more pixelated output what in civ size help to achieve sharper unit look. It is helpful if you see long props like a spear looking washed out in Flicster.


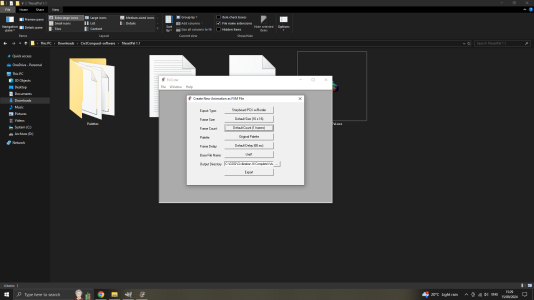
Next step is to combine all rendered frames into storyboards, default, attack, death, run, victory and fortify. Sandris's Storyboard Builder will do that for you in few seconds. You need to browse the folder with rendered frames and hit "create storyboard".
SBB tend to crash if you have to many subfolders, so try to make short folder structure, something like this: desktop\folder\unit frames\achilles

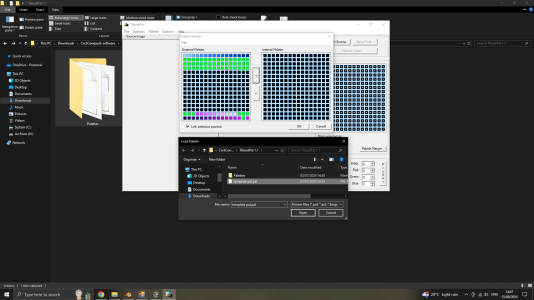
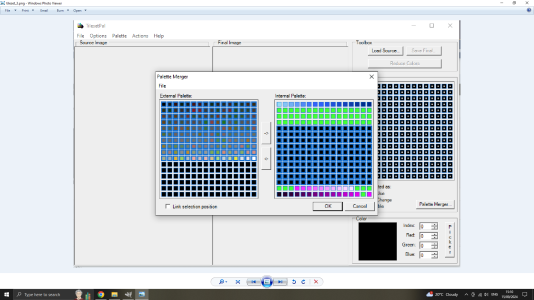
Next step is in Gimp. The storyboards are rendered on pink background which is a colour assigned for transparency however if you want to have a quick unit palette for Flicster which produce FLC files you'll need to render once again your unit but this time on grey background and also you need to change a dark blue civ colour to the same grey colour as background. From this grey storyboard you can extract 160 colours which you will need later for your palette creation.
In Gimp you need to combine 3 storyboard in one file as below:

Next step: convert combined storyboards to 160 colours, use default settings and press convert. Save a file as unit_grey.BMP

achilles.blend it's a finished and animated Blender unit with a script which during rendering will export all 6 animations (default, attack, death, run, victory and fortify) to eight direction folders, you need to only change a highlighted path leading to the folder on your pc and start render... and then you will see all unit frames rendered for later process. Remember - the highlighted path dir = "C:/Users/YourPC/Desktop/achilles/" needs to have slash "/" not backslash "\" as default windows path will produce like this C:\path\file. It is crucial here in order to run the script.
The unit is ready for render, use default render settings. The only thing you can experiment with is a filter size which default settings are set to 1.50px. Value lower than default gives more pixelated output what in civ size help to achieve sharper unit look. It is helpful if you see long props like a spear looking washed out in Flicster.
Next step is to combine all rendered frames into storyboards, default, attack, death, run, victory and fortify. Sandris's Storyboard Builder will do that for you in few seconds. You need to browse the folder with rendered frames and hit "create storyboard".
SBB tend to crash if you have to many subfolders, so try to make short folder structure, something like this: desktop\folder\unit frames\achilles
Next step is in Gimp. The storyboards are rendered on pink background which is a colour assigned for transparency however if you want to have a quick unit palette for Flicster which produce FLC files you'll need to render once again your unit but this time on grey background and also you need to change a dark blue civ colour to the same grey colour as background. From this grey storyboard you can extract 160 colours which you will need later for your palette creation.
In Gimp you need to combine 3 storyboard in one file as below:
Next step: convert combined storyboards to 160 colours, use default settings and press convert. Save a file as unit_grey.BMP
Attachments
Last edited:
") . If everything you have done until now was correct, then open the Flicster - File>Open> browse of an empty flc file you created earlier, default for instance, and if you saved your storbyoard with applied palette over default.pcx now in Flicster you should see your unit.
. If everything you have done until now was correct, then open the Flicster - File>Open> browse of an empty flc file you created earlier, default for instance, and if you saved your storbyoard with applied palette over default.pcx now in Flicster you should see your unit.