LamilLerran
Chieftain
- Joined
- Jan 19, 2016
- Messages
- 25
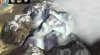
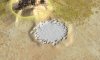
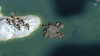
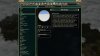
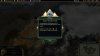
Wondrous Nature adds additional natural wonders to Civ V. The initial release includes Mount Everest, Salar de Uyuni, and Giant's Causeway.
Wondrous Nature is designed to be as lightweight as possible while addressing the reality that adding natural wonders involves fooling the Civ V graphics code, and therefore absolutely requires a DLL. Nonetheless, the DLL changes are quite short, and my hope is that people who use a different DLL mod will find it easy to add my changes to their DLL code.
My hope is that people can extend or fork Wondrous Nature with their own natural wonders. As such, I am also posting a tutorial on how to add a natural wonder to Civ using Wondrous Nature.
Wondrous Nature is currently only compatible with Brave New World, and will never be compatible with vanilla CiV. I am not certain whether I will or even can release a G&K version.
How I Did It
The Civ V graphics code does not handle natural wonders particularly elegantly. If a feature is tagged as a natural wonder in the XML, the graphics code seems to have some sort of hardcoded list it checks against to determine the terrain. If you use this tag for a custom wonder, you typically get out Mt Fuji (or a distorted version of it).
So, I added a PseudoNaturalWonder tag in SQL, and then modified the DLL so that when it checked whether a feature had the NaturalWonder tag set to true, it also checked whether the PseudoNaturalWonder tag was set to true. Thus, WondrousNature makes the core game code think a feature is a natural wonder, while making the graphics code think the feature is not a natural wonder (for which the graphics work mostly fine).
This means that if you add a feature, tag it as a PseudoNaturalWonder, and give it a graphic in essentially the same way you would for an improvement or a resource, you get something that acts in game as a natural wonder.
This does show a limitation of the technique: graphics for improvements / resources are different than graphics for terrains; in particular, you can't change the contours of the land, so the 3D model has to sit on top of the land. I have been able to work around this when designing my natural wonders, but it is a limitation.
Adding Your Own Natural Wonders
Adding your own natural wonder in Wondrous Nature takes about the same amount of work as adding a brand new resource with brand new graphics. This is a moderately large amount of work, especially to create a new 3D graphic. This tutorial is intended to help you do all the necessary steps to create your own natural wonder.
A new natural wonder will require you to add several files to Wondrous Nature and to modify several files in Wondrous Nature. The files you need to modify are:
For most wonders, the most complicated file to create will be the gr2 file, which contains the 3D model and associates that model with the appropriate textures. Fortunately, this works the same as creating a model for an improvement or resource, and similarly to creating a model for a unit. These threads give helpful instructions for this process. When creating a model, you will also create the textures, which will be saved as "*_diff.dds" (for the main texture), "*_sref.dds" (which determines shininess; it's reasonable to make this purely black for most models), and possibly "*_h.dds" (a heightmap; it's only effective if the model is following the terrain though, see Salar de Uyuni for an example).
Now you need to create a feature_*.fxsxml file to tell Civ to put the textures you created on the mesh you created. It should look like the following:
Be sure to replace the filenames with asterisks with the filenames you're actually using. If you don't have a *_h.dds file, omit that entire line. If you are doing something fancy like adding effects, you'll add additional things here relating to that.
At this point, you only have two art assets to go, and they're both 2D. One of them is an icon for your wonder. Copy one of the black circles out of NaturalWonderAtlas256.dds (it is best if you copy a 256x256 square centered on the circle; this will include a fairly wide transparent border). Then draw an icon for your wonder on this circle without changing the alpha channel (transparency). Save this icon and copy it back into NaturalWonderAtlas256.dds on top of the black circle you started from. Now take your icon, resize it to 128x128 (assuming you started at 256x256 as recommended), and paste the result over the corresponding circle in NaturalWonderAtlas128.dds. Continue this process, resizing to 80x80, 64x64, and 45x45 for the NaturalWonderAtlas80.dds, NaturalWonderAtlas64.dds, and NaturalWonderAtlas45.dds files respectively. It is critical that you paste over the same circle in all five files.
The last art asset that remains is sv_*.dds, which is the strategic view image for your wonder. These images can overflow the hex (see, for example, mountains), so compare to an asset like sv_ice.dds from the base game assets to get a model for the size of your strategic view image.
Now you're done with art! What remains is the coding modifications to WNArtDefines.xml and WNGameData.xml. We'll look at WNGameData.xml first.
First, we need to add a Row to the Features table. It will look like this:
You will replace the asterisks with your natural wonder's name (in all caps with underscores for spaces). Also, replace the # sign in PortraitIndex with the number of the circle you replaced with your icon in the NaturalWonderAtlas*.dds files, which you determine as follows. The circles in the NaturalWonderAtlas*.dds files each have a number, starting at 0 in the top left, then counting up first from left to right then top to bottom (reading order). Thus, the first row is 0 1 2 3 4 5 6 7. Find your icon in the file, count up to find its number, and replace the # in the above code with this number.
You can make additional changes here as well if you like (e.g., you might add
as well), but this is a good basic setup for a natural wonder.
Next, we need to add one or more rows to the Feature_YieldChanges table of the following format:
Here * is your all-caps-and-underscores natural wonder name, YIELD_PRODUCTION could also be YIELD_FOOD, YIELD_FAITH, YIELD_GOLD, YIELD_CULTURE, or YIELD_SCIENCE, and # is a number that says how many of the indicated resource you want your natural wonder tile to provide.
It's polite to put a comment like
at the beginning of your YieldChanges rows to make it easier to see where each natural wonder's code starts in this section.
Next, we add a Row to the Natural_Wonder_Placement table. There are many possibilities here; I'll show an example, but you can see other fields by looking at the Natural_Wonder_Placement table in Assets/DLC/Expansion2/Gameplay/XML/Terrain/CIV5Features.xml
The last change to this file is adding a pair of Rows to the Language_en_US table (or a corresponding table for whatever language(s) you're localizing into). These are the in-game text for the name of your natural wonder and the civilopedia description of your natural wonder:
(For the most part natural wonders don't take an article (e.g. "Mount Everest") but some do (e.g. "The Grand Canyon"), so change that line accordingly.)
Only one file to go!
In WNArtDefines.xml, you first add the following Row to the table ArtDefine_Landmarks:
Then in ArtDefine_LandmarkTypes add
and finally, in ArtDefine_StrategicView, add
You now have all the files done! You now need to import all the new files into the WondrousNature project. Once they're all in, set "Import into VFS" to "true" on all of the *.dds files, on the feature_*.gr2 file, and on the feature_*.fxsxml file. Now build the project. If it all works, open up Civ and run the mod!
If you're really lucky, everything is now working! More likely, you'll have some debugging to do. If you have any questions, feel free to ask!
Implementing Wondrous Nature in Your Own DLL Mod
If you have a DLL mod (either that you authored or that you have the source code for) that you want to use with Wondrous Nature, you will need to merge the source code and compile a new merged DLL. Fortunately, the DLL changes in Wondrous Nature are quite short and straightforward, so you should be able to do so without too much trouble. I've attached a git patch file with the necessary changes relative to the base BNW C++ code (ready for compiling as described in this thread).
Note: You can add the Wondrous Nature code to your DLL and still choose not to use Wondrous Nature; the code will sit inactive and nothing will go wrong. Thus you can put the WN code in your DLL and then turn WN on or off separately from the rest of your mod. This can also allow your mods' users to choose whether or not to use Wondrous Nature with your mod. Note that if you do this, you will need to delete the file 'CvGameCore_Expansion2.dll' from Wondrous Nature so that it will work with your mod. I recognize that this manual deletion is an imperfect technique, and I intend to release an alternative version for easier compatibility.
Reuse
I encourage people to adapt, modify, or otherwise reuse any or all of Wondrous Nature for their own projects. If you are working on a Civ V mod and your mod is compatible with the CC-BY Creative Commons license, all you need to do is add the contents of license.txt to your own license information (although some of that license releases my part of the work into the public domain -- you probably want to delete that bit). If one or both of these is not true, you may still use my work in your own project, but some of this work has other or additional authors, and those files have additional restrictions.
Specifically: The DLL file, the modinfo file, and all of the XML and LUA code are all directly related to the main Civilization V code, and may not be available for use outside the context of Civ V. The NaturalWonderAtlas*.dds files are based on a Civ V template, and include an image (for Salar de Uyuni) derived from a work by Martin St-Amant published under a CC-BY-3.0 license. See here for the work and its license: https://en.wikipedia.org/wiki/Salar...yuni_Décembre_2007_-_Centre_de_Nulle_Part.jpg. All other art assets (those files which appear in the Art folder) are wholly my work, and are available in the public domain and so may be used for any purpose.
Thanks for reading. Let me know if you have any questions, comments, or bug reports!
Wondrous Nature is designed to be as lightweight as possible while addressing the reality that adding natural wonders involves fooling the Civ V graphics code, and therefore absolutely requires a DLL. Nonetheless, the DLL changes are quite short, and my hope is that people who use a different DLL mod will find it easy to add my changes to their DLL code.
My hope is that people can extend or fork Wondrous Nature with their own natural wonders. As such, I am also posting a tutorial on how to add a natural wonder to Civ using Wondrous Nature.
Wondrous Nature is currently only compatible with Brave New World, and will never be compatible with vanilla CiV. I am not certain whether I will or even can release a G&K version.
How I Did It
The Civ V graphics code does not handle natural wonders particularly elegantly. If a feature is tagged as a natural wonder in the XML, the graphics code seems to have some sort of hardcoded list it checks against to determine the terrain. If you use this tag for a custom wonder, you typically get out Mt Fuji (or a distorted version of it).
So, I added a PseudoNaturalWonder tag in SQL, and then modified the DLL so that when it checked whether a feature had the NaturalWonder tag set to true, it also checked whether the PseudoNaturalWonder tag was set to true. Thus, WondrousNature makes the core game code think a feature is a natural wonder, while making the graphics code think the feature is not a natural wonder (for which the graphics work mostly fine).
This means that if you add a feature, tag it as a PseudoNaturalWonder, and give it a graphic in essentially the same way you would for an improvement or a resource, you get something that acts in game as a natural wonder.
This does show a limitation of the technique: graphics for improvements / resources are different than graphics for terrains; in particular, you can't change the contours of the land, so the 3D model has to sit on top of the land. I have been able to work around this when designing my natural wonders, but it is a limitation.
Adding Your Own Natural Wonders
Adding your own natural wonder in Wondrous Nature takes about the same amount of work as adding a brand new resource with brand new graphics. This is a moderately large amount of work, especially to create a new 3D graphic. This tutorial is intended to help you do all the necessary steps to create your own natural wonder.
A new natural wonder will require you to add several files to Wondrous Nature and to modify several files in Wondrous Nature. The files you need to modify are:
- WNArtDefines.xml in the XML folder
- WNGameData.xml in the XML folder
- Each of the five NaturalWonderAtlas*.dds files in the Art folder
- A feature_*.fxsxml file in XML
- A *.gr2 file in Art/[WonderName]
- A *_diff.dds file in Art/[WonderName]
- A *_sref.dds file in Art/[WonderName]
- Possibly a *_h.dds file in Art/[WonderName]
- A sv_*.dds file in Art/[WonderName]
For most wonders, the most complicated file to create will be the gr2 file, which contains the 3D model and associates that model with the appropriate textures. Fortunately, this works the same as creating a model for an improvement or resource, and similarly to creating a model for a unit. These threads give helpful instructions for this process. When creating a model, you will also create the textures, which will be saved as "*_diff.dds" (for the main texture), "*_sref.dds" (which determines shininess; it's reasonable to make this purely black for most models), and possibly "*_h.dds" (a heightmap; it's only effective if the model is following the terrain though, see Salar de Uyuni for an example).
Now you need to create a feature_*.fxsxml file to tell Civ to put the textures you created on the mesh you created. It should look like the following:
Code:
<Asset>
	<Mesh file="feature_*.gr2" source="Max" />
	<Texture file="*_diff.dds" source="Max" />
	<Texture file="*_h.dds" source="Max" />
	<Texture file="*_sref.dds" source="Max" />
</Asset>At this point, you only have two art assets to go, and they're both 2D. One of them is an icon for your wonder. Copy one of the black circles out of NaturalWonderAtlas256.dds (it is best if you copy a 256x256 square centered on the circle; this will include a fairly wide transparent border). Then draw an icon for your wonder on this circle without changing the alpha channel (transparency). Save this icon and copy it back into NaturalWonderAtlas256.dds on top of the black circle you started from. Now take your icon, resize it to 128x128 (assuming you started at 256x256 as recommended), and paste the result over the corresponding circle in NaturalWonderAtlas128.dds. Continue this process, resizing to 80x80, 64x64, and 45x45 for the NaturalWonderAtlas80.dds, NaturalWonderAtlas64.dds, and NaturalWonderAtlas45.dds files respectively. It is critical that you paste over the same circle in all five files.
The last art asset that remains is sv_*.dds, which is the strategic view image for your wonder. These images can overflow the hex (see, for example, mountains), so compare to an asset like sv_ice.dds from the base game assets to get a model for the size of your strategic view image.
Now you're done with art! What remains is the coding modifications to WNArtDefines.xml and WNGameData.xml. We'll look at WNGameData.xml first.
First, we need to add a Row to the Features table. It will look like this:
Code:
<Row>
	<Type>FEATURE_*</Type>
	<Description>TXT_KEY_FEATURE_*</Description>
	<Civilopedia>TXT_KEY_CIV5_FEATURES_*_TEXT</Civilopedia>
	<ArtDefineTag>ART_DEF_FEATURE_*</ArtDefineTag>
	<Movement>1</Movement>
	<Impassable>false</Impassable>
	<InfluenceCost>-3</InfluenceCost>
	<PseudoNaturalWonder>true</PseudoNaturalWonder>
	<NoImprovement>true</NoImprovement>
	<Rough>false</Rough>
	<YieldNotAdditive>true</YieldNotAdditive>
	<PortraitIndex>#</PortraitIndex>
	<IconAtlas>CUSTOM_NATURAL_WONDER_ATLAS</IconAtlas>
</Row>
You can make additional changes here as well if you like (e.g., you might add
Code:
<InBorderHappiness>2</InBorderHappiness>Next, we need to add one or more rows to the Feature_YieldChanges table of the following format:
Code:
<Row>
	<FeatureType>FEATURE_*</FeatureType>
	<YIELDTYPE>YIELD_PRODUCTION</YIELDTYPE>
	<Yield>#</Yield>
</Row>It's polite to put a comment like
Code:
<!--Your wonder name-->Next, we add a Row to the Natural_Wonder_Placement table. There are many possibilities here; I'll show an example, but you can see other fields by looking at the Natural_Wonder_Placement table in Assets/DLC/Expansion2/Gameplay/XML/Terrain/CIV5Features.xml
Code:
<Row>
	<NaturalWonderType>FEATURE_*</NaturalWonderType>
	<OccurrenceFrequency>10</OccurrenceFrequency>
	<AvoidLandAdjacentToOcean>true</AvoidLandAdjacentToOcean>
	<AvoidFreshWater>true</AvoidFreshWater>
	<ChangeCoreTileToFlatland>true</ChangeCoreTileToFlatland>
	<CoreTileCanBeAnyTerrainType>false</CoreTileCanBeAnyTerrainType>
	<CoreTileCanBePlains>true</CoreTileCanBePlains>
	<CoreTileCanBeDesert>true</CoreTileCanBeDesert>
	<CoreTileCanBeAnyFeatureType>false</CoreTileCanBeAnyFeatureType>
	<CoreTileCanBeNoFeature>true</CoreTileCanBeNoFeature>
	<AdjacentTilesCareAboutTerrainTypes>true</AdjacentTilesCareAboutTerrainTypes>
	<AdjacentTilesAvoidGrass>true</AdjacentTilesAvoidGrass>
	<MaximumAllowedAdjacentGrass>0</MaximumAllowedAdjacentGrass>
	<AdjacentTilesAvoidSnow>true</AdjacentTilesAvoidSnow>
	<MaximumAllowedAdjacentSnow>0</MaximumAllowedAdjacentSnow>
	<AdjacentTilesCareAboutFeatureTypes>true</AdjacentTilesCareAboutFeatureTypes>
	<AdjacentTilesAvoidForest>true</AdjacentTilesAvoidForest>
	<MaximumAllowedAdjacentForest>0</MaximumAllowedAdjacentForest>
	<AdjacentTilesAvoidJungle>true</AdjacentTilesAvoidJungle>
	<MaximumAllowedAdjacentJungle>0</MaximumAllowedAdjacentJungle>
	<AdjacentTilesAvoidMarsh>true</AdjacentTilesAvoidMarsh>
	<MaximumAllowedAdjacentMarsh>0</MaximumAllowedAdjacentMarsh>
</Row>
The last change to this file is adding a pair of Rows to the Language_en_US table (or a corresponding table for whatever language(s) you're localizing into). These are the in-game text for the name of your natural wonder and the civilopedia description of your natural wonder:
Code:
<Row Tag="TXT_KEY_FEATURE_*">
	<Text>[wonder name goes here]</Text>
	<Gender>neuter:no_article</Gender>
</Row>
<Row Tag="TXT_KEY_CIV5_FEATURES_*_TEXT">
	<Text>[Civilopedia text goes here]</Text>
</Row>Only one file to go!
In WNArtDefines.xml, you first add the following Row to the table ArtDefine_Landmarks:
Code:
<Row>
	<Era>Any</Era>
	<State>Any</State>
	<Scale>1</Scale>
	<ImprovementType>ART_DEF_IMPROVEMENT_NONE</ImprovementType>
	<LayoutHandler>SNAPSHOT</LayoutHandler>
	<ResourceType>ART_DEF_FEATURE_*</ResourceType>
	<Model>feature_*.fxsxml</Model>
	<TerrainContour>1</TerrainContour>
</Row>
Code:
<Row>
	<Type>ART_DEF_FEATURE_*</Type>
	<LandmarkType>Resource</LandmarkType>
	<FriendlyName>[human-formatted wonder name]</FriendlyName>
</Row>
Code:
<Row>
	<StrategicViewType>ART_DEF_FEATURE_SALAR_DE_UYUNI</StrategicViewType>
	<TileType>Feature</TileType>
	<Asset>sv_salar.dds</Asset>
</Row>
You now have all the files done! You now need to import all the new files into the WondrousNature project. Once they're all in, set "Import into VFS" to "true" on all of the *.dds files, on the feature_*.gr2 file, and on the feature_*.fxsxml file. Now build the project. If it all works, open up Civ and run the mod!
If you're really lucky, everything is now working! More likely, you'll have some debugging to do. If you have any questions, feel free to ask!
Implementing Wondrous Nature in Your Own DLL Mod
If you have a DLL mod (either that you authored or that you have the source code for) that you want to use with Wondrous Nature, you will need to merge the source code and compile a new merged DLL. Fortunately, the DLL changes in Wondrous Nature are quite short and straightforward, so you should be able to do so without too much trouble. I've attached a git patch file with the necessary changes relative to the base BNW C++ code (ready for compiling as described in this thread).
Note: You can add the Wondrous Nature code to your DLL and still choose not to use Wondrous Nature; the code will sit inactive and nothing will go wrong. Thus you can put the WN code in your DLL and then turn WN on or off separately from the rest of your mod. This can also allow your mods' users to choose whether or not to use Wondrous Nature with your mod. Note that if you do this, you will need to delete the file 'CvGameCore_Expansion2.dll' from Wondrous Nature so that it will work with your mod. I recognize that this manual deletion is an imperfect technique, and I intend to release an alternative version for easier compatibility.
Reuse
I encourage people to adapt, modify, or otherwise reuse any or all of Wondrous Nature for their own projects. If you are working on a Civ V mod and your mod is compatible with the CC-BY Creative Commons license, all you need to do is add the contents of license.txt to your own license information (although some of that license releases my part of the work into the public domain -- you probably want to delete that bit). If one or both of these is not true, you may still use my work in your own project, but some of this work has other or additional authors, and those files have additional restrictions.
Specifically: The DLL file, the modinfo file, and all of the XML and LUA code are all directly related to the main Civilization V code, and may not be available for use outside the context of Civ V. The NaturalWonderAtlas*.dds files are based on a Civ V template, and include an image (for Salar de Uyuni) derived from a work by Martin St-Amant published under a CC-BY-3.0 license. See here for the work and its license: https://en.wikipedia.org/wiki/Salar...yuni_Décembre_2007_-_Centre_de_Nulle_Part.jpg. All other art assets (those files which appear in the Art folder) are wholly my work, and are available in the public domain and so may be used for any purpose.
Thanks for reading. Let me know if you have any questions, comments, or bug reports!
Attachments
-
0001-Added-PseudoNaturalWonder-feature-type.zip2.5 KB · Views: 358
-
Wondrous Nature (v 2).civ5mod1.9 MB · Views: 403
-
 Wondrous Nature Steam Everest Detail v3.jpg52 KB · Views: 1,732
 -
 Wondrous Nature Steam Salar de Uyuni Detail v3.jpg52.2 KB · Views: 1,860
 -
 Wondrous Nature Steam Giant's Causeway Detail.png493.5 KB · Views: 1,722
 -
 Wondrous Nature Steam Full Salar de Uyuni Civilopedia.jpg149.9 KB · Views: 1,349
 -
 Wondrous Nature Steam Full Everest Discovery.jpg101.1 KB · Views: 1,230
 , anyway, thanks a lot for the efforts
 ")
