We didn't have map projection or anything in the earlier versions, just your single blue line. It vanished into the void a lot, too, like 3/4 of the way to the Mün it would vanish every time — so to cut out guesswork people burned as hard as they could and almost straight to it.
You are using an out of date browser. It may not display this or other websites correctly.
You should upgrade or use an alternative browser.
You should upgrade or use an alternative browser.
Kerbal Space Program
- Thread starter Leonel
- Start date
hobbsyoyo
Deity
- Joined
- Jul 13, 2012
- Messages
- 26,575
Oh wow that's crazy I had no idea! The line still liked to disappear a lot in .17.1. Though now the manuever mode likes to act crazy sometimes (like not letting you set a manuever randomly) even if they fixed the dissappearing course indicator line.
hobbsyoyo
Deity
- Joined
- Jul 13, 2012
- Messages
- 26,575
Hey guys, so I have a serious question.
I volunteer at HeadStart where my wife works. It's a pre-K program for poor kids. In the past, I've given lessons on space and rockets and they went bonkers over it.
I'm thinking about recording videos of random cool stuff in KSP, possibly with narration. I think they'd love it to death.
My question(s): What free software do I need to have to record my playing sessions with or without narration?
What are some cool things I could do that are science-y that look cool and are explanable to a four year old? My wife can help me dumb it down where needed, but at the same time I don't want to explain Peroapsis or something very unituitive and complicated (unless someone suggests a clever way to do it).
For example I could explain retrograde, but the problem is that in orbit, you can't see the the ship slowing down and seeing it happen is very important.
warpus
Sommerswerd asked me to change this
I made it into orbit!
around the sun
I had orbit of Kerbin, but wanted to screw around with the ap and pe, and ended up slinging out of orbit.
The rocket design that finally did it is highly unstable.. I can only burn fuel at just over 33% thrust, and when I have to separate the stages I always seem to run into issues with balance.. it tends to happen when I have to reorient my spacecraft to point towards the horizon.. the whole operation seems so delicate that it almost always goes wrong.
What's going to happen with these guys, who are now in orbit around the sun? They'll probably get flung out of the solar system or end up crashing into a planetary body, right? What if they get lucky and the orbit is for some reason stable.. would I be able to leave them there and attempt a rescue mission?
warpus
Sommerswerd asked me to change this
For example I could explain retrograde, but the problem is that in orbit, you can't see the the ship slowing down and seeing it happen is very important.
You could use sound cues maybe, like the pitch changing... or colours. somehow
hobbsyoyo
Deity
- Joined
- Jul 13, 2012
- Messages
- 26,575
HmmYou could use sound cues maybe, like the pitch changing... or colours. somehow
Oh hey if I did it near a space station with zero relative velocity at first, that would demonstrate it. Eh, I don't know.
I made it into orbit!
around the sun
I had orbit of Kerbin, but wanted to screw around with the ap and pe, and ended up slinging out of orbit.
The rocket design that finally did it is highly unstable.. I can only burn fuel at just over 25% thrust, and when I have to separate the stages I always seem to run into issues with balance.. it tends to happen when I have to reorient my spacecraft to point towards the horizon.. the whole operation seems so delicate that it almost always goes wrong.
What's going to happen with these guys, who are now in orbit around the sun? They'll probably get flung out of the solar system or end up crashing into a planetary body, right? What if they get lucky and the orbit is for some reason stable.. would I be able to leave them there and attempt a rescue mission?
Congrats!
They will almost certainly stay in orbit around the sun. Unless they cross the orbit of a planet, they probably will never come close enough to anything to face orbital drift. The game uses discrete spheres of influence (SoI). This is a compromise they chose to make to deal with the huge computational challenges and gameplay issues faced when dealing with computing gravity.
What this means is that instead of each planet or moon having a continuous, smooth grativational field that extends forever (but approaches 0 asymptotically), they each have discrete regions where their fields are active, outside of that region there is no gravitational effects.
So let's say a planet's SoI extends to 500,000 km. If you are at 500,001km, you will never experience or have to deal with the planet's gravity; it 'switches off' at 500,000km. But within 500,000km, you will experience it's affects and it grows stronger closer to the planet.
So long story short, if your kerbals are in an orbit that doesn't cross a planets, they'll always be in that orbit. If they do cross a planet's orbit, the orbit will only change if they happen to arrive at the crossing point when the planet is pretty close to them at that instant.
On your rocket, you can add AV-8 fins (I looked them up), they are A/SAS controllable. Leave A/SAS on during the whole flight whenever you are not rolling over. Also, turn on RCS when you are above 15km as it will help more up in the thin/non-existant atmosphere. Be careful though because RCS can overcorrect, you have to watch it and turn it on or off as necessary.
You can also add SAS pods to your stages, they will also help stabilize. You only need ONE ASAS pod though, it's effects are not cumulative. SAS is cumulative.
If you have screenshots, I can help further.
Edit: You can only burn at 25%? Hm that's a serious issue. So it gets really unstable above 25%? You have A/SAS on?
Edit 2: Yes, leave them there. Rescue missions are fun.

Leonel
Breakfast Connoisseur
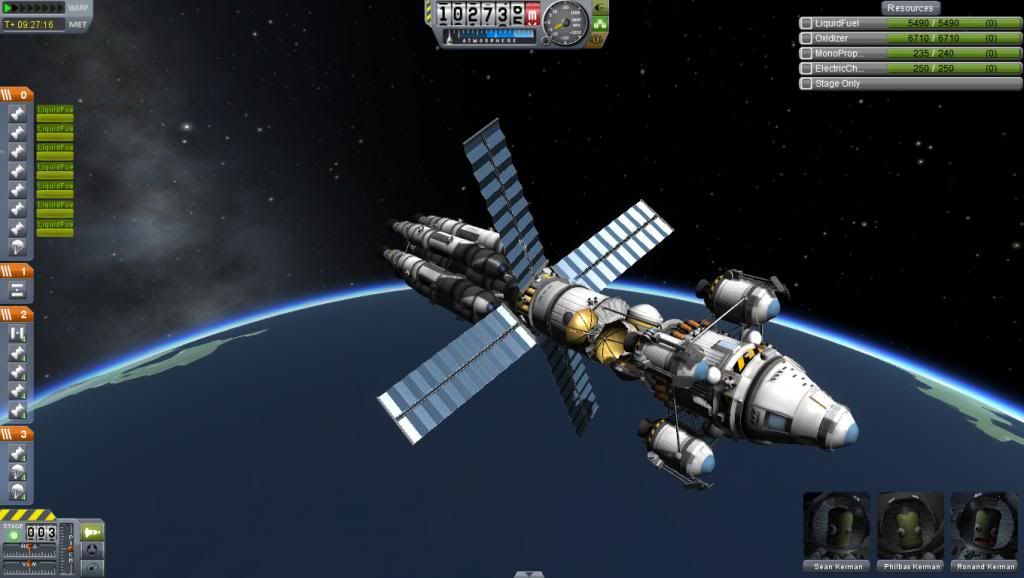
This is intended to get my Kerbonauts to Duna and back. The main ship will propel the capsule to Duna and when they reach orbit, the capsule will detach with two Kerbonauts and make their way to the surface while one stays with the mothership. The lander is equipped with 8 parachutes to help slow it down in the atmosphere while the engines help control descent. When it's time to return, the lander will lift off from the surface with whatever fuel is left in the four nacelles and when their fuel is exhausted, smaller engines take control and help push the capsule into rendezvous orbit with the mothership where they'll connect again and make their way home to a ticker tape parade!
I actually assembled this in four stages. The habitat module that would house comms, crew quarters, RCS fuel and docking ports that'll help guide the fuel assembly into place, the fuel assembly, the engine assembly and the capsule itself.
warpus
Sommerswerd asked me to change this
Aaaaaand Poland can into orbit!! 
Finally
periapsis 65,000
apoapsis 320,000
Nice, I will definitely try to go after some of those guys once I'm good enough at the basics. There's like 5 of them out there now.
One per.. pillar?
This is the rocket I used to get into orbit for the first time:

Feel free to rip the design to shreds. It is really only the result of a poorly planned out evolution-like trial an error run that saw me modify previous designs until things worked just well enough to get me into orbit.
It was actually 33%.. but.. shortly after that I improved my design and went up to being able to comfortably boost it up to 66%-70% for the first little while anyway.. Yeah, I have SAS on.
Every once in a while my rocket will just start spinning out of control, like it's losing its centre of gravity or something. It usually happens shortly before my bottom stage is almost out of fuel.. which makes sense, because the centre of gravity is slowly moving towards the front as you burn, so the rocket should in theory start slowly veering off course. I guess? That's how I explain it anyway.. It's a shame though, because then I have to detach that section and move onto stage 2 early. It also means that I have to go a bit slower when my rocket is still in 1 piece but I'm fairly high up and there's very little atmosphere. but I suppose that must be normal. I must figure out a way to design my rocket so it's not so.. unwieldly.
I just got out of orbit, reentered the atmosphere, deployed my parachute, and then promptly crashed into the ground and exploded.. i'm guessing because my upper stage weighs too much. I guess I should be jettisoning everything except just the capsule right at the end...
That is amazing
Finally
periapsis 65,000
apoapsis 320,000
So long story short, if your kerbals are in an orbit that doesn't cross a planets, they'll always be in that orbit. If they do cross a planet's orbit, the orbit will only change if they happen to arrive at the crossing point when the planet is pretty close to them at that instant.
Nice, I will definitely try to go after some of those guys once I'm good enough at the basics. There's like 5 of them out there now.
You can also add SAS pods to your stages, they will also help stabilize. You only need ONE ASAS pod though, it's effects are not cumulative. SAS is cumulative.
One per.. pillar?
If you have screenshots, I can help further.
This is the rocket I used to get into orbit for the first time:
Spoiler :
Feel free to rip the design to shreds. It is really only the result of a poorly planned out evolution-like trial an error run that saw me modify previous designs until things worked just well enough to get me into orbit.
Edit: You can only burn at 25%? Hm that's a serious issue. So it gets really unstable above 25%? You have A/SAS on?
It was actually 33%.. but.. shortly after that I improved my design and went up to being able to comfortably boost it up to 66%-70% for the first little while anyway.. Yeah, I have SAS on.
Every once in a while my rocket will just start spinning out of control, like it's losing its centre of gravity or something. It usually happens shortly before my bottom stage is almost out of fuel.. which makes sense, because the centre of gravity is slowly moving towards the front as you burn, so the rocket should in theory start slowly veering off course. I guess? That's how I explain it anyway.. It's a shame though, because then I have to detach that section and move onto stage 2 early. It also means that I have to go a bit slower when my rocket is still in 1 piece but I'm fairly high up and there's very little atmosphere. but I suppose that must be normal. I must figure out a way to design my rocket so it's not so.. unwieldly.
I just got out of orbit, reentered the atmosphere, deployed my parachute, and then promptly crashed into the ground and exploded.. i'm guessing because my upper stage weighs too much. I guess I should be jettisoning everything except just the capsule right at the end...
Leonel said:This is intended to get my Kerbonauts to Duna and back. The main ship will propel the capsule to Duna and when they reach orbit, the capsule will detach with two Kerbonauts and make their way to the surface while one stays with the mothership. The lander is equipped with 8 parachutes to help slow it down in the atmosphere while the engines help control descent. When it's time to return, the lander will lift off from the surface with whatever fuel is left in the four nacelles and when their fuel is exhausted, smaller engines take control and help push the capsule into rendezvous orbit with the mothership where they'll connect again and make their way home to a ticker tape parade!
I actually assembled this in four stages. The habitat module that would house comms, crew quarters, RCS fuel and docking ports that'll help guide the fuel assembly into place, the fuel assembly, the engine assembly and the capsule itself.
That is amazing
Leonel
Breakfast Connoisseur
It can look great all it wants, the real question is if it'll actually do what I built it to do! ")
hobbsyoyo
Deity
- Joined
- Jul 13, 2012
- Messages
- 26,575
Yeah! Noice!Aaaaaand Poland can into orbit!!
Finally
periapsis 65,000
apoapsis 320,000
Well, looking at your rocket, you actually shouldn't need it.One per.. pillar?
It's a solid design, I've just tweaked a few things and I'm going to walk you through asparagus staging to get the most out of this design.Feel free to rip the design to shreds. It is really only the result of a poorly planned out evolution-like trial an error run that saw me modify previous designs until things worked just well enough to get me into orbit.
*Ok, first off, ditch the nose cones on the boosters. The game uses a simplified drag model at the moment (unless they changed that without saying anything) that models drag as a function of mass. So the heavier something is, the more drag it creates. So those nosecones add mass, which perversly adds drag. This drag model will change in the future, but for now the nose cones hurt your design.
*Delete the bottom delta wings on the booster cores and either replace them with the canards you use on the upper stages or with an AV-8 winglet (or is it called a fin--IDK, but it's the AV-8). I've never had luck with canards, but the AV-8 works like a charm. Those delta wings don't move on their own, which means all they are doing is adding mass and drag since they only create lift when mounted horizontally.
*Delete all of the extra ASAS pods on the boosters and the core. ASAS is not cumulative, and an ASAS pod does not add SAS functionality. Place a decoupler under the capsule, this way you can break the capsule off of the orbital stage for landing. Under that decoupler, place a single ASAS pod. This will control all of your winglets and RCS thrusters (when RCS is switched on) for the entire rocket. Delete all the other ASAS pods other than this one.
You could add SAS (not ASAS) pods to your boosters, as SAS is cumulative (adding more SAS pods adds more torquing ability, adding more ASAS pods does not make the winglets or RCS thrusters or thrust vectoring work better). But this design really shouldn't need the extra SAS if you get the fins/winglets right.
*Delete the canards right below the capsule. They won't work in space and aren't needed. I showed in this pic that you should also delete the canards below that set, but actually you should keep them or replace them with AV-8's. My bad on that mistake; that stage does need some sort of control surfaces.
*You only need one radial decoupler for each of your side boosters. All the extra ones only add mass and are redundant. Replace all of them (except the top one) with struts. If you find that the side boosters collide with the main core after seperation, attach some Sepatrons to them and make sure they are turned facing inward using the QWEASD keys. Also make sure the sepatrons are staged to go off at the same time as the decouplers and make sure that they don't face directly inward and are close to the central core or they'll detonate the central fuel tanks. The sideways firing sepatrons will push your booster stages safely away from your core stage when you drop the boosters.
*I'm not sure what all you've got on top of your capsule. I would suggest attaching a docking port (so that you can practice docking and it will also make rescue missions easier) on top and attach radial parachutes to the side.
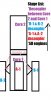
*OK, asparagus staging. So I drew some orange lines that stand for fuel lines at the bottom. That is to make your rocket asparagus staged, which will dramatically increase performance. Let me explain:
Asparagus staging makes it so that your side boosters fall off in a sequence instead of all at once. It also makes it so that the boosters that are next to fall off are feeding fuel into the other boosters and the core, so that each time you drop a booster off, the remaining boosters and core are still fully fueled.
To do this, look at the first tank (marked A). Attach a fuel line that goes from A to B. Then attach a fuel line that goes from B to C (the central core). When you place a fuel line, fuel flows from the tank you first stick it on to the one you place the other end on. So you do attach them first to A, then to B.
Now, do the same on the other side of the rocket, starting with the booster that is exactly opposite to A. Finally, in the staging side bar of the VAB, make all of the engines fire in your 'last stage' (the one at the bottom of the list). Above that, place the decouplers for the A booster and the one directly opposite to that in their own stage. Then, in a stage above that, place the B booster and it's opposite into their own stage.
Now, when you take off, all engines will fire, with the A stage and it's opposite fueling both the B stage and it's opposite and the central core. Your A stages will run out quickly; don't worry about this. Dump them when they empty with space bar. You will now have your B stages and the core, fully fueled and still flying. Dump your B stages when they empty, leaving just a fully fueld core. Then fly everything like you did before. You will find your rocket will go much further with the same amount of fuel. You can add more booster cores this way, you just add more links in the daisy chain.
One last thing: attach the fuel lines to the bottom tanks in each stack.
This should help. Though it may seem like I changed a lot, really, the overall design is solid, these suggestions are really minor tweaks.
I think that if you add the fins where the delta wings are, it should fly with more stability. Everything looks good though. Oh, and those big mainsail engines you are using tend to overheat fast so you will never really be able to turn up thrust to 100% anyways. But they are good engines overall, I use them all the time.It was actually 33%.. but.. shortly after that I improved my design and went up to being able to comfortably boost it up to 66%-70% for the first little while anyway.. Yeah, I have SAS on.
Yeah that could be it, but I think it's a lack of usable fins that are hurting you. If you make the suggested changes and are still having issues, let me know and we'll work out what's going on. Also make sure your RCS is activated along with your SAS when you are high in the atmosphere. Even if you have an ASAS module installed and the SAS is turned on, if the RCS isn't turned on, they won't be usable to the ASAS system.Every once in a while my rocket will just start spinning out of control, like it's losing its centre of gravity or something. It usually happens shortly before my bottom stage is almost out of fuel.. which makes sense, because the centre of gravity is slowly moving towards the front as you burn, so the rocket should in theory start slowly veering off course. I guess? That's how I explain it anyway.. It's a shame though, because then I have to detach that section and move onto stage 2 early. It also means that I have to go a bit slower when my rocket is still in 1 piece but I'm fairly high up and there's very little atmosphere. but I suppose that must be normal. I must figure out a way to design my rocket so it's not so.. unwieldly.
You want to attach a decoupler right under the capsule so that you can dump the orbital engine and tanks right before reentry. They add a lot of mass which parachutes struggle to cope with. What this means is that when the chutes are in drogue mode (not fully opened, they fully open at 500m above sea/ground level) they will not be able to slow the whole thing down enough for a safe full deployment.I just got out of orbit, reentered the atmosphere, deployed my parachute, and then promptly crashed into the ground and exploded.. i'm guessing because my upper stage weighs too much. I guess I should be jettisoning everything except just the capsule right at the end...
When they do fully deploy, if you are going to fast, the sudden, massive g force created by the chute drag will rip everything apart. If you only have a capsule to land, you won't have this problem.
Oh and make sure you are not time warping during parachute deployment, it screws up the physics something nasty.
Let me know if there's anything else that needs looking at.
Again, I hope I'm not coming off as condescending, I'm just trying to pass on the fruit of my own laborious trial-and-error.
It can look great all it wants, the real question is if it'll actually do what I built it to do!
Don't you love how you can restage everything in flight now?
I hated it when in versions before .18, you would spend hours on a mission only to find out you had mistaged some part that caused the whole mission to fail.
Attachments
Leonel
Breakfast Connoisseur
You can restage? I realized that putting the four landing rockets together with the parachutes was probably a bad idea for deceleration out of orbit. I was just going to manually activate the rockets in orbit but separating the descent rockets and parachutes would make things smoother.
hobbsyoyo
Deity
- Joined
- Jul 13, 2012
- Messages
- 26,575
Yeah, you can take the icons in the staging list on the left and move them around as needed during a mission. Quicksave first as you don't always get what you wanted.
OR: You can also add rockets to the the number keys with action groups in the VAB, this will let you shut down and restart engines as needed on the fly, I think.
OR: You can also add rockets to the the number keys with action groups in the VAB, this will let you shut down and restart engines as needed on the fly, I think.
hobbsyoyo
Deity
- Joined
- Jul 13, 2012
- Messages
- 26,575
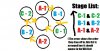
Here is a top down view of how asparagus stanging looks:

A-1 and A-2 feed into B-1 and B-2, which feed into C-1 and C-2, which in turn feed into the core.
On the right is how the stage list should work. Put your engines down at the very bottom stage (which is the first stage to 'fire' or activate). The next stage up should be the decouplers of A-1 and A-2, then above that a stage with the decouplers of B-1 and B-2 and finally a stage for the decouplers of C-1 and C-2.
In the stage list, the next stage above the C-1 and C-2 decouplers should go the stage with the decoupler that kicks off the bottom core stack so that the stack above it can fire and fly off.
You may add or delete boosters in pairs as needed. For instance, you could go without a C-1 and C-2 pair (this is how your rocket is actually arranged). To do this, simply make B-1 and B-2 connect to the core stage. To add another pair, just add a D-1 and D-2 pair and instead of connecting the C-1 and C-2 pair to the core, have them connect to the D- pair, and have the D- pair connect to the core. You have to do this in pairs, so 3, 5 and 7 side booster arrangements don't work.
Here is a side view for greater clarity. This example only has 4 side boosters like yours, they are labled A-1 & A-2 and B-1 & B-2. (A-2 is on the other side of the rocket).

Let me know if I need to clarify anything.
A-1 and A-2 feed into B-1 and B-2, which feed into C-1 and C-2, which in turn feed into the core.
On the right is how the stage list should work. Put your engines down at the very bottom stage (which is the first stage to 'fire' or activate). The next stage up should be the decouplers of A-1 and A-2, then above that a stage with the decouplers of B-1 and B-2 and finally a stage for the decouplers of C-1 and C-2.
In the stage list, the next stage above the C-1 and C-2 decouplers should go the stage with the decoupler that kicks off the bottom core stack so that the stack above it can fire and fly off.
You may add or delete boosters in pairs as needed. For instance, you could go without a C-1 and C-2 pair (this is how your rocket is actually arranged). To do this, simply make B-1 and B-2 connect to the core stage. To add another pair, just add a D-1 and D-2 pair and instead of connecting the C-1 and C-2 pair to the core, have them connect to the D- pair, and have the D- pair connect to the core. You have to do this in pairs, so 3, 5 and 7 side booster arrangements don't work.
Here is a side view for greater clarity. This example only has 4 side boosters like yours, they are labled A-1 & A-2 and B-1 & B-2. (A-2 is on the other side of the rocket).
Let me know if I need to clarify anything.
Attachments
warpus
Sommerswerd asked me to change this
Hey, I just got home and I'm going through your notes now hobbsyoyo, trying to re-assemble my rocket into a more efficient design a bit before my friend comes over, at which point I might have to stay away from my computer for a while.
It's definitely quite a bit to wrap your head around, but I definitely do not mind learning about any of the involved concepts. I mean, up until these last couple days I was largely ignorant on the subject of what it means to put something in orbit, aside from vague notions of escape velocity, the forces involved, etc., but I never quite realized how important lateral movement was, for example. I think most people just think "point rocket up, keep going until in orbit", or some version of that.
The asparagus staging thing is intriguing. I'm going to read everything you wrote now and try to wrap my head around it, while I re-assemble my rocket. Thanks again! And wish me luck..
warpus
Sommerswerd asked me to change this
Good luck on your highly efficientdeath machinerocket!
I call it Mother%@&! 2700 for a reason
This new version is going to be MF 3000
The guys in orbit around the sun have similar names, without version numbers.
Oh, and the top of my capsule is just a parachute and that's it. Or at least it should be! By the way, all the diagrams are really helping, thanks a lot!
warpus
Sommerswerd asked me to change this
Struts, how do they work?
warpus
Sommerswerd asked me to change this
Which ones do I use to attach boosters to a core? I've been screwing around with them, but it doesn't seem very intuitive yet.
Similar threads
- Replies
- 4
- Views
- 594
- Replies
- 2
- Views
- 754
- Replies
- 115
- Views
- 13K
- Replies
- 24
- Views
- 3K