damnrunner
Deity
- Joined
- Oct 19, 2005
- Messages
- 2,004
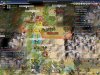
Kaleb - I think you are right about the healing. They attacked two turns ago. At the end of last turn their units that stayed put healed. At the end of this turn, their units that stay put again will heal again.
I am less worried about them moving units to the hill 1E of TKY. Any units they move will not get the benefits of healing. I am also wary of splitting off one mace from our stack. They could attack it with their full strength LB in Zero which should give the mace enough damage to easily get killed with 1 or 2 more follow up attacks.
For this reason I think we move the whole stack 1N. They will move the hill LB into TKY and probably move the unprompted LB in Zero to the hill. I don't think they will move any other units as they won't heal if they do. Attacking us would also be pointless as they would take very high losses (RNG willing).
Next turn we can combine our two stacks at the tile 1S of TKY.
On the following turn that would give us 2 cats, 3 maces, 1 ele, 1 HA - vs. 2 LBs and 1 spear. They will probably chop one more unit (maybe 2) in this period of time - but they can't really bring up any other units other than chariots.
If they don't move units out of Zero this turn they won’t get to TKY in time. But if they do move out of Zero this turn - it will take them 2 turns to get to TKY during which they won't heal any.
 would have liked more discussion but we can't hold up game indefinitely so I've done the turn...
")


