You are using an out of date browser. It may not display this or other websites correctly.
You should upgrade or use an alternative browser.
You should upgrade or use an alternative browser.
Ruff03 - AW Middle Ages
- Thread starter ruff_hi
- Start date

ruff_hi
Live 4ever! Or die trying
Roster
Ruff
Conroe - very well done
colony - skip
Munterpipe - up
Woobi - on deck
Ruff
Conroe - very well done
colony - skip
Munterpipe - up
Woobi - on deck
Munterpipe
Clums
Ok, I can't play until Sunday, so Ruff, it's up to you if we should wait until then or do a double skip.
ruff_hi
Live 4ever! Or die trying
Prefer a double skip ... so, Woobi, you up for this?
ruff_hi
Live 4ever! Or die trying
Guess not. New roster ...
Roster
Conroe - very well done
colony - skip
Ruff - up
Munterpipe -on deck
Woobi - ???
Roster
Conroe - very well done
colony - skip
Ruff - up
Munterpipe -on deck
Woobi - ???
ruff_hi
Live 4ever! Or die trying
Good News - we are still alive. This round of 10 turns we didn't get out of our back yard. We really only visited our front yard, and apart from the knight way SW in enemy territory, all of our units are in our territory. The overall military statistics were 38 victories and 5 losses (1 of those being said knight and 3 of the losses being in 1 turn to Malinese forces). I wasn't feeling to happy after that round.
Here is the current state or play …

As you can see, we have a few units up against us but we have more units defending. The only real problem is that we have units that are trying to sneak past Bombay. They have actually been on that forest square for about 5 turns and made no move to get past. I have two Woodsman II macemen escorting 2 workers who are chopping forests in that region. Forests are good for hammers but they are better for defense. That is ok if our units are in the forests but that is bad - B A D - if their units are in the forest.

I think we should chop the forest where the enemy is currently (if we can get there). I chopped the forest where our woodsman II maces are to provide a killing zone. Enemy units can only move 1 tile per round (x-horses) and so they will have to stop on a 0% defensive tile. That is when we hit them with cats and (try) to wipe them out. I am not sure about chopping the other forest tiles. It has its pluses (bigger killing zone) and minuses (less hammers, less tiles for us to 'hide' in).
Be careful moving units into Bombay - don't let them finish on a square next to enemy units. I was stopping them 2 squares away and then running them in next round. This is good as it also leaves them with a movement point if you want them to attack a stack. You will notice that we still have our wheat farm (they would put a unit there and I would remove it) but we lost our horses (they finally put a mini-stack of pikes there and I couldn't take them all out).
On the propaganda front - we should have a poster made up for this guy - "Our Brave Fighting Forces" ...

Finally, our finances are back in the black (courthouses helped) and I finally sent that workboat out to fish - I think the enemy navy has gone.
Here is the current state or play …
As you can see, we have a few units up against us but we have more units defending. The only real problem is that we have units that are trying to sneak past Bombay. They have actually been on that forest square for about 5 turns and made no move to get past. I have two Woodsman II macemen escorting 2 workers who are chopping forests in that region. Forests are good for hammers but they are better for defense. That is ok if our units are in the forests but that is bad - B A D - if their units are in the forest.
I think we should chop the forest where the enemy is currently (if we can get there). I chopped the forest where our woodsman II maces are to provide a killing zone. Enemy units can only move 1 tile per round (x-horses) and so they will have to stop on a 0% defensive tile. That is when we hit them with cats and (try) to wipe them out. I am not sure about chopping the other forest tiles. It has its pluses (bigger killing zone) and minuses (less hammers, less tiles for us to 'hide' in).
Be careful moving units into Bombay - don't let them finish on a square next to enemy units. I was stopping them 2 squares away and then running them in next round. This is good as it also leaves them with a movement point if you want them to attack a stack. You will notice that we still have our wheat farm (they would put a unit there and I would remove it) but we lost our horses (they finally put a mini-stack of pikes there and I couldn't take them all out).
On the propaganda front - we should have a poster made up for this guy - "Our Brave Fighting Forces" ...
Finally, our finances are back in the black (courthouses helped) and I finally sent that workboat out to fish - I think the enemy navy has gone.
Spoiler turnlog :
----------------------------New entries----------------------------
Turn 240 (1650 AD)
Bombay begins: Castle
Delhi begins: Castle
Madras finishes: Knight
Bangalore grows: 6
Ruff_Hi: IBT:
While defending, Knight defeats (1.60/10): German Pikeman
Turn 242 (1655 AD)
Madras begins: Maceman
While attacking, Knight defeats (6.80/10): Incan Maceman
Knight promoted: Combat I
Knight promoted: Combat II
While attacking, Knight defeats (7.00/10): Incan Crossbowman
While attacking, Maceman defeats (6.64/8): Incan Maceman
Maceman promoted: Combat I
Maceman promoted: Medic I
Maceman promoted: Shock
Calcutta grows: 4
Ruff_Hi: IBT:
While defending, Knight loses to: German Catapult (5.00/5)
Turn 243 (1660 AD)
Knight promoted: Combat III
Catapult promoted: Barrage I
Catapult promoted: Barrage II
Catapult promoted: Barrage I
Catapult promoted: Barrage II
Ruff_Hi: Two suicide cats that survived!!
While attacking, Knight defeats (4.50/10): Incan Catapult
Knight promoted: Combat I
Knight promoted: Shock
While attacking, Knight defeats (5.50/10): Roman Maceman
Bombay finishes: Castle
Calcutta finishes: Longbowman
Ruff_Hi: IBT:
While defending, Longbowman defeats (0.96/6): Roman Maceman
While defending, Maceman defeats (2.88/8): Roman Maceman
Turn 244 (1665 AD)
Calcutta begins: Longbowman
Longbowman promoted: City Garrison I
Longbowman promoted: City Garrison II
Delhi finishes: Castle
Ruff_Hi: IBT:
While defending, Maceman defeats (6.72/8): German Maceman
While defending, Maceman loses to: Incan Crossbowman (2.04/6)
While defending, Longbowman defeats (2.28/6): Roman Crossbowman
While defending, Maceman defeats (3.92/8): Roman Maceman
While defending, Knight defeats (8.40/10): Roman Crossbowman
While defending, Maceman defeats (7.28/8): Roman Catapult
While defending, Maceman defeats (2.16/8): Roman Maceman
While defending, Knight defeats (6.10/10): Roman Crossbowman
Turn 245 (1670 AD)
Delhi begins: Longbowman
Knight promoted: Combat III
Maceman promoted: Shock
Delhi finishes: Longbowman
Bombay grows: 9
Bombay finishes: Crossbowman
Madras finishes: Maceman
Bangalore finishes: Courthouse
Jute finishes: Courthouse
Ruff_Hi: IBT:
While defending, Longbowman loses to: Malinese Catapult (5.00/5)
While defending, Longbowman defeats (4.56/6): Malinese Catapult
While defending, Longbowman loses to: Malinese Crossbowman (1.32/6)
While defending, Knight defeats (5.00/10): Malinese Crossbowman
While defending, Knight loses to: Malinese Crossbowman (1.50/6)
Turn 246 (1675 AD)
Delhi begins: Longbowman
Bombay begins: Longbowman
Madras begins: Longbowman
Bangalore begins: Knight
Jute begins: Knight
While attacking, Knight defeats (6.30/10): Incan Maceman
Crossbowman promoted: City Garrison I
Crossbowman promoted: City Garrison II
Delhi begins: Knight
Ruff_Hi: IBT:
While defending, Longbowman defeats (5.16/6): Malinese Catapult
While defending, Maceman defeats (6.16/8): Malinese Maceman
Turn 247 (1680 AD)
While attacking, Maceman defeats (6.08/8): German Pikeman
While attacking, Knight defeats (8.60/10): Malinese Crossbowman
Knight promoted: Combat II
While attacking, Maceman defeats (6.88/8): German Pikeman
Maceman promoted: Woodsman I
Maceman promoted: Woodsman II
Longbowman promoted: City Garrison I
Longbowman promoted: City Garrison II
Delhi finishes: Knight
Madras finishes: Longbowman
Ruff_Hi: IBT:
While defending, Longbowman defeats (6.00/6): Incan Catapult
While defending, Longbowman defeats (5.16/6): Incan Crossbowman
Turn 248 (1685 AD)
Madras begins: Maceman
While attacking, Knight defeats (8.60/10): Malinese Crossbowman
While attacking, Knight defeats (2.40/10): Malinese Pikeman
While attacking, Maceman defeats (6.48/8): Incan Crossbowman
Knight promoted: Combat I
Knight promoted: Combat II
While attacking, Knight defeats (4.40/10): Incan Catapult
Delhi finishes: Longbowman
Madras grows: 8
Bangalore grows: 7
Ruff_Hi: IBT:
Turn 249 (1690 AD)
Delhi begins: Maceman
Maceman promoted: Cover
Delhi finishes: Maceman
Bombay finishes: Longbowman
Calcutta grows: 5
Ruff_Hi: IBT:
While defending, Longbowman defeats (6.00/6): Japanese Catapult
While defending, Longbowman defeats (5.28/6): Japanese Catapult
While defending, Pikeman defeats (0.30/6): Japanese Knight
While defending, Longbowman defeats (4.44/6): Japanese Crossbowman
While defending, Longbowman defeats (0.30/6): Japanese Crossbowman
Turn 250 (1695 AD)
Delhi begins: Maceman
Bombay begins: Pikeman
Longbowman promoted: City Garrison I
Longbowman promoted: City Garrison I
Longbowman promoted: City Garrison II
Longbowman promoted: City Garrison II
Longbowman promoted: City Garrison I
Longbowman promoted: City Garrison II
Longbowman promoted: City Garrison III
Maceman promoted: Woodsman I
Maceman promoted: Woodsman II
Madras finishes: Maceman
Jute finishes: Knight
Calcutta finishes: Longbowman
Ruff_Hi: IBT:
While defending, Longbowman defeats (5.22/6): German Crossbowman
While defending, Longbowman defeats (4.44/6): German Crossbowman
While defending, Maceman defeats (7.04/8): German Pikeman
Turn 251 (1700 AD)
Madras begins: Pikeman
Jute begins: Maceman
Calcutta begins: Maceman
While attacking, Knight defeats (4.30/10): Japanese Knight
Munterpipe
Clums
Great work ruff!
I see light in the end of the tunnel. Winning this would truly be marvelous.
Time victory is turned off in this mod, right? If so, I would say that we could use the infinite turns to our advantage. If not, we're in a hurry.
I'll pick it up tomorrow.
I see light in the end of the tunnel. Winning this would truly be marvelous.
Time victory is turned off in this mod, right? If so, I would say that we could use the infinite turns to our advantage. If not, we're in a hurry.
I'll pick it up tomorrow.
Munterpipe
Clums
I've played, but I'll have to post tomorrow.
Munterpipe
Clums
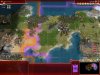
Bombay is standing easily, with the AI attacking every single turn instead of cooperating as they should.
I founded Lahore, and since we are now very able to hold the AI back, I started some more infrastructure and began building us a navy.
I lost 5 units in my ten turns and killed 37 AI units.
Two of the lost guys were workers, that a woodsman 2 mace managed to get to while sneaking past Bombay.
There are 37 more AI units visible outside Bombay, but We'll be allright for now, with 20 guys holding the fort inside.
I'd say we have ourselves a comfortable standstill, but we still need to concieve of a way to win this.

http://forums.civfanatics.com/attachment.php?attachmentid=125438&stc=1&d=1146528932
Sorry about the short post.
I founded Lahore, and since we are now very able to hold the AI back, I started some more infrastructure and began building us a navy.
I lost 5 units in my ten turns and killed 37 AI units.
Two of the lost guys were workers, that a woodsman 2 mace managed to get to while sneaking past Bombay.
There are 37 more AI units visible outside Bombay, but We'll be allright for now, with 20 guys holding the fort inside.
I'd say we have ourselves a comfortable standstill, but we still need to concieve of a way to win this.
http://forums.civfanatics.com/attachment.php?attachmentid=125438&stc=1&d=1146528932
Sorry about the short post.
Attachments
ruff_hi
Live 4ever! Or die trying
Roster
Conroe - up
colony - on deck
Ruff -
Munterpipe - holding the fort
Woobi - MIA?
Conroe - up
colony - on deck
Ruff -
Munterpipe - holding the fort
Woobi - MIA?
Got it ...
 If Bombay is secure and we now have a navy, I'm thinking I should work on building us a SOD.
Any words of wisdom before I play?colony said:Good news that Bombay's secure for now, although it looks like it'll be hard to turn this into a winning position just now it might be possible in a few turnsets.
If Bombay is secure and we now have a navy, I'm thinking I should work on building us a SOD.ruff_hi
Live 4ever! Or die trying
How about developing a rational for unit mix and promotion mix for both attack and defense (and our ideal tile location for both).
Conroe said:Got it ...
Any words of wisdom before I play?
Well if we can get a decent sized stack together (It's a lot, and will take a while to build, but maybe ~20 units + Cats (4 Accuracy for the cultural defence and then 2 with Barrage for each city?)) and go after cities one at a time with it, whilst building another I think we should be able to conquer a lot of territory before the time runs out. The problem with a SoD is we'll need a few defensive units in it. 2 Drill Longbows, 2 XBows, 2 Pikes should be able to take a few attacks, assuming we can get out of our territory, with the rest split between Maces (Cover/CR) and Knights.
If possible then we really need to chop the forests near Bombay too.
Judging from the comments, it appears that we are all leaning towards the idea of 1 Super-SOD to push out of our territory and start taking the battle to the AI. As Colony noted, our SOD will need some defensive units. I think we will need at least 13 units for stack defense.
The Crossbowmen will provide the bulk of the defense, with the Longbowmen and Macemen providing support. Bombay has pretty much become useless as a production center. We should probably consider Woobi's suggestion of capturing a city as a buffer. I think St Petersburg, which was built on a hill, is the best choice. If we can take the heat off of Bombay, it would be a good source of hammers for future troop training. To that end, I would rather not chop any more forests around Bombay.
A look at the demographics and power graph show some disturbing news. If it wasn't for Peter, we would be dead last in troops. I guess it is good to know that he has not recovered from our earlier suppression efforts. Unfortunately, we really do not have an edge in any of the stats. The manufacturing number is at least average. That number would definitely change if we could get Bombay back on-line.


Munterpipe started work on building us a navy. However, it is not yet large enough to risk leaving the safety of the ports. For the time being, I am going to leave Bangalore and Jute on Caravel construction. If we can create a SOD of boats, we may be able to take control of our waters once again.
Objectives: Start building us a Super-SOD.
Turn 0 - 1750AD: I'm tempted to start this off by revolting to Theocracy. This would give our SOD an extra 2xp. Unfortunately, it is not enough for an extra promotion, but it would put most of them just one battle from a 3rd promotion. In the end, I really don't want to lose the 1 turn to anarchy ...
IBT: The cultural defense of Bombay is smashed to 0% by Capac. Mansa suicides a couple of cats against our Longbowmen. Mansa then suicides a couple of Macemen against our Longbowmen.
Turn 1 - 1755AD: Delhi trains a Maceman and starts on a Crossbowman. Jute constructs a Caravel and starts on another one.
The collateral damage from the 2 cats is taken care of by our Medic in Bombay. All 3 Knights in Bombay are still wounded from prior engagements. And, our Level 5 Longbowman is wounded from the 2 mace attacks; he needs 1 turn to heal, but has earned another promotion. This guy is absolutely amazing. He has City Garrison III and Guerilla I promtions already; which means that with the 170% bonus he could hold off a Grenadier! I decide to keep up the theme and give him Guerilla II.
Tokugawa has a couple of Knights in the open. I attack one of them with our Pikeman. He is now eligible for his 3rd promotion, Formation, and will be added to our SOD.
IBT: Tokugawa sends his remaining Knight past Bombay after our Worker. Fortunately, he cannot reach the Worker in 1 turn.
Then, the battle over Bombay gets ugly! First up, a Japanese Catapult suicides against our super LB. Then, a Japanese Knight gets 3 good licks in on our Super LB before dying. Then, Bizmark suicides a Catapult against another of our Longbowman, before sending in his Maceman to die.
Next up is Capac. His suicide Catapult does some damage to one of our City Garrison II Longbowman before being taken out. He then sends a City Raider II Catapult up against one of our Guerilla II Longbowmen. Then, he sends in a couple of Crossbowmen to die, but not before drawing some blood.
Mansa Musa's suicide Catapult is able to withdraw from combat before dying. But, at this point, all of our Longbowmen are wounded. Mansa's Crossbowman has a 20% chance of winning, but our Longbowman holds the city. Julius Caesar's suicide Catapult is going up against one of our Macemen. Then, Caesar's two Macemen inflict some damage to our wounded Maceman and Crossbowman. Caesar's Crossbowman has almost even odds against our defending wounded Knight. The Knight manages to prevail.
We killed 13 units without a single loss. But, a lot of damage was inflicted, especially to our Longbowmen. One of our Longbowmen is eligible for a promotion and gets a City Garrison III. Our wounded Knight is also eligible for his 4th promotion, so I give him Charge; hopefully he can start taking the heat from the suicide Catapults, thus freeing up our Longbowmen. (I would later realize that this was a wasted promotion. The longbows would continue to defend against the cats.)
Turn 2 - 1760AD: Madras completes a Forge and starts on a Crossbowman.
If the AI had committed all of their combined forces, Bombay probably would have fallen. Our only healthy defenders in Bombay are some Macemen. If JC and Bizmark attack next turn, they will be doing so with Crossbowmen.
I attack Tokugawa's Knight that is threatening our Worker. Our Pikeman is barely alive as a result. Next, I decide to do something about the AI stack sitting on the forest north of Bombay. This stack is being defended by a lone Pikeman. Our Maceman will have a 65% chance of defeating that pike. Then, our Woodsman II stack can move forward to claim this tile, hopefully for good.

A Shock promoted Maceman in Bombay has a 90% chance of taking out the Pikeman. Unfortunately, it took almost all of his health (0.3/8) to do it. It may have been a mistake to use one of Bombay's defenders, but it is too late now. Capac's 2 wounded cats easily fall to our woodsmen maces. And, we have now reclaimed one more of Bombay's tiles.
IBT: Bizmark did not notice what happened to Tokugawa's Knight that threatened our Worker. He sends his Knight around Bombay to do the same thing. Meanwhile, his Crossbowman attacks our wounded super Level 6 Longbowman. Our LB starts the battle with 72/100HP, but only has 7HP left before finally killing Bizmark's Crossbowman. We came close to losing that Longbowman!
Next, Mansa Musa suicides a Maceman against one of our Macemen. It was no contest, as we win without even a scratch. Lastly, Caesar sends in a City Raider II Catapult that gets a few licks in on our City Garrison III Longbowman before withdrawing from combat.
Turn 3 - 1765AD: Delhi completes a Crossbowman and starts a Maceman. Bangalore completes a Caravel and starts another one. Calcutta completes a Worker and starts a Pikeman.
Well, we managed to keep Bombay for one more turn! Unfortunately, our 2 best longbows are now wounded. We do, however, have 4 other healthy longbows and most of our Macemen are back to full health.
I use our last healthy Pikeman in Bombay to take out Bizmark's wandering Knight. Like the last one, he is severly wounded. Then, one of our Knights takes out a lonely, wandering and wounded Catapult.
Lastly, we are looking at 15 healthy units sitting on the hill overlooking Bombay. I decide to suicide one of our 2 Catapults that are in Bombay against this stack. The cat only does slight damage, but 4 of the damaged units are Crossbowmen. That will help if our maces have to do any of the fighting.
IBT: First up is Tokugawa who suicides a City Raider II Catapult. Then, our City Garrison II Longbowman defeats his Maceman. Huayna Capac then suicides a City Raider I Catapult against our wounded City Garrison III Longbowman. The cat is able to withdraw, unfortunately. Capac's other Catapult isn't so lucky, though.
Our Guerilla II Longbowmen finally see some action, as Julius Caesar steps up to the plate. We kill 3 of JC's Crossbowman in that action. For a last hoorah, Caesar suicides a City Raider II Pikeman against our Maceman.
In other news, 2 Crossbowmen and a Pikeman are trying to sneak around Bombay.
Turn 4 - 1770AD: Delhi completes a Maceman and starts on a Crossbowman. Madras completes a Crossbowman and starts on another one.
Meanwhile, 2 of our Workers begin construction of a fort on the recently captured forest tile north of Bombay. A Woodsman II Maceman fortified in a forest with a fort should be pretty well safe. I'm not sure who is responsible for the woodsmen promotions, but good job!
IBT: A lone Pikeman, under command of Huayna Capac, attacks this turn.
Turn 5 - 1775AD: Things were going so well, and then the unthinkable happens. We lose a Knight. We had 2 Crossbowmen sneaking around Bombay, if you recall. They also had a Pikeman with them, but he committed suicide on the IBT. I send our Level 5, Shock and Charge promoted Knight to attack. He loses even though he has a 96% chance of winning. That is just not right. Our next Knight has a 97% chance against a wounded Crossbowman. Fortunately, he does the right thing and wins. Lastly, a Crossbowman finishes the job started by our first Knight.
In other news, Tokugawa has left a lone Knight exposed in the open. I would prefer to attack the Knight with a Pikeman, but then our pike would be sitting defenseless in the open. Fortunately, we have a Formation-promoted Knight (with 75% odds) available for the job.
IBT: Mansa starts us off by suiciding a Catapult against our now-healthy Level 6 super-LB. He then suicides a Maceman against super-LB. Finally, his Crossbowman is able to get a couple of licks in before dying at the feet of super-LB.
Next, Caesar sends in a City Raider II Catapult. It has no chance of winning against our City Garrison III Longbowman, but does manage to scratch up the bow before dying. It's nothing that our Medic can't handle, though.
Turn 6 - 1780AD: Delhi completes a Crossbowman and begins a Maceman. Jute completes a Caravel and begins a Catapult.
Meanwhile, Bizmark has planted a couple of Knights on top of the horse tile south of Bombay. A bit of a sticky wicket is encountered as JC has left a healthy Combat II Maceman to protect the Knights from our Pikemen. I am going to have to risk leaving them for now.
IBT: Turns out the risk was a bad idea. Bizmark's 2 Knights pillage the road into Bombay and are still being protected by JC's Maceman.
Bizmark decides to suicide a City Raider II Catapult against our Super-LB. Then, Capac suicides 2 Catapults against our City Garrison III Longbowmen. He then sends in a lone Crossbowman to die. Last up is Caesar's City Raider II Catapult. It manages to withdraw rather than dying.
Turn 7 - 1785AD: Delhi completes a Maceman and starts a Longbowman. Madras completes a Crossbowman and starts a Maceman. Bangalore completes a Caravel and starts a Work Boat. Bombay completes a Pikeman and starts on a Forge.
We now have 4 Caravels in Bangalore. They each get a Combat I promotion and sail south towards Jute, hugging the coast line. Mansa has 3 Combat I Caravels, as well. Will he take the bait? Everybody's Caravels have the exact same strength, but the defender gets a 10% coastal defense.
First order of business is to get rid of Bizmark's 2 Knights and JC's Maceman. A Combat III (w/Formation) Knight is the only unit that will draw the Maceman as defender and still have odds (79%) of winning. It looked iffy for a moment, but our Knight won (3.2/10) in the end. This allowed our Pikemen to finish off Bizmark's two Knights. Unfortunately, it also left one of our pike's exposed in the open, since the road was pillaged.
Next, our Knights kill one of Capac's Macemen and one of Mansa's Crossbowmen.
IBT: Mansa takes the bait with 2 of his 3 Caravels. They do considerable damage, but our boats prevail.
Bombay's cultural defenses had grown to 30%, but Caesar bombs them back down to nothing. Then, our Level 6 super Longbowman earns his 6th promotion (Drill I) taking out Caesar's Crossbowman.
Turn 8 - 1790AD: Delhi completes a Longbowman and starts a Maceman. Calcutta completes a Pikeman and starts a Catapult.
Unfortunately, Mansa has the around-the-world movement bonus on his boats. This forces me to sail our boats back into Bangalore for healing, as Mansa has reinforcements arriving next turn.
IBT: Nobody attacks?
Turn 9 - 1795AD: Jute completes a Catapult and starts on another one.
Mansa makes a mistake! He sailed two of his Caravels around the horn towards Jute. He left one of his Caravels outside of Bangalore. I sail our 2 healthy Caravels out of Bangalore to bait his lone Caravel. We have 2 more Caravels at Jute, which will join the fray next turn.
I should also note that the defensive portion of our super-SOD is all but complete, except for our Medic. All that remains are the CR Macemen and the Catapults. Oh, and a couple of Knights; but I figured that we can pick up the Knights from Bombay as our SOD is passing by ...

IBT: Bizmark starts us off with a suicide Catapult. His Knight and Pikeman then charge screaming to their deaths. Mansa then suicides a City Raider II Catapult.
Peter has decided to join the party! He has 5 Catapults enroute to Bombay. All of them are Combat I, which probably means that he has not built a Barracks, yet.
Turn 10 - 1800AD: Delhi completes a Maceman and starts another one. Madras completes a Maceman and starts on our Medic Explorer. Bangalore completes the [pre-maturely built] Work Boat and resumes Caravel construction.
Unfortunately, Mansa did not take the bait this time. I sail our boats back into Bangalore to wait for the other two to heal. If we can get all of our boats together into a single SOD, they should be able to withstand any attack in a coastal tile. Once they have Combat II promotions, we can think about holding ocean tiles ...
I notice that Tokugawa has left a lone Knight in the field. I decide to teach him a lesson about why this is a bad idea. Unfortunately, the lesson did not go over well, as his Knight killed out Combat III Formation promoted Knight. We had 80% odds, which usually means a win ... One of our other Knights finishes the job and returns to the safety of Bombay.
Notes: Wow! What an intense set of turns! If I counted correctly (and I'm sure I missed some!), we had 59 kills versus 3 losses. Incredible! The AI managed only one coordinated attack. After that, there were not enough troops in and around Bombay to do any serious damage. The next person may not be so lucky. I count 38 units bearing down on Bombay. This is the most that I have seen during my turns. All of the longbows and maces are healthy, though, so that should help.

The defenders of Bombay! Especially our Medic!

As for our own Super-SOD, it is forming up nicely. As I noted earlier, the stack defense is mostly in place. Only the Medic and Knights remain. Now we just need to churn out the Macemen and Catapults! My best guess is that we will need another 10 turns of SOD building before it is ready to hit the road.
I did a break-down of the number of units that I killed during my turns. Of the 59 units that were taken out, over 30% were Catapults and 25% were Crossbowmen. I'm wondering if we shouldn't add a couple of Charge promoted Macemen plus another Cover promoted Crossbowman to our stack defense mix? Or maybe we should give the longbows Charge promotions rather than Drill?
On the demographics screen, we are still trailing the AI in troops. A look at the power graph is rather interesting. A few minor blips on the graph, but our opponents are not taking any serious hits.

And the save ...
2 Longbowmen (Drill II)
2 Crossbowmen (Shock)
2 Crossbowmen (Cover)
2 Macemen (Cover)
2 Pikemen (Combat II -> Formation)
1 Explorer (Medic)
2 Knights (Combat II)
2 Crossbowmen (Shock)
2 Crossbowmen (Cover)
2 Macemen (Cover)
2 Pikemen (Combat II -> Formation)
1 Explorer (Medic)
2 Knights (Combat II)
The Crossbowmen will provide the bulk of the defense, with the Longbowmen and Macemen providing support. Bombay has pretty much become useless as a production center. We should probably consider Woobi's suggestion of capturing a city as a buffer. I think St Petersburg, which was built on a hill, is the best choice. If we can take the heat off of Bombay, it would be a good source of hammers for future troop training. To that end, I would rather not chop any more forests around Bombay.
A look at the demographics and power graph show some disturbing news. If it wasn't for Peter, we would be dead last in troops. I guess it is good to know that he has not recovered from our earlier suppression efforts. Unfortunately, we really do not have an edge in any of the stats. The manufacturing number is at least average. That number would definitely change if we could get Bombay back on-line.
Munterpipe started work on building us a navy. However, it is not yet large enough to risk leaving the safety of the ports. For the time being, I am going to leave Bangalore and Jute on Caravel construction. If we can create a SOD of boats, we may be able to take control of our waters once again.
Objectives: Start building us a Super-SOD.
Turn 0 - 1750AD: I'm tempted to start this off by revolting to Theocracy. This would give our SOD an extra 2xp. Unfortunately, it is not enough for an extra promotion, but it would put most of them just one battle from a 3rd promotion. In the end, I really don't want to lose the 1 turn to anarchy ...
IBT: The cultural defense of Bombay is smashed to 0% by Capac. Mansa suicides a couple of cats against our Longbowmen. Mansa then suicides a couple of Macemen against our Longbowmen.
Turn 1 - 1755AD: Delhi trains a Maceman and starts on a Crossbowman. Jute constructs a Caravel and starts on another one.
The collateral damage from the 2 cats is taken care of by our Medic in Bombay. All 3 Knights in Bombay are still wounded from prior engagements. And, our Level 5 Longbowman is wounded from the 2 mace attacks; he needs 1 turn to heal, but has earned another promotion. This guy is absolutely amazing. He has City Garrison III and Guerilla I promtions already; which means that with the 170% bonus he could hold off a Grenadier! I decide to keep up the theme and give him Guerilla II.
Tokugawa has a couple of Knights in the open. I attack one of them with our Pikeman. He is now eligible for his 3rd promotion, Formation, and will be added to our SOD.
IBT: Tokugawa sends his remaining Knight past Bombay after our Worker. Fortunately, he cannot reach the Worker in 1 turn.
Then, the battle over Bombay gets ugly! First up, a Japanese Catapult suicides against our super LB. Then, a Japanese Knight gets 3 good licks in on our Super LB before dying. Then, Bizmark suicides a Catapult against another of our Longbowman, before sending in his Maceman to die.
Next up is Capac. His suicide Catapult does some damage to one of our City Garrison II Longbowman before being taken out. He then sends a City Raider II Catapult up against one of our Guerilla II Longbowmen. Then, he sends in a couple of Crossbowmen to die, but not before drawing some blood.
Mansa Musa's suicide Catapult is able to withdraw from combat before dying. But, at this point, all of our Longbowmen are wounded. Mansa's Crossbowman has a 20% chance of winning, but our Longbowman holds the city. Julius Caesar's suicide Catapult is going up against one of our Macemen. Then, Caesar's two Macemen inflict some damage to our wounded Maceman and Crossbowman. Caesar's Crossbowman has almost even odds against our defending wounded Knight. The Knight manages to prevail.
We killed 13 units without a single loss. But, a lot of damage was inflicted, especially to our Longbowmen. One of our Longbowmen is eligible for a promotion and gets a City Garrison III. Our wounded Knight is also eligible for his 4th promotion, so I give him Charge; hopefully he can start taking the heat from the suicide Catapults, thus freeing up our Longbowmen. (I would later realize that this was a wasted promotion. The longbows would continue to defend against the cats.)
Turn 2 - 1760AD: Madras completes a Forge and starts on a Crossbowman.
If the AI had committed all of their combined forces, Bombay probably would have fallen. Our only healthy defenders in Bombay are some Macemen. If JC and Bizmark attack next turn, they will be doing so with Crossbowmen.
I attack Tokugawa's Knight that is threatening our Worker. Our Pikeman is barely alive as a result. Next, I decide to do something about the AI stack sitting on the forest north of Bombay. This stack is being defended by a lone Pikeman. Our Maceman will have a 65% chance of defeating that pike. Then, our Woodsman II stack can move forward to claim this tile, hopefully for good.
A Shock promoted Maceman in Bombay has a 90% chance of taking out the Pikeman. Unfortunately, it took almost all of his health (0.3/8) to do it. It may have been a mistake to use one of Bombay's defenders, but it is too late now. Capac's 2 wounded cats easily fall to our woodsmen maces. And, we have now reclaimed one more of Bombay's tiles.
IBT: Bizmark did not notice what happened to Tokugawa's Knight that threatened our Worker. He sends his Knight around Bombay to do the same thing. Meanwhile, his Crossbowman attacks our wounded super Level 6 Longbowman. Our LB starts the battle with 72/100HP, but only has 7HP left before finally killing Bizmark's Crossbowman. We came close to losing that Longbowman!
Next, Mansa Musa suicides a Maceman against one of our Macemen. It was no contest, as we win without even a scratch. Lastly, Caesar sends in a City Raider II Catapult that gets a few licks in on our City Garrison III Longbowman before withdrawing from combat.
Turn 3 - 1765AD: Delhi completes a Crossbowman and starts a Maceman. Bangalore completes a Caravel and starts another one. Calcutta completes a Worker and starts a Pikeman.
Well, we managed to keep Bombay for one more turn! Unfortunately, our 2 best longbows are now wounded. We do, however, have 4 other healthy longbows and most of our Macemen are back to full health.
I use our last healthy Pikeman in Bombay to take out Bizmark's wandering Knight. Like the last one, he is severly wounded. Then, one of our Knights takes out a lonely, wandering and wounded Catapult.
Lastly, we are looking at 15 healthy units sitting on the hill overlooking Bombay. I decide to suicide one of our 2 Catapults that are in Bombay against this stack. The cat only does slight damage, but 4 of the damaged units are Crossbowmen. That will help if our maces have to do any of the fighting.
IBT: First up is Tokugawa who suicides a City Raider II Catapult. Then, our City Garrison II Longbowman defeats his Maceman. Huayna Capac then suicides a City Raider I Catapult against our wounded City Garrison III Longbowman. The cat is able to withdraw, unfortunately. Capac's other Catapult isn't so lucky, though.
Our Guerilla II Longbowmen finally see some action, as Julius Caesar steps up to the plate. We kill 3 of JC's Crossbowman in that action. For a last hoorah, Caesar suicides a City Raider II Pikeman against our Maceman.
In other news, 2 Crossbowmen and a Pikeman are trying to sneak around Bombay.
Turn 4 - 1770AD: Delhi completes a Maceman and starts on a Crossbowman. Madras completes a Crossbowman and starts on another one.
Meanwhile, 2 of our Workers begin construction of a fort on the recently captured forest tile north of Bombay. A Woodsman II Maceman fortified in a forest with a fort should be pretty well safe. I'm not sure who is responsible for the woodsmen promotions, but good job!
IBT: A lone Pikeman, under command of Huayna Capac, attacks this turn.
Turn 5 - 1775AD: Things were going so well, and then the unthinkable happens. We lose a Knight. We had 2 Crossbowmen sneaking around Bombay, if you recall. They also had a Pikeman with them, but he committed suicide on the IBT. I send our Level 5, Shock and Charge promoted Knight to attack. He loses even though he has a 96% chance of winning.
That is just not right. Our next Knight has a 97% chance against a wounded Crossbowman. Fortunately, he does the right thing and wins. Lastly, a Crossbowman finishes the job started by our first Knight.In other news, Tokugawa has left a lone Knight exposed in the open. I would prefer to attack the Knight with a Pikeman, but then our pike would be sitting defenseless in the open. Fortunately, we have a Formation-promoted Knight (with 75% odds) available for the job.
IBT: Mansa starts us off by suiciding a Catapult against our now-healthy Level 6 super-LB. He then suicides a Maceman against super-LB. Finally, his Crossbowman is able to get a couple of licks in before dying at the feet of super-LB.
Next, Caesar sends in a City Raider II Catapult. It has no chance of winning against our City Garrison III Longbowman, but does manage to scratch up the bow before dying. It's nothing that our Medic can't handle, though.
Turn 6 - 1780AD: Delhi completes a Crossbowman and begins a Maceman. Jute completes a Caravel and begins a Catapult.
Meanwhile, Bizmark has planted a couple of Knights on top of the horse tile south of Bombay. A bit of a sticky wicket is encountered as JC has left a healthy Combat II Maceman to protect the Knights from our Pikemen. I am going to have to risk leaving them for now.
IBT: Turns out the risk was a bad idea. Bizmark's 2 Knights pillage the road into Bombay and are still being protected by JC's Maceman.
Bizmark decides to suicide a City Raider II Catapult against our Super-LB. Then, Capac suicides 2 Catapults against our City Garrison III Longbowmen. He then sends in a lone Crossbowman to die. Last up is Caesar's City Raider II Catapult. It manages to withdraw rather than dying.
Turn 7 - 1785AD: Delhi completes a Maceman and starts a Longbowman. Madras completes a Crossbowman and starts a Maceman. Bangalore completes a Caravel and starts a Work Boat. Bombay completes a Pikeman and starts on a Forge.
We now have 4 Caravels in Bangalore. They each get a Combat I promotion and sail south towards Jute, hugging the coast line. Mansa has 3 Combat I Caravels, as well. Will he take the bait? Everybody's Caravels have the exact same strength, but the defender gets a 10% coastal defense.
First order of business is to get rid of Bizmark's 2 Knights and JC's Maceman. A Combat III (w/Formation) Knight is the only unit that will draw the Maceman as defender and still have odds (79%) of winning. It looked iffy for a moment, but our Knight won (3.2/10) in the end. This allowed our Pikemen to finish off Bizmark's two Knights. Unfortunately, it also left one of our pike's exposed in the open, since the road was pillaged.
Next, our Knights kill one of Capac's Macemen and one of Mansa's Crossbowmen.
IBT: Mansa takes the bait with 2 of his 3 Caravels. They do considerable damage, but our boats prevail.
Bombay's cultural defenses had grown to 30%, but Caesar bombs them back down to nothing. Then, our Level 6 super Longbowman earns his 6th promotion (Drill I) taking out Caesar's Crossbowman.
Turn 8 - 1790AD: Delhi completes a Longbowman and starts a Maceman. Calcutta completes a Pikeman and starts a Catapult.
Unfortunately, Mansa has the around-the-world movement bonus on his boats. This forces me to sail our boats back into Bangalore for healing, as Mansa has reinforcements arriving next turn.
IBT: Nobody attacks?
Turn 9 - 1795AD: Jute completes a Catapult and starts on another one.
Mansa makes a mistake! He sailed two of his Caravels around the horn towards Jute. He left one of his Caravels outside of Bangalore. I sail our 2 healthy Caravels out of Bangalore to bait his lone Caravel. We have 2 more Caravels at Jute, which will join the fray next turn.
I should also note that the defensive portion of our super-SOD is all but complete, except for our Medic. All that remains are the CR Macemen and the Catapults. Oh, and a couple of Knights; but I figured that we can pick up the Knights from Bombay as our SOD is passing by ...
IBT: Bizmark starts us off with a suicide Catapult. His Knight and Pikeman then charge screaming to their deaths. Mansa then suicides a City Raider II Catapult.
Peter has decided to join the party! He has 5 Catapults enroute to Bombay. All of them are Combat I, which probably means that he has not built a Barracks, yet.
Turn 10 - 1800AD: Delhi completes a Maceman and starts another one. Madras completes a Maceman and starts on our Medic Explorer. Bangalore completes the [pre-maturely built] Work Boat and resumes Caravel construction.
Unfortunately, Mansa did not take the bait this time. I sail our boats back into Bangalore to wait for the other two to heal. If we can get all of our boats together into a single SOD, they should be able to withstand any attack in a coastal tile. Once they have Combat II promotions, we can think about holding ocean tiles ...
I notice that Tokugawa has left a lone Knight in the field. I decide to teach him a lesson about why this is a bad idea. Unfortunately, the lesson did not go over well, as his Knight killed out Combat III Formation promoted Knight.
We had 80% odds, which usually means a win ... One of our other Knights finishes the job and returns to the safety of Bombay.Notes: Wow! What an intense set of turns! If I counted correctly (and I'm sure I missed some!), we had 59 kills versus 3 losses. Incredible! The AI managed only one coordinated attack. After that, there were not enough troops in and around Bombay to do any serious damage. The next person may not be so lucky. I count 38 units bearing down on Bombay. This is the most that I have seen during my turns. All of the longbows and maces are healthy, though, so that should help.
The defenders of Bombay!
Especially our Medic!
As for our own Super-SOD, it is forming up nicely. As I noted earlier, the stack defense is mostly in place. Only the Medic and Knights remain. Now we just need to churn out the Macemen and Catapults! My best guess is that we will need another 10 turns of SOD building before it is ready to hit the road.
I did a break-down of the number of units that I killed during my turns. Of the 59 units that were taken out, over 30% were Catapults and 25% were Crossbowmen. I'm wondering if we shouldn't add a couple of Charge promoted Macemen plus another Cover promoted Crossbowman to our stack defense mix? Or maybe we should give the longbows Charge promotions rather than Drill?
On the demographics screen, we are still trailing the AI in troops. A look at the power graph is rather interesting. A few minor blips on the graph, but our opponents are not taking any serious hits.
And the save ...
ruff_hi
Live 4ever! Or die trying
Great report. I think the most serious question we have is what promotion to select next for SLB.
Roster
Conroe - building a fort - first time ever reported in a SG!
colony - up
Ruff - on deck
Munterpipe
Woobi - MIA?
Roster
Conroe - building a fort - first time ever reported in a SG!
colony - up
Ruff - on deck
Munterpipe
Woobi - MIA?
<lurker comment>
Drill, all the way. No question about it. In fact, I would start giving your other Longbows Drill after the third defense promotion or so, rather than the fifth. The thing about Drill on your top city defenders is that not merely does it improve their odds of winning the fight, which from that consideration alone it probably does better than a specific anti-unit promotion, but it also *vastly*, and I mean vastly, imcreases the odds of winnilng with less damage taken so you can fight again and again with the same powerful unit. At the extreme, ewith Drill IV, you have better than half odds of taking no dmage at all, assuming you've got some defense promotions and a city on a hill too.
I'll put up a screenshot of a *really* silly longbow from a Marathon Hub AW game later.
Garath
ruff_hi said:I think the most serious question we have is what promotion to select next for SLB.
Drill, all the way. No question about it. In fact, I would start giving your other Longbows Drill after the third defense promotion or so, rather than the fifth. The thing about Drill on your top city defenders is that not merely does it improve their odds of winning the fight, which from that consideration alone it probably does better than a specific anti-unit promotion, but it also *vastly*, and I mean vastly, imcreases the odds of winnilng with less damage taken so you can fight again and again with the same powerful unit. At the extreme, ewith Drill IV, you have better than half odds of taking no dmage at all, assuming you've got some defense promotions and a city on a hill too.
I'll put up a screenshot of a *really* silly longbow from a Marathon Hub AW game later.
Garath
Got it, I'll try to play tonight, although it may have to wait until tomorrow.
So apart from holding Bombay and building up our SoD is there anything else?
For unit promotions I'm not sure about Charge, Catapults are weak anyway, so a Combat promo might help almost as much against them, but also be useful against all units. I agree with Garath about Drill too. First strikes make a lot of difference, mainly in terms of the number of turns spent healing, and on flat ground outside a city is probably the most useful promo for Longbowmen (as long as there are Pikes to defend against the Knight)
Munterpipe
Clums
Agree. Charge will be quite useless as it doesn't reduce the colatteral damage.
Great report, Conroe.
How do you manage to keep track of everything during the IBT attacks?
Edit:
Another thing to consider in this situation, with Bombay being on a hill, is taking guerilla over garrison for some of our longbows. The bonus is about the same if I recall right, and the guerilla bonus could obviously be useful on hills outside the city as well.
ruff_hi said:Conroe - building a fort - first time ever reported in a SG!

First time, huh?
 Can't say that I've ever built that many, myself. The only reason that I even considered it was that Firaxis allowed us to build them in forests with this last patch.
Unfortunately, I do it the hard way.Munterpipe said:How do you manage to keep track of everything during the IBT attacks?
I look through the log at the start of each turn. The autologger would probably make this an easier job, but I don't have it installed. After looking at some of Ruff_Hi's changes, though, I'm thinking of finally trying it out.Somebody already did that. We have 3 Guerilla II Longbowmen in Bombay. The problem is that they don't see much action since the game will always select the City Garrison bows before the Guerilla defenders. They do provide a nice safety valve, of course. Actually, with SLB in Bombay, even our City Garrison units don't see much fighting.Munterpipe said:Another thing to consider in this situation, with Bombay being on a hill, is taking guerilla over garrison for some of our longbows. The bonus is about the same if I recall right, and the guerilla bonus could obviously be useful on hills outside the city as well.