Situation Assessment: The map looks pretty much the same as the last time I played. A bunch of bad guys are descending upon a heavily defended Bombay. Even though we lost our first Super Longbowman (SLB), I see that he has been replaced with another one. This SLB has City Garrison III and Drill III promotions.
I also notice that our navy has been pretty much wiped out. We are down to 2 Caravels, although one of them has a Combat II promotion. I'll have to see about building this back up to protect the fishing nets that have been thrown out since I last played.
I also see some of our cities are starting to get some war weariness. Nothing too much, but we may have to start messing with the culture slider at some point. The construction of Theatres and Temples would help, but I need to concentrate on building us a SOD. I will see about using the

to turn some of those angry faces into hammers.
Objectives: Start building us a SOD!
Turn 0 - 1860AD: Change Delhi from a Catapult to a Pikeman.
IBT: One of Bombay's Pikemen whacks a Japanese Knight without even breaking a sweat.
Turn 1 - 1862AD: Delhi completes a Pikeman and starts another one. Madras completes a Catapult and starts a Longbowman.
One of our formation-promoted Knights whacks one of Tokugawa's Knights.
IBT: Tokugawa bombards the defenses of Bombay back down to 0%. Bizmark then suicides a couple of Catapults against our SLB Longbowman. After losing a couple of Knights to our Pikemen, he decides to give up.
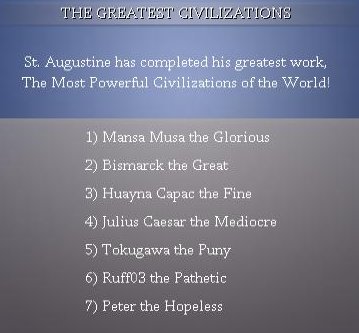
And, according to St Augustine's list of most powerful nations, we are pathetic!
Turn 2 - 1864AD: Delhi completes a Pikeman and starts another one. Madras completes a Longbowman and starts another one. Bangalore completes a Catapult and starts a Longbowman.
And then I pull a Gerald Ford move. With an errant mouse click, I suicide our most highly promoted Knight against one of Mansa's Pikemen.

I was trying to take a look at the SOD on the hill overlooking Bombay, and instead attacked it!

What's that old saying about stupidity kills?
IBT: The AI hits us with a huge coordinated attack. And we take some loses. First up is Tokugawa. Our Pikeman takes a couple of scratchs before defeating his Knight.
Next up is Bizmark with a large force. He starts off with a suicide catapult that is easily dismantled by our SLB. This is followed by 2 more Knights that get in a few licks on SLB. Bizmark's next Knight is killed by one of our Pikemen. But, his next Knight (0.8/10) manages to kill one of our Pikemen, despite our 80% odds of winning the battle. Finally, one of our formation-promoted Knights is able to whack Bizmark's final Knight.
Next up is Huayna Capac and his four, count 'em 4, suicide Catapults. The fourth cat was able to withdraw before being killed. Capac's first Knight is slain by our last healthy Pikeman. But, his next Knight slays, nay slaughters, our healthy Crossbowman. We had 70% odds in that fight. Capac finishes up with a Maceman that is defeated by one of our Longbowmen.
Mansa Musa makes a light-hearted attempt at an attack. He suicides a Catapult and then sends in a Pikeman. Both are slaughtered by our Longbowmen. Julius Caesar concludes with a suicide Catapult and 2 Crossbowmen. All 3 are killed.
Total carnage: we lost 2, they lost ...

a bunch.
Turn 3 - 1866AD: Delhi completes a Pikeman and starts another one. Bombay completes a Knight and starts another one. Jute completes a Catapult and starts a Caravel.
IBT: Tokugawa starts us off with a suicide Catapult that withdraws before being defeated. He follows that up with a Knight that gets a few hits on our Pikeman before the pike takes him out. Tokugawa's last Knight is slaughtered by our Longbowman. He then sends in a Knight to die at the hands of our Longbowman, but not before doing considerable damage to our longbow. Our Pikeman receives quite a few blows before killing Tokugawa's other Knight.
Meanwhile, Bizmark decides to get cute and sends a wounded Knight around Bombay. Unfortunately for him, this is where our new SOD is being staged.
Meanwhile, off the coast of Jute, Caesar's Combat II Caravel has only a 30% chance of sinking our Combat II Caravel. JC is able to overcome the odds and we are down to 1 boat.
Next up is Capac, who sends in 3 suicide Catapults. Only one of them is killed, as the first two withdraw from combat.
Turn 4 - 1868AD: Madras completes a Longbowman and starts on a Crossbowman.
Our last remaining Caravel finishes off the wounded Roman Caravel before high-tailing it out of there. Unfortunately, Mansa has 2 healthy Caravels, with his circumnavigation bonus, in range of our still healthy Caravel.
Back in Bombay, Bizmark has left some Knights out in the open. The first one is attacked by Bombay's only healthy Pikeman. We had a 77% chance of winning the fight; instead, our pike was slaughtered! I give a slightly wounded Pikeman a Combat III promotion to go along with his formation promotion and send him in next with 84% odds. I didn't think he was going to survive the fight, but he managed to kill that Knight. Next, a formation-promoted Knight has 79% odds of winning; but he is also unable to do it. Having just lost 2 units, I'm thinking of giving up on this small stack! I really hate my RNG! But, so far all I've managed to do is promote Bizmark's Knights, so I've got to take them out. I send in another formation-promoted Knight. He has 95% odds against a slightly wounded Knight, yet he is barely able to survive! At least we are now 2 for 2, though. The last Knight that I send in has 100% odds against Bizmark's critically wounded, remaining Knight. Guess what? Our Knight is critically wounded and barely manages to survive the encounter.
Lastly, I reinforce Bombay with a couple of troops from our SOD stack.
IBT: Tokugawa starts us off, as usual, by sending in a Pikeman to be slaughtered by SLB. Tokugawa's other Knight manages to overcome our 80% odds and slays one of our Guerilla II Longbowmen. Finally, the attack ends with Huayna Capac providing some more xp for SLB. SLB is now 2xp away from his 7
th promotion.
Turn 5 - 1870AD: Delhi completes a Pikeman and starts another one. Bangalore completes a Longbowman and starts a Crossbowman. Calcutta completes a Longbowman and starts a Catapult. Jute completes a Caravel and starts another one. Lahore also completes a Caravel and starts another one.
Capac has left a couple of Knights out in the open; they are covering Tokugawa's wounded Knight, the one that killed our Longbowman. While I would love some revenge, I don't trust my RNG enough to attack.
IBT: Tokugawa starts off with two suicide Catapults that are slaughtered by our Longbowman. He then suicides a Knight against one of our Pikemen in need of a promotion. Capac's next Knight almost kills that same Pikeman. His last Knight, though, has only a 10% chance to win against SLB Jr, who has both Guerilla II and Drill IV promotions. Capac's Knight overcomes those odds and Jr is slain!
Next up is Mansa, who suicides a City Raider I Catapult against SLB. Unfortunately, the cat is able to withdraw from combat. Mansa's Maceman isn't so lucky, as he is slaughtered by SLB. For some odd reason, though, SLB manages to only acquire 1xp during these engagements.
Finally, of the coast of Jute, Mansa sends a Combat I Caravel against our newly promoted Combat II Caravel. After taking heavy damage, we manage to sink Mansa's Caravel.
Turn 6 - 1872AD: Delhi completes a Pikeman and starts another one. Madras completes a Crossbowman and starts another one.
Mansa left one of his Combat II Crossbowmen all alone out in the open. Our Combat III, Shock promoted Knight
has had 99% odds to whack the Crossbowman.

My RNG killed our Knight! I send another Knight in to finish the job, so the Crossbowman does not get a promotion. I am sorely tempted to attack some other Knights hanging around; but after losing a 99%'er, I'm a bit gun-shy of my RNG!
IBT: Tokugawa gets lucky, as his suicide Catapult withdraws from combat. His Knight goes after SLB pretty hard, but SLB manages to win the day. One of Bizmark's two suicide Catapults also manages to withdraw from combat. Bizmark's lone Knight, though, is no match for our Longbowman. Our Longbowmen also take out Bizmark's Crossbowman and Pikeman.
Next up is Mansa Musa with two wounded suicide Catapults that get slaughtered. They do cause collateral damage, though. Our Longbowmen defeat the two Macemen that Mansa sends in next. And, his Pikeman does not stand a chance against our Maceman.
Meanwhile, off the coast of Lahore, one of our Combat I Caravels sinks Mansa's Combat I Caravel.
Turn 7 - 1874AD: Lahore completes a Caravel and starts another one. Meanwhile, our Caravel sails into Lahore for healing, as Mansa's Caravel fleet is in range.
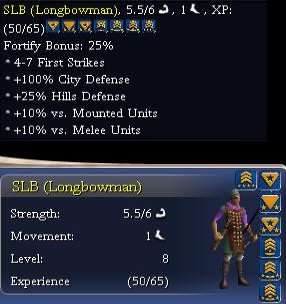
And the news of the day is SLB gets his 7
th promotion! It's a Drill IV. He gets a minimum of 4 first strikes against everything but Knights (they are immune to first strikes).
Meanwhile, one of Capac's Knights is attempting to sneak around Bombay. As the Knight is wounded, it should be some free xp. Our Knight barely survives the engagement.
IBT: Tokugawa suicides a Crossbowman against SLB. Four first strikes and he's dead!
Next up is Bizmark. He sends a lowly Combat II Knight up against our 100% healthy, Combat III, Formation-promoted Pikeman, who has a 25% fortify bonus, 25% hill defense bonus, and a 25% cultural defense bonus. Even though our guy has a 96% chance of winning, we lose a valuable Pikeman.
My RNG is faulty, I tell you!
After Bizmark's Knight attacks, he bombards our cultural defenses down to 10%.
Capac is up next with a suicide Catapult. He then loses a Knight to our Pikeman before sending in a City Raider II Catapult to die. Capac then flails a Knight onto our Pikeman. SLB then uses his first strikes against Capac's Maceman and Crossbowman. Unfortunately, they bite back leaving SLB severly wounded (2.7/6).
And pulling up the rear is Mansa Musa, who suicides a City Raider II Catapult.
Turn 8 - 1876AD: Delhi completes a Pikeman and starts a Crossbowman. Madras completes a Crossbowman and starts another one. Bangalore completes a Crossbowman and starts another one. Jute completes a Caravel and starts another one.
Bizmark has a couple of Knights that are trying to sneak around Bombay. I don't have a choice but to whack them. I decide to give our Pikemen in our SOD some experience, and earn them a Formation promotion. Unfortunately, that move leaves one of the pikes wounded and vulnerable in the open. I am forced to take out a Maceman and Crossbowman, belonging to Caesar, that is sitting atop of Bombay's horse resource. Fortunately, my RNG cooperates this time.
IBT: Tokugawa manages a single suicide Catapult this turn. It died. Bizmark's attack was not quite as lame, but close. He sends in a suicide Catapult, followed by a critically wounded Knight. His Combat I Maceman was at least healthy; well healthy when the battle started, he's dead now. Mansa Musa could only manage a suicide cat, but it withdraws from combat. Julius Caesar's suicide cat also withdraws from combat. His City Raider I Pikeman does a bit of damage to one of our Longbowmen, but our bow does prevail.
Turn 9 - 1878AD: Delhi trains a Crossbowman and starts on another one. Calcutta completes a Catapult and starts on another one.
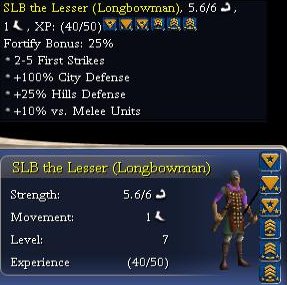
A Level 6 Longbowmen has earned his 6
th promotion and is renamed
SLB the Lesser. He is given a Drill III to go along with his City Garrison III promotion.
It looks like we have quite a few Knights heading towards Bombay. Bombay is down to 2 Pikemen, and they are both wounded. I decide to reinforce the city with 2 Pikemen from our SOD. We will need to train a couple more to replace them in our SOD.
I sail a couple of our Caravels out of Lahore in an attempt to lure Mansa to attack. We'll see if he takes the bait. I make sure to keep them out of range of Tokugawa's Combat III Caravel, though.
IBT: Tokugawa chooses not to attack this time around, so Bizmark starts us off with a Knight. His Knight does quite a bit of damage to SLB the Lesser before Les is able to subdue him. With 29/100HP left, Les may be sitting the rest of this turn out.
Capac is up next with a City Raider II Catapult that suicides. Capac's second suicide Catapult manages to withdraw from combat. Capac uses his last Catapult to bombard Bombay's cultural defenses to 0%. Capac then loses a Knight to a Combat II Pikeman. Capac's next Knight goes up against our Shock-promoted Maceman; we had at least one more healthy pike, so I'm not sure why our mace was chosen. We probably should have lost that one, but we got lucky and killed the Knight.
Mansa is up next with a Maceman. The mace draws SLB, who is at 3/4
th strength. The mace reduces SLB to half strength before SLB kills him. Mansa's last hoorah is a Pikeman that just gets slaughtered by one of our Shock Macemen.
Caesar begins his turn by sacrificing a wounded cat. Caesar's first Maceman dies to our City Garrison I Longbowman. Caesar's next Maceman is Combat I ready and has even odds against our half-strength SLB. SLB puts 3 of his first strikes on the money, but then goes down for the count.

I'm not even sure why SLB was fighting, because we had Shock-promoted Macemen and at least one City Garrison II Longbowman available. I find it hard to believe that they had worse odds than a half-strength bow! Please bow your heads for a moment of silence -- SLB may you rest-in-peace!
Next, Caesar sends in a Combat I Crossbowman that has 8% odds against our Combat II Knight. Guess what? We lose another Knight.
I hate my RNG!
Turn 10 - AD: Lahore completes a Caravel and starts on another one.
Notes: Another intense set of turns is over. And frankly, I am exhausted. Unfortunately, I don't have a kill ratio to report, because I lost count somewhere along the way. The executive summary is available, though. We lost more than I would have liked, and they lost a whole lot more.
I managed to build us up a navy of 6 Caravels, with 2 more in production. I also started working on our SOD. I'd probably have had more of the stack defense units trained if I hadn't had to pull some out to reinforce Bombay. The last set of turns that I played, I was just seeing a ton of Crossbowmen. This time around, I didn't see that many Crossbowmen, but I did see a lot of Knights. I'm thinking we should probably add another Pikeman to the list of stack defense units in my earlier post. Units remaining to be built:
1 Maceman
4 Crossbowmen
3 Pikemen
3 Knights
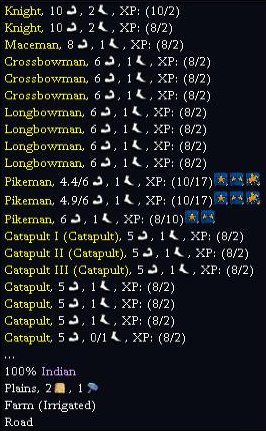
And, here is a shot of our SOD, thus far:
Of course, this does not include the CR Macemen and Catapults to be used in the actual city assaults. I did build a few cats out of our low-hammer towns, but I concentrated on stack defense units primarily.
And, lastly, the save ...

")