SGOTM 17 - The Shawshank Redemption

For the record, my vote is:

Worker 1NW, upload screenshot and decide where to go next. Move worker again based on discussion before moving settler.

If nothing interesting found by the worker's next two moves, move the settler W+W.
 
I'm going offline now. I am ok with you moving all units one more time, if you get a consensus, as long as you don't settle any cities.
 
Another thing I want us to consider is that if we're looking to move west with the settler, then exploring SE-SW with the worker doesn't delay the settler in his westward journey at all and would get the worker to the pig the same turn that NW-NW does (one turn later than NW-W or NW-SW).

LowtherCastle said:
3. If we don't send the archer SE and we do settle on the archer we might make it impossible to get some valuable seafood in our BFC of another city. At this point we don't know if resources are at a premium or not. Even if there's just one seafood to go with the pigs, that's far better than on the archer, imo, even settling 3-4 turns later (or is it?), because our capital could easily do 20bpt or more.

If there's gems or seafood down there and we don't settle them but other teams do, we're a long way behind.
 
What could be in the two fogged tiles to the SW SE that would be game-changing if we missed them? That location will have poor food pre-Calendar and no production (zero hills) from what we can see.

We already said that our capital is going to be fairly lame so an academy is likely not in the cards. So whatever is down there can be had with our second or third city. Putting our capital there is really going to kill our REX with only 1, 2 or 3 chops and no hills. Even if there are pigs and gems (or pigs and copper) in the fog (which I highly doubt), would that be enough to make it worth settling our capital in the far corner of the map? If not, then I think we can ignore the SE until later.

If we're going to explore with the worker, I'd rather move him NW than SE.
 
Sorry if my post above wasn't overly clear - the two sections were about separate issues.

The SE-SW worker moves question was simply to get the team to consider this possibility as the only way we're likely to defog those tiles for likely around 30 turns.

The second portion was agreement with LC that even though we want the pigs, committing to settling where the archer stands now for our capital location feels sub optimal, and that we might be better off exploring more fully around the pig before committing.

For the record from the posts so far:

Dhoomstriker - wkr NW
Mitchum - wkr NW
LowtherCastle - wkr NW (suggested in a series of moves)
ingentingg - wkr NW
Jastrow - wkr chop
mscellaneous - wait
ZPV - wkr loop around to the northwest (impression)

I'd like to give the team some time to look at the save before doing anything (seeing as how I only uploaded it this morning and not last night) but the majority appear to support worker to the NW and pausing again to see what we can see, see, see.
 
Jastrow said:
I would rather use the 3 spare worker turns to chop a forrest (into a granary, most likely, but maybe in a settler)

I think Jastrow's idea was not to move the worker NW but instead to move him SW+W to the banana tile so that he could quickly hop on a forest and chop it. Please correct me if I'm wrong...
 
You're right (corrected above) - I read the "I agree" with respect to your post, but on re-reading didn't clearly take in what the "except the last part" referred to!
 
I think Jastrow's idea was not to move the worker NW but instead to move him SW+W to the banana tile so that he could quickly hop on a forest and chop it. Please correct me if I'm wrong...
Perhaps he meant something else. Moving the Worker SW G + W western G Banana actually requires 1 additional turn relative to moving the Worker NW G + SW G For to start Chopping a Forest, and would require the same number of turns to get to other Forests in the west.

The only other Forest that we'd be closer to would be the GH For, but I'm not particularly keen to Chopping it first. Having that 2-Hammer square helped when we wanted a bonus Hammer for building a Settler by working a G For + a GH For square. Given that we could have the G Pig square, this approach may not matter, but it seems like it would be a stronger play to Chop a GFor (compared to Chopping a GH For square), since we won't really have time to Chop and Mine a GH For in the short term.


Okay, I can give up on the idea of parking the Archer on the G Pig square. However, in order to get a City with Seafood + the Pig, we'd be settling on Turn 3, with us pretty much committing to moving down the peninsula with a Settler on Turn 1.

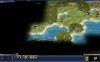
In addition, I dispute the claim that we could accidentally mess up a Seafood Resource by settling either NE + E of the G Pig or 1NE of the G Pig, since the screenshot appears to show a square of land SE + SE of the G Pig that could still be settled for any hidden Seafood.

If we honestly believe that a Pig + Coastal Fish location will exist down there, such that we'd want a Pig + Moai location down there, why not just settle on the G Banana and build a reasonably-fast Settler for that southern peninsula area?


At some point soon, we're going to have to commit to sending the Settler in a particular direction, be it toward the G Pig or be it toward the north-west where the Scout is located. I've seen nothing compelling revealed by the Scout yet... and no sign of Hills are on the horizon, either, which we would have been able to see since there aren't Forests blocking our view.


What would then make us want to move the Archer 1SE to the GHFor next? Only a Seafood Resource appearing 3S of the western G Banana, in my opinion. If the Settler moved 1W Grassland Banana + 1SW Grassland (1SE of the western Lake), we would reveal that square. Then, you wouldn't need to worry about missing a Seafood Resource in our capital, although we could get it later anyway, as I said above, with another City, even if there was a Seafood Resource there. Of course, if another Crab Resource appeared 3S of the western G Banana and you still did not think that settling 1SW of the western G Banana (1SE of the western Lake) would make for a good capital, then I'd say that we shouldn't even bother to reveal that square now.


Moving the Archer 1NW GFor does give us slightly more info than moving him 1W GFor, but only if we don't plan to move the Scout W + SW.


Also, the Scout could be just as easily used to prevent Jungle growth on the G Pig if the reason for not wanting to park the Archer there was so that we could get to work on Worker-stealing.


What would we have to reveal to the north with the Worker or to the north-west with the Scout to justify not settling by the G Pig with our capital? There's a Lake, a G Banana, and a GH square to the north and literally just Grassland Forests to the north-west so far.


If we really are okay with committing one Worker action to exploring, why not send the Worker 1NW Grassland + 1NE GH? It would take us just as long to get to the G Pig square as 1NW Grassland + 1NW GFor with the Worker. We'd reveal more squares by going NW + NE and the square that we wouldn't reveal compared to going NW + NW is a G For, so its chances of containing a Resource are relatively small.


I'm still fine with moving the Worker 1NW Grassland and reuploading a paused saved game. When I get some time later this evening, I'll try and use fog-recreating to see if I can discover anything more about our starting area.
 
Mini PPP to gain specific feedback on proposed moves:

T0: Worker NW, pause and upload for discussion/feedback.

Based on this revealing nothing significant (by team consensus), the following actions would be planned:

T0: Worker NW again (pause and upload if anything significant revealed)
T0: Revolt to Slavery
T0: Settler W, SW

Stop and upload to discuss.

The following is a rough T1 plan to guide discussion.
T1: Archer 1SE - pause to upload and discuss.
T1: Scout 1NW - pause to upload and discuss
T1: Scout ?? - depending on what is revealed
T1: Settler ?? - depending on what is revealed
T1: Worker ?? - depending on what is revealed

Also, as the majority of you seem to be in an opposite time zone to me, I have no objections if to keep the game moving in the beginning where there's lots of 1 move, upload, discuss, that someone else swaps in.
 
chopster said:
T0: Worker NW again (pause and upload if anything significant revealed)
I would probably prefer to move the Worker NE GH instead, unless a Forest or Jungle will block our view from the Hills square, as we'll then see all of the same squares minus one G For square (and possibly minus a distant Hills square that would otherwise be revealed) in exchange for seeing more squares being revealed and without delaying us arriving at the G Pig any more than moving NW + NW would delay us arriving on the G Pig.


chopster said:
T0: Settler W, SW
...
T1: Archer 1SE - pause to upload and discuss.
As far as I am concerned, the most relevant water-based square is 3S of the G Banana. To reveal it, we would only need to make one of these moves.

Obviously, if the Worker were to reveal something interesting that might cause us to consider settling northward, the Settler will be far less likely to go W + SW. But, if the Worker finds nothing, sending the Settler W + SW frees the Archer to head westward, which both puts him on the path to stealing a Worker and on the path to revealing more land around the G Pig square.


chopster said:
T0: Settler W, SW
...
T1: Scout 1NW - pause to upload and discuss
If we're sending the Scout NW, to me that implies that we'd be looking for somewhere else to settle in that direction, in which case moving the Settler W + SW would put the Settler far out of position. So, it's probably one or the other out of these two moves.
 
I think Jastrow's idea was not to move the worker NW but instead to move him SW+W to the banana tile so that he could quickly hop on a forest and chop it. Please correct me if I'm wrong...

Sorry, I was not clear...

I am suggesting worker 1 move NW, and look at the sreenshot.

The chop comment was in response to us have several extra turns to explore before the pig enters the borders. IF we decide to build the captital where the Archer now is, then we can start forrest choping "on the way to the pig".
 
Looks good, chopster :)
 
OK, enough time has passed and the theme still appears to be worker 1NW and post.

GOT IT and making that move now.
 
REAL SAVE LINK

Moving the worker NW revealed two grassland elephants:

Spoiler :
attachment.php


Zoomed in pictures of the North and the SW for reference:
Spoiler :
attachment.php

Spoiler :
attachment.php


2NE of the worker and both 2N and 2N1E appear to be jungle.
2N1W of the worker appears to be grassland.
2N2W of the worker appears to be forest.

3S, 3S1W and 3S2W of the archer appear to be jungle.
3S1E of the archer is coast.
 

Attachments

  • T0 North0000.JPG
    T0 North0000.JPG
    312.1 KB · Views: 182
  • T0 SW0000.JPG
    T0 SW0000.JPG
    249.1 KB · Views: 114
  • SGOTM17 wkrNW0000.JPG
    SGOTM17 wkrNW0000.JPG
    234.1 KB · Views: 151
Don't worry about the old links.
We've just found our killer units. :ar15:
 
After studying the REAL SAVE:

1. Settling on the archer does NOT block access to any seafood tiles.

2. The jungle grass tile 2S of the archer is on a river. There are 3 jungle grass tiles S, SW, and1S2W of that tile, two straddling that river. That means we could settle our capital on a river and include the pigs on T3 or T4. That capital would have at least two (jungle) river grass tiles for building cottages. The T3 capital would have 2 forests that we know of, the T4, none that we know of.

Notes:
1. Kcd said after SG16 that he tried to make all settling possibililites roughly equivalent. My guess is he worked hard to do that again, with the notion that the more possibilities, the more variety between the teams. What you sacrifice settling later you might gain back in strength of capital, or you might not.
2. We don't know how far north or south we are. The "peninsula" might not be a peninsula at all.
 
I'm heading to bed now, so I'm fine if someone else wants to take the reins while the majority of you are awake.

My gut still says worker NW even though NE would likely reveal more tiles.
 
ELEPULTS!!!

Some thoughts:

Techs:
I no longer have any interest is IW. There is not that muc jungle yet, and we have archers for early defense, and cats-n-pachs for later. I also dont like Alpha, since I think we will likely get mostly religious techs to trade for. So, I am for Math first. CoL would be my second choice.

The South east:
I dont want to waste any time looking into the SE. There is nothing that could be there which would make me settle there. It is on the edge of the map, and would increase maintenance... And there are no really better tiles than bacon. If something is juicy is there, we can alwys back-fill it.

Settling:
I am thinking of 1NE of the pigs... That would get the pigs in the first ring, and thus get it on0line about 4 turns earlier. It gives up the banana, and we would need to make sure there is another tile in the west of some value, but it might well make sense.

City2:
On or near the elephants could make a lot of sense, but of course we will know way more before having to make this decision.

Timing (If we settler 1E of pig)
This of course assums there is at least one resources somewhere to replace the banana, but lets pretend that for the minute.

T0:
-Revolt slavery
-Settler W-SW
-Worker: 1W (Not 1NW, that costs a turn of pigs!)

T1:
Scout: W-SW, to see if there is anything making settling NE of pig correct.
Settler W-W
Worker SW-S
Archer (SE) -land bridge


T2:
Settler founds NE of pig.
Worker SW-W (into city)

T3:
Worker SW and starts pasturing!
 
What are our priorities? I think something like this:
1) Find a "good enough" capital site ASAP. Then settle it.
2a) Uncover other nearby city sites, so we can work out the best way to develop the land.
2b) Do some initial development on the capital.
3a) Explore further out, to meet AIs and make a long term plan for killing them all.
3b) Develop the land.

I don't consider defaulting to Pig-NE as meeting priority 1.
However, it does mean that we need to use the scout to uncover the BFCs near the pig, even though we double-explore a few tiles, because it is faster.
It also tells us to look down what I'll now call the isthmus with the archer, and plan to be able to settle either direction from the pig.

That means the elephant area is left for the worker to explore. We can waver between possible faster pig improvement, or exploring that area. Personally I'd take advantage of the short window before panthers start spawning because it will be harder to explore in turns 10+.
 
Back
Top Bottom