Entry class: Contender
Game status: Cultural Victory for Russia
Game date: 1740 AD
Base score: 1422
Final score: 8153
I began by moving my Settler 1 square East, for several reasons. I did so in order to start beside the Oasis, to sit on and use up the otherwise useless Desert square, and to be able to use the Desert Hills square on which we started. A Desert Hills square only yields 3 Hammers when mined, so I normally ignore this kind of a square, but I ended up having to use it a lot during the course of the game, for lack of a better square.
I built a Worker first, followed by a Warrior. Then I built two Settlers--the first one for one of my Legendary-to-be cities and the second one in order to obtain Marble within my cultural borders. This second city, which I assumed would be a relatively marginal city, proved to be a very useful core city. This city brought in a lot of my Commerce throughout the game, as it had several Grassland and Coastal squares available for usage. Further, this city was not a major burden to my empire, as it was placed very close to my capital.
My research path went as follows:
Agriculture -> Animal Husbandry -> Pottery -> Writing -> Mathematics -> Mysticism -> Masonry -> Polytheism -> Priesthood -> Bronze Working -> Metal Casting (from The Oracle) -> Code of Laws -> Monotheism -> Theology
Later, I was the first to research Music and the first to research Liberalism. I took the classic Nationalism tech as my free tech for being the first to research Liberalism.
I built The Oracle on Turn 51/320 (965 BC), at the same time that Stonehenge was built by an AI. I'd missed out on completing Stonehenge by one turn. Still, since I built many of the other early Wonders, I really didn't miss Stonehenge very much.
I was able to build the Great Wall, which became a very useful Wonder for my build order. I ended up building very little military at the start of the game.
Later on, when an invasion of two Swordsmen landed, I only just completed a Maceman on that very turn in an otherwise undefended city. I waited a couple of turns to attack the invaders, until I had a Chariot arrive, in order to better support my city. Essentially, I waited to avoid losing my city due to a bad random number generation roll (i.e. in case my Maceman dropped his Mace and fell on it). Perhaps, instead, my Maceman may have captured both swords of the Swordsmen using his mace, drawn the swords away from the Swordsmen towards himself, but then accidentally skewered himself with one of the swords. Either way, my caution allowed me to keep my city at the loss of a single upgraded Cottage (the Cottage was probably upgraded to a Village at that point).
Since I went for a Cultural Victory, here are the dates of when the various religions were founded:
I'd never played an Always War game prior to this one. As per a couple of practice games, up until about 1000 BC, I discovered that the declaration of war would be made as soon as contact was made, without any diplomacy at all--not even a promise of putting someone's head on a pike. Therefore, once I figured out which part of our starting area was the isthmus, I avoided exploring it as much as I could.
Thank you, Ronnie1 and greatbeyond, for the practice maps!
I'd also tried to avoid settling cities at the far West and at the far East of our hub. It was pretty clear from seeing the edge of the top of the map that we were in the North. By the shape of the land, it looked like we were on the "top middle" hub. Learning Calendar later confirmed this point for me, since I'd missed finding out early on in the game, when I failed to build Stonehenge.
Interestingly, a Barbarian city spawned on my isthmus. I deliberated how to handle the situation for quite some time and I kept rethinking the issue throughout my game.
I chose to leave the Barbarian city where it was, in the hope that the AI would avoid the city and thus, would avoid making contact with me. It wasn't long before my culture allowed me to see the square immediately to the South of the Barb city, within the city's borders. For quite some time, however, the squares to the South of the Barb city's 1-square-wide cultural radius were hidden from me within my fog of war.
Possibly as a result of the existence of the Barb city, here are the dates of when I made contact with and hence, declared war on the AI:
At first I assumed that the Japanese must be one of the AI closest to me. Later, when I discovered that they were nearly at the opposite end of the map, I realised that they must have come up my isthmus, had their unit (a Warrior?) taken out by a Barb Warrior from the Barb city, and met me without leaving a visible trace when it was my turn. Perhaps I would have seen the event if I had not disabled the displaying of AI moves in the game options, but disabling this option seems to be required in order to keep the pace of the game flowing. I'm certain that many of you also have this game option disabled, especially after having read about the tales of hordes of units which besieged your empires.
So, as to whether or not the presence of the Barbarian city helped is unclear. Since my cultural borders allowed me to see the square to the South of the Barb city, an AI, such as the Japanese, could still meet me, as long as they were willing to walk inside of the Barb city's borders. Later, as my culture imposed itself upon the squares immediately to the North of the Barb City, an AI needed only to walk within one square outside of the Barb City's 1-square-wide cultural radius, in order to meet me.
It's hard to say, but perhaps this city kept away some of the AIs' Scouts.
I met the French thanks to an expanding cultural border--a concept which is hard to avoid in a Cultural Victory type of game.
Saladin (of the Arabian Empire) met me via an interesting method, perhaps one that you've never before considered. Can you guess how I met him?
On the turn that Isabella met me, she built the University of Sankore. Presumably, she met me just so that she could rub that fact in my face.
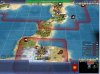
The Barbarian city stood for quite some time, until the various AI amassed big enough forces to dare challenge it. Unfortunately, the Barb city mostly had Warrior defenders, so it fell quickly to the amassed forces. This part of the plan might not have been the greatest, as it meant that several stacks of city-busting AI hordes were mere paces away from my empire when the Barb City was taken.
Yet, even after the Barb city fell, I think that its location continued to work in my favour. When it fell, three of the AI had stacks of units there. The French captured and kept the city. When they did so, they moved all of their units into the city, parked them there, and healed them. Another AI also healed their units there. Therefore, I initially only had to face one AI's large stack (Saladin's).
This situation of only one AI coming at my cities at a time was crucial, as I was only able to attack and kill off all but one of Saladin's units with my own units on Turn 150/320 (1475 AD). I still had to wait for the next turn to kill off Saladin's last Chariot, as I'd run out of offensive defenders. Had I faced another AI's stack, I would have had to fight with my wounded units, probably losing the game at that point.
I quickly kicked my empire into military-unit-production mode, which meant that my Legendary-to-be cities missed out on a couple of Wonders. However, the effort was worthwhile, as it kept me in the game.
I started to research Military Tradition, as I noticed that one of the AI had Gunpowder and most of the rest had Guilds. I was hoping that Cavalry (Cossacks) would be enough to hold off the enemies at my gates.
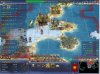
As I healed my troops and added new ones to my mini-stack, I pushed forwards to the French-captured Barb city. I was able to effectively use some City Raider promotions to reduce the AI units in the city--seeing as how Macemen and Spearmen made up the majority of my "army", this point helped a lot.
I let the French keep the city for a while, until they pulled a da_Vinci:
Here is a thought ... send a settler with your attackers, found a city on the edge of the enemy, then upgrade the obsolete units on the border. Then unleash hell!
Well, it wasn't long before the French were upgrading their units into Grenadiers. I guess that the French must have been reading our pre-game discussion thread!
Fearing that the situation was getting out of control, I threw all of my remaining units at their captured Barb city, capturing it with some losses. On the next turn, the AI sensed my weakness and headed directly towards the captured French-Barb city.
Fortunately, it was about this time that all of my cities went Legendary, with the first one going Legendary on Turn 185/320 (1725 AD) and the last one going Legendary on Turn 188/320 (1740 AD).
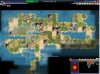
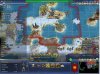
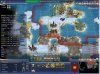
My 3 Legendary City Locations:
1) Moscow, settled 1E of the starting location
2) St. Petersburg, settled on top of the Cow resource to the West of our starting location. At the time, the location seemed good enough, although had I known that Copper was going to appear 1 square outside of the city's fat cross, I likely would have settled where I could grab the Stone, Copper, and Cow within the city's fat cross
3) Rostov, settled near the Fish, Horse, and Cow resources to the East of our starting location
I played a pretty standard type of Cultural Victory game.
I built some early wonders, built Cottages in my 3 Legendary-to-be cities, and I tried to get some Great Artists.
I started my Great Artist production late and I even messed it up a bit--on Turn 102/320 (710 AD) I discovered that I'd assigned two Merchants to produce Great People Points instead of two Artists, in the city which was supposed to be my "Great Artist Town". I called the city a "town" as opposed to a "farm" because I'd Cottaged the city (i.e. the city had several towns but not several farms near the end of the game). I used Cottages due to the city being my 3rd Legendary-to-be city (Rostov), although, arguably, another approach would have been to use Farms and Caste System. Anyway, I caught my Specialist error three turns later, which still resulted in giving me a Great Artist.
I placed all of the early-game and mid-game Great-Artist-producing Wonders in Rostov, except for The Parthenon, as the city wasn't ready to produce The Parthenon within a reasonable construction date and I really didn't want to miss out on that Wonder.
Unfortunately, I really only produced TWO Great Artists (not counting the one from Music)
I did start and stop my 100% cultural output for a while, reverting to collecting Gold. I spent that Gold on Cathedrals, which seemed to be a worthwhile effort. I only had 1 Great Artist to use as a cultural bomb at the end of the game, as the other two had been settled, so the choice of where to bomb him was easy.
Thanks once again to the admins for a wonderful game!


")
 , so already had Cossacks by this stage. No real dramas.
 bonus. Was running with pacifism as well, which also helped here. (I lightbulbed quite a few of my tech's with the
