You are using an out of date browser. It may not display this or other websites correctly.
You should upgrade or use an alternative browser.
You should upgrade or use an alternative browser.
Kerbal Space Program
- Thread starter Leonel
- Start date
warpus
Sommerswerd asked me to change this
Alright, I made all the changes you recommended, excluding the asparagus staging thing. I easily made it into orbit with enough fuel to make a whole bunch of orbit corrections.. Everything seemed a lot more stable and I could really crank my engines. A lot easier to control than the previous version!
The struts I'm still not too sure about, but I made it work. First I removed all radial decouplers except one at the top, like you said.. except that I also left one at the bottom. That allowed me to place fuel tanks one by one, and easily snap them into place. Then I added a bunch of random EAS-4 strut connectors in between and it's incredibly stable.. It doesn't look symmetric, but it works very well.
Did I do that right? Are there better ways? You said to just leave one decoupler but the way I did it seemed to make it a lot easier so I went with that. Getting things to snap into place seems to be a pain sometimes and every once in a while things just get fused into things.. So if something works, I tend to go with it.
Anyway, I have 2 questions now:
Which docking port should I be using? I want to leave something in orbit and then launch again to try to dock with it. What sort of compatibility issues are there with the different types of docking ports I can use?
2nd question: If I were to implement to asparagus staging thing, how great would the benefits be?
warpus
Sommerswerd asked me to change this
Okay, I re-read what you wrote about the vegetable staging implementation very carefully, and
1. You said it will give me a dramatic improvement in efficiency
2. It seems simple enough to implement.
I'm doing it, then worrying about docking with stuff
I can also see why it works.. How far can you take the concept?
edit: Eh, okay, this is kind of stupid, but I'm having problems with the grouped decouplers. Whenever I try to separate them into different groups I can't get it so that I can just move one.. can't seem to ungroup them either.. and in the end a group of 3 or 4 always ends up just floating there, where I can't drag them into any category and I have to quit out of the screen and reload.
I'm going to go through the key bindings list to see how I can ungroup, but maybe you have some suggestions about how to approach that
hobbsyoyo
Deity
- Joined
- Jul 13, 2012
- Messages
- 26,575
See, just minor changes. You made a good design!Alright, I made all the changes you recommended, excluding the asparagus staging thing. I easily made it into orbit with enough fuel to make a whole bunch of orbit corrections.. Everything seemed a lot more stable and I could really crank my engines. A lot easier to control than the previous version!
Oh dude, just use whatever works, don't worry about little details. It seems like you got it right so any little changes aren't worth fussing over - they won't affect your rocket's performance anyways.The struts I'm still not too sure about, but I made it work. First I removed all radial decouplers except one at the top, like you said.. except that I also left one at the bottom. That allowed me to place fuel tanks one by one, and easily snap them into place. Then I added a bunch of random EAS-4 strut connectors in between and it's incredibly stable.. It doesn't look symmetric, but it works very well.
Did I do that right? Are there better ways? You said to just leave one decoupler but the way I did it seemed to make it a lot easier so I went with that. Getting things to snap into place seems to be a pain sometimes and every once in a while things just get fused into things.. So if something works, I tend to go with it.
As for the symmetry, are you using the symmetry button in the bottom left corner? It's a little circle with a dot in it. If you click it, it will cycle through different patterns, these represent double symmetry, triple symmetry and so on. This means if you have double symmetry selected, if you add a part to the side, an exact duplicate is also added to the opposite side. This cuts down on asymmetry and makes it easier. You can also cycle through these symmetry options with the X key.
But if it's all holding up very well, I wouldn't worry about it too much.
Also, pressing Control and Z will undo a misclick mistake, it may take a second to load though.
You have to use the same ports to connect. So Clamp-O trons attach to Clamp-O trons and Clamp-O tron Jr's. attach to Clamp-O tron Jr's.Anyway, I have 2 questions now:
Which docking port should I be using? I want to leave something in orbit and then launch again to try to dock with it. What sort of compatibility issues are there with the different types of docking ports I can use?
The Clamp-O trons allow you to transfer fuel and monopropellent (RCS fuel) while the Clamp-O tron Jr's don't. So I don't use the Jr's, but I *think* they are the only ones that attach to the 1 kerbal pod (which I also never use).
Anyways, there is also a covered Clamp-O tron. It's cool looking and it attaches to regular Clamp-O trons (it is just a regular Clamp-O tron with a covering - it doesn't attach to a Clamp-O tron Jr). To open the shroud that covers it, right click on it while in space and press the blue button that says deploy or open or something.
Pretty big. You could either lift heavier stuff, go faster, go higher or some combination of the three. It's very helpful, though the performance boost is bigger on bigger rockets. You might not see a huge boost for your design, but as you move on to bigger rockets, you almost have to move to asparagus staging.2nd question: If I were to implement to asparagus staging thing, how great would the benefits be?
My standard launcher has the payload up top, with two stacked orange tanks below it for the central core.Okay, I re-read what you wrote about the vegetable staging implementation very carefully, and
1. You said it will give me a dramatic improvement in efficiency
2. It seems simple enough to implement.
I'm doing it, then worrying about docking with stuff
I can also see why it works.. How far can you take the concept?
Surrounding the core is 8 core boosters, each with two orange tanks. To attach eight large tanks radially like this, you have to place either two or three radial decouplers (depending on which type I use) on top of each other to give enough space between all the tanks or they overlap.
The decoupler stacks kind of look like: I}}I (the left I is the central core, the right I is a side booster. The two }} are the two decouplers stacked on top of each other.
This launcher has allowed me to do some cool stuff such as:
*Placing another orange tank on top of the launcher with a capsule/manuevering system on top of that. I delivered the orange tank (fully fueled!) to my space station to allow me to use the station as a fuel depot. This is huge, because I don't have to launch a tank that I'm also using to fuel my launcher, which means you have to launch more tanks to fill the empty tank you delivered. I just delivered full tanks, ready to be used, four times to my space station. Pics of it are few pages back.
*I launched a Munar lander with 2 complete, autonomous rovers attached to the side of it. When I landed the lander, I dropped off the two rovers (they are very large too) to go exploring a crater and look for easter eggs like the Monolith on the Mun, the Neil Armstrong monument and the Munar arches. Then, I flew the lander back home.
*I launched a massive Munar base to make a precision landing at the Mun near the rovers. It has room for 18 Kerbals and it has wheels so I can drive it around. It also has 4 docking ports so I can add new modules to the base. Then, I left 2 kerbals at the base and put the third one in an escape capsule that I had placed at the top of the base. I detached the escape capsule and sent it back to Kerbin. All of that went to the Mun in one piece.
Now, I am bragging a little, but seriously, all of these things were possible due to asparagus staging. It would not be possible without asparagus staging. I mean, I could've had done those things by launching smaller pieces on multiple launches, but the big mega rocket I use really saves me time and effort.
edit: Eh, okay, this is kind of stupid, but I'm having problems with the grouped decouplers. Whenever I try to separate them into different groups I can't get it so that I can just move one.. can't seem to ungroup them either.. and in the end a group of 3 or 4 always ends up just floating there, where I can't drag them into any category and I have to quit out of the screen and reload.
I'm going to go through the key bindings list to see how I can ungroup, but maybe you have some suggestions about how to approach that
Let's say you have a group of four decouplers in the stage list on the right. You want to click on just one and move it to another stage. Click the icon, this should expand it to show all four icons in the group. Now, they are all highlighted, so even if you grab one and try and move it, they will all move with it. So expand the list, then click off to the side of the list (you don't have to click on anything in particular, you are just clicking off to the side to de-highlight the whole group). Now you can grab the one piece in the group that you want and move it. When you click to grab it though, click and hold while you move it or the whole thing resets.
I think this answers your question, let me know if I misread you. (I usually only have hanging icons when I have physically detached a part of the rocket, maybe this is your problem? To change staging, don't try and move the actual parts, move the icons on the right - sorry, I'm not sure what the issue is)
You can also add or delete new stages in the list by clicking the + and - buttons. It's also helpful to know that the staging list in the VAB only bears some resemblance to the actual set up of the rocket, it can be changed without having to make the rocket in a special order. Though you have to be careful because you can accidentally set a rocket to fire when the stage below it hasn't broken off.
One last tip on staging:
For stages that are directly atop another (like the Core 1 and Core 2 stage in the second drawing I posted earlier), you can place the engines from Core 2 in the same stage as the decoupler that separates them. What this means is that when you press space bar, both the decoupler will fire and the engine that causes Core 2 to keep on going will fire at the same time. This saves you from having to press spacebar twice and also helps separate the spent stage from the rest of the launcher.
Is all this as clear as mud?
warpus
Sommerswerd asked me to change this
That all makes sense. I have been using the symmetry thing to make sure that my rocket's centre of gravity doesn't move.
That's really weird about the decouplers, because after carefully following your instructions I am now able to move them one by one. Amazing. You should be inside this game, helping people out
That's really weird about the decouplers, because after carefully following your instructions I am now able to move them one by one. Amazing. You should be inside this game, helping people out

warpus
Sommerswerd asked me to change this
I implemented asparagus last night.. Works great!
So I have 4 big boosters around my core on my lower stage.. I want to expand that to 6, but, how do I add the structs, when the big boosters are going to be blocking my view? More trial an error or is there a trick to it?
So I have 4 big boosters around my core on my lower stage.. I want to expand that to 6, but, how do I add the structs, when the big boosters are going to be blocking my view? More trial an error or is there a trick to it?
hobbsyoyo
Deity
- Joined
- Jul 13, 2012
- Messages
- 26,575
You can hold down the mouse wheel and drag the mouse forward or back to zoom in or out (IIRC). You can zoom all the way through a booster and see the central core, this makes attaching struts easier.
Alternatively (and I just thought this up on the spot, so it may not work) - You can build up just one booster will all of the struts on it attached to the central core. Click on the radial decoupler to detach it, then press X to get the desired hex symmetry. Now when you go to reattach it, 5 copies of it will appear around the core. When you attach it, they will all have the struts you placed on the first one. You will still have to attach struts to lash the boosters to each other (which you should do), but this is much easier to do than attaching struts to the core from each booster (and which should now be done since you put them on the first one and then made copies of it with the symmetry button).
I am not sure how this will work if you use two decouplers, one on top and bottom. I'd just try grabbing the first one (if you click a decoupler, everything 'below' it [beside it in the case of radial decouplers] will detach with it) and seeing what it does. If it goofs up, I would try placing the ring of six decouplers at the bottom first. Then build up one side booster on a spot that doesn't go over the lower decoupler. When built, detach the booster at the top decoupler, then, using symmetry, place attach the six boosters in such a way that they reconnect with the lower decouplers. Does that make sense?
warpus
Sommerswerd asked me to change this
K that gives me ideas as to how to make it work. I'm going to build a rocket with more power!
What do you think I should focus on next in terms of my development? I really want to build a space station.. How should I proceed? I suppose I should try docking with something first?
Or should I be trying to get to the moon?
What do you think I should focus on next in terms of my development? I really want to build a space station.. How should I proceed? I suppose I should try docking with something first?
Or should I be trying to get to the moon?
You can go anywhere--we were racing to land on planets before because we didn't have the opportunity to build space stations in prior versions.
Building solid lander craft is a bit of a challenge, especially making sure that it can carry enough fuel to return to Kerbin safely. And of course, the extra weight means you will have to upgrade your launch and booster stages, so the rockets get bigger.
I think there is a default space station core module in the VAB, and I'd modify that to start. The key component is that Big-Ben-clock-looking piece with a bunch of docking ports, and instead of putting parachutes on your modules put docking ports on those as well. Heavy RCS for close-in maneuvering and docking is a must.
hobbsyoyo
Deity
- Joined
- Jul 13, 2012
- Messages
- 26,575
I think a Mun landing is about the next easiest thing to do. Next easiest would be a space station. Everything else is about as challenging as everything else after that, but designing the right rocket for the different jobs can get tricky, especially regarding the landers as Antilogic said.
warpus
Sommerswerd asked me to change this
Okay, here's what I'm going to do:
1. Upgrade my rocket using the asparagus method & more boosters
2. Put the space station core module in orbit
3. Try to dock with it
I figure I need to learn how to dock with stuff, and if I succeed I have the building blocks for a space station. Then I can try going to the mun, since my rocket.. might have enough power for an attempt.. maybe? How big does my 2nd stage have to be if I want to have a lander (on the 3rd stage?)?
I did the "to the mun part 1" tutorial yesterday, and orbit transfer seems.. maybe not easy, but very doable. I've only done it once and it seemed straightforward enough - it was mostly me using the things I've learned over the last couple days, really.
Two things I've been wondering about:
1. I could probably find the answer to this if I re-read last couple pages of the thread and a couple private messages, but.. I'll just ask.. During launch and attempt to get into orbit, I should be eventually moving laterally *opposite* to the spin of Kerbin.. right? How do I know which way to go?
2. I know how to re-enter the atmosphere after being in orbit - but what's the most optimal way of landing? or does that depend on the scenario?
In the tutorial I tried landing on the mun after I finished everything, but ended up I think coming in too fast laterally.. It was dark, I had problems figuring out which way to burn to best come in for a soft landing.. and in the end ended up crashing. That made me wonder about the couple times I've re-entered the atmosphere on Kerbin. I just burn, decrease my orbit, and make my way down without much thought. Should I be thinking about entry vectors or crap like that?
It seems like the best way to land on the mun is to come down vertically somehow, since you can't use a parachute and need to make conditions as easy as possible for landing. How do I do that?
edit: thinking about it, burning retrograde until I'm no longer moving laterally makes sense, but there's probably logistical issues I haven't thought of. Ah well, for now I've got other things to worry about
This doesn't work, but I do have 2 attached boosters w/ 2 decouplers (top and bottom) all moving as a single unit.. So after I add the struts and turn on summetry, I should be able to just plop it all in and get what I want.
edit: I'm using +/- on my numpad to zoom in and out. excellent
I tried building a rocket using orange pieces and failed. It flies and gets me into orbit, but it's too inefficient. I'm going back to my old design and beefing that up instead.
1. Upgrade my rocket using the asparagus method & more boosters
2. Put the space station core module in orbit
3. Try to dock with it
I figure I need to learn how to dock with stuff, and if I succeed I have the building blocks for a space station. Then I can try going to the mun, since my rocket.. might have enough power for an attempt.. maybe? How big does my 2nd stage have to be if I want to have a lander (on the 3rd stage?)?
I did the "to the mun part 1" tutorial yesterday, and orbit transfer seems.. maybe not easy, but very doable. I've only done it once and it seemed straightforward enough - it was mostly me using the things I've learned over the last couple days, really.
Two things I've been wondering about:
1. I could probably find the answer to this if I re-read last couple pages of the thread and a couple private messages, but.. I'll just ask.. During launch and attempt to get into orbit, I should be eventually moving laterally *opposite* to the spin of Kerbin.. right? How do I know which way to go?
2. I know how to re-enter the atmosphere after being in orbit - but what's the most optimal way of landing? or does that depend on the scenario?
In the tutorial I tried landing on the mun after I finished everything, but ended up I think coming in too fast laterally.. It was dark, I had problems figuring out which way to burn to best come in for a soft landing.. and in the end ended up crashing. That made me wonder about the couple times I've re-entered the atmosphere on Kerbin. I just burn, decrease my orbit, and make my way down without much thought. Should I be thinking about entry vectors or crap like that?
It seems like the best way to land on the mun is to come down vertically somehow, since you can't use a parachute and need to make conditions as easy as possible for landing. How do I do that?
edit: thinking about it, burning retrograde until I'm no longer moving laterally makes sense, but there's probably logistical issues I haven't thought of. Ah well, for now I've got other things to worry about
You can hold down the mouse wheel and drag the mouse forward or back to zoom in or out (IIRC). You can zoom all the way through a booster and see the central core, this makes attaching struts easier.
This doesn't work, but I do have 2 attached boosters w/ 2 decouplers (top and bottom) all moving as a single unit.. So after I add the struts and turn on summetry, I should be able to just plop it all in and get what I want.
edit: I'm using +/- on my numpad to zoom in and out. excellent
I tried building a rocket using orange pieces and failed. It flies and gets me into orbit, but it's too inefficient. I'm going back to my old design and beefing that up instead.
90° heading is what you want to get into orbit. It's the D key (unless your rocket spins on ascent). ")
The Mun transfer is pretty easy--basically, get into a low-to-medium orbit, and then watch the horizon as you circle around Kerbin. The moment you see the Mun, start burning your engine and then watch the map. When you intersect with the Mun's orbit, stop burning. You should get an intercept fairly easily.
I think you hit the nail on the head with your new Mun landing strategy. In short, there are two landing strategies I use, one for atmospheres and one for non-atmospheres. For planets/moons with atmospheres, it's best to drop your periapsis just below the atmosphere (into the dark-to-medium blue range), and let the atmosphere bleed off your speed. For moons without atmospheres, this doesn't work. I get into a low orbit around the Mun (say, around 10k m), then I burn retrograde to completely stop my forward momentum. At that point, I'm dropping straight done towards the Mun's surface. Next, I burn my engines to slow my descent down to around 30ish m/s until I get fairly close to the ground (within 1k m or so). At that point, I burn more heavily and try to land at a speed under 5 m/s.
Important note: your altimeter measures the distance from your craft to sea level, not to the surface. I had external fuel tanks on my lander for the transfer and deorbit burns, and I jettison them on the descent and watch the pieces fall. Each piece will have a distance-to-the-craft label. When they explode, I check the altimeter and the last number I saw, and that gives me a good idea where the ground is.
For precision landing, circularize an orbit at roughly 10km or outside the atmo, whichever. Burn normal or anti-normal (that should be right between your ap and pe, aka 90 degrees from them) to change inclination. Kill lateral velocity when you're above your chosen landing site. For atmospheres, don't kill 100% lateral velocity, the atmo will do that for you (and you'll be going too fast to kill all lateral velocity anyway); just retroburn until you have no PE. Practice and get better at predicting the difference between your landing site and your map's marker of your landing site — depending on atmospheric drag and your re-entry angle those can be quite different.
If you have a crapload of fuel still and no plan to return the lander, feel free to kill all lateral velocity, but don't cry to me when you run out during the landing — or if the rotation of the planet shifts your projected landing site off by 50km
Hope this post helped and didn't obfuscate matters.
Leonel
Breakfast Connoisseur
How do you transfer fuel to empty tanks? I figure that if my Duna mission is successful, I could save the transfer vehicle in orbit and just send up modular mission capsules for future Duna missions.
Luckymoose
The World is Mine

Kuban Mun Base efforts have experienced pilot error and 45 m/s impact. One of the large solar arrays remain, as does the battery and some of the propellant. Joebro and Bob Kerman are safe. I will deliver an unmanned habitat module for them at some point to improve their situation.
Leonel
Breakfast Connoisseur
I finally made it to Duna! I figure instead of risking my newly built interplanetary ship, I just throw an inexpensive probe at it to gain the experience of planetary transfers. After waiting for the right time and multiple restarts, I finally got a probe into Duna orbit. Here's the series of course corrections I had to make to normalize my orbit from my initial entry into Duna's gravity well
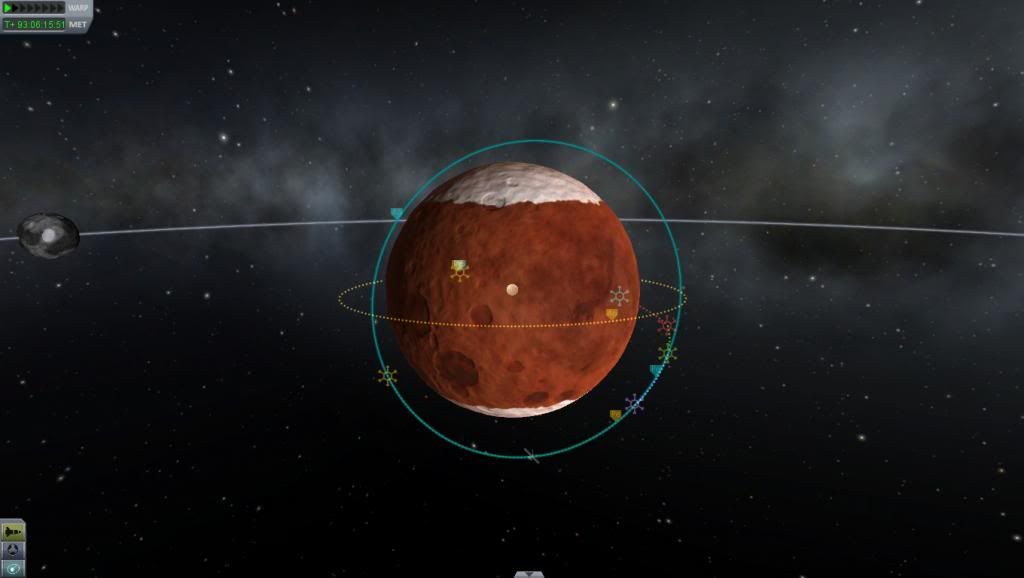
And here's my pretty new probe in orbit!

I also landed a probe on the surface to get a feel for what the atmosphere is like. So after getting enough confidence to launch the Duna Express...
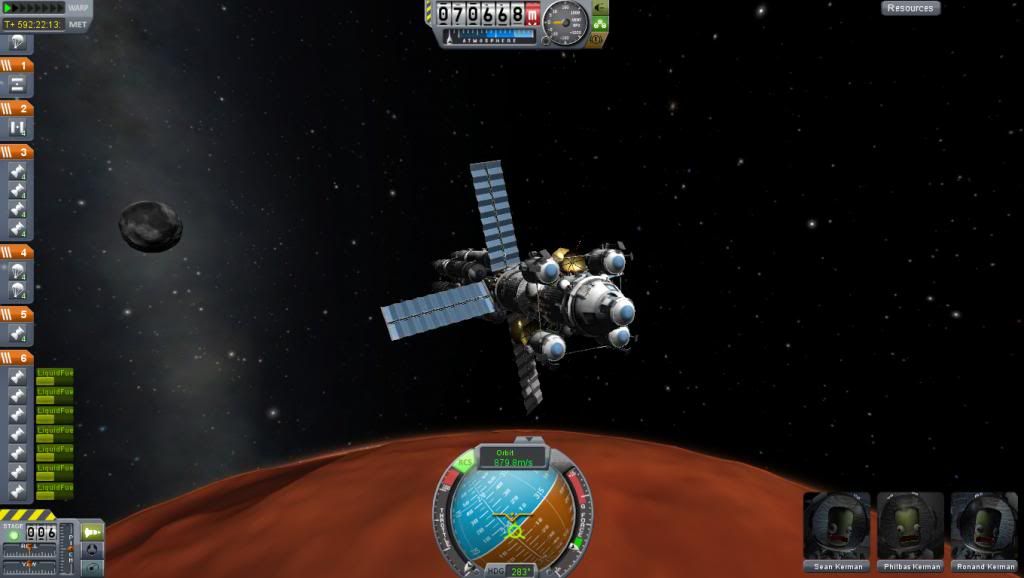
It's a terribly poor performing vehicle I've discovered. The fuel won't go through the docking ports to make one long fuel thing but I was able to transfer fuel. It's also off balance and not perfectly aligned. I also spent a great deal of fuel just getting to Duna. I went through 3 refuelings of those engines just to get into orbit. I'm going to make an extreme effort to preserve those four lander nacelles for when I'm going to have to abandon the mother ship. Fortunately the unmanned lander I sent beforehand demonstrated the parachutes will deploy well in the low lands. A painful lesson, but a good one.
And here's my pretty new probe in orbit!
I also landed a probe on the surface to get a feel for what the atmosphere is like. So after getting enough confidence to launch the Duna Express...
It's a terribly poor performing vehicle I've discovered. The fuel won't go through the docking ports to make one long fuel thing but I was able to transfer fuel. It's also off balance and not perfectly aligned. I also spent a great deal of fuel just getting to Duna. I went through 3 refuelings of those engines just to get into orbit. I'm going to make an extreme effort to preserve those four lander nacelles for when I'm going to have to abandon the mother ship. Fortunately the unmanned lander I sent beforehand demonstrated the parachutes will deploy well in the low lands. A painful lesson, but a good one.
Similar threads
- Replies
- 4
- Views
- 601
- Replies
- 2
- Views
- 758
- Replies
- 115
- Views
- 13K
- Replies
- 24
- Views
- 3K