Kerbal Space Program

All right, I promised some screenshots from my 0.18.2 game this weekend and I've got a few minutes left to do this!

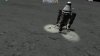
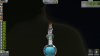
I returned to the Mün with a variation on my Dunabomber series lander and delivery system. Turns out, in low gravity without the parachutes and atmosphere, it's a bit top-heavy and unstable. This was a pain to land, need to do a redesign.

Spoiler :
attachment.php


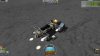
I've been sending out probe-satellites to the moons, and one of the probes spotted a Mun arch. Couldn't resist building a manned rover to find it. Turns out, it's a bit over-powered and has earned the nicknames "Rocket Sled" and "Flying Coffin". To land it takes some skill--you need to slowly drop down until you see the shadow on the Mün, then cut the engine and kick the rover forward so it lands on its wheels. I'm glad for the save-reload feature, this sucker blew up a few times on the approach and even took off the ground and crashed again a couple times.

Spoiler :
attachment.php

attachment.php


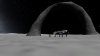
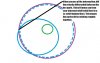
And now, the big project I have been working on: the Antilogic Space Station, also known as the A.S.S. It has a central "core" module, two habitation modules with 3 twin solar panel banks each, a propulsion module in the rear, an RCS extender module aligned vertical, and an escape pod that can carry 9 kerbals back to Kerbin in case of a disaster. However, due to how weak the docking clamps are, the propulsion module is just for show--running it at anything greater than 5-10% will shake the station apart.

Spoiler :
attachment.php


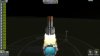
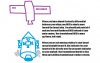
I'm trying to make it a major fuel station, so it needs a bunch of fuel tanks. Six orange tankers should do it, but you have to get those into orbit somehow. Enter the most ridiculous rocket I've built to date:

Spoiler :
attachment.php

attachment.php


I love the solid booster stage separation--you can kind of see the structure of the module is a simple core module with RCS, with 6 attached orange tanks. The main lifters have poodles under them for orbital maneuvering, then mainsails. An additional two mainsails are attached to each column and are quasi-asparagus staged. Each secondary mainsail has three solid boosters attached to it, and there are an extra six on the inside. On top of the interior ones, there are tiny fuel tanks on tops that feed into the core six mainsails (hard to see, I should just upload the model so you can play with it).

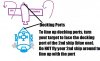
Unfortunately, the tanks and central docking module are so placed that that I cannot dock with my station. I need to launch another RCS extender module for the bottom of the station to attach it. :(
 

Attachments

  • screenshot0.jpg
    screenshot0.jpg
    97.2 KB · Views: 251
  • screenshot6.jpg
    screenshot6.jpg
    115.9 KB · Views: 213
  • screenshot7.jpg
    screenshot7.jpg
    70.8 KB · Views: 221
  • screenshot10.jpg
    screenshot10.jpg
    94.5 KB · Views: 246
  • screenshot16.jpg
    screenshot16.jpg
    89.5 KB · Views: 216
  • screenshot17.jpg
    screenshot17.jpg
    78.4 KB · Views: 230
Nice solid booster stage separation - and I thought my new rocket design with 12 solid rocket boosters attached all around was crazy.. It *was* super slow though, tons of lag. Tried using them with an upgraded interplanetary Muad'Dib design for the first time last night (actually, I guess my first mission to Eve used 6 of them) - they did their job but getting to Moho was a pain. I couldn't figure out an intercept and gave up.
 
So what all does 18.2 have in it? Just bug fixes or something major?

I hope to get to play again sometime this weekend, it was a hectic holiday season for me.
_______

Some basic tips on docking:

1)Launch your first ship/piece into a cicular orbit well about the atmosphere, at least 100km up. It needs to be in as cirucular of an orbit as possible.

2)Before launching your second ship/piece, wait until the first piece is flying over the launchpad. It can be in front or behind it a little bit, but it needs to be close to being overhead when you launch.
Spoiler :
attachment.php


3)Launch your second piece but cut the engines when your apogee gets close to intersecting the orbit of the 1st piece, even if you don't have an orbit yet.
Spoiler :
attachment.php


4)(Do steps 4-6 quickly, before you pass apogee) Go to the map view and click on the 1st piece (while still controlling the 2nd) and select 'Set as target'. This will set the first piece as your target and it will bring up some markers along your orbit that if you hover over will tell you how close you will come to your target.

5)Using the manuever mode, drag the different tabs around until the intersection marker shows that you will be within ~10km of your target in orbit. Double check that the resulting orbit is possible: it will not take into account atmospheric drag, so if the resulting orbit dips into the atmosphere, you will not intercept the two pieces even though it says you will.
Spoiler :
attachment.php


6)Burn when you hit the manuever node that you set while in manuever mode. There will be an icon next to your navball that will show how long (actually, how much delta v you have remaining in your burn) you need to burn for. There will also be a marker on the navball itself that shows you where to point. When this is complete, you will be set up to intercept the 1st piece at the point shown in your orbit shown in the manuever mode on the map screen.

7) Coast until you are ~10km from the 1st piece. Make sure that you still have it set as your target. Click on the velocity readout above your navball and it will switch from showing orbital velocity to showing the difference in velocity between you and your target.

8)While still having the first piece set as a target, point in the retrograde direction and burn until the difference in velocity between the two pieces is close to zero. If you have done this correctly, you are now in a matching orbit alongside the other piece.
Spoiler :
attachment.php


9)With almost 0 velocity between your ships (as long as you're under 30m/s speed differential, you should be OK), point your ship toward the first piece. Now slowly burn, this will start to move you toward your target.

10)BE PATIENT. It's a slow process and will take some time to creep up on the other part, but if you get impatient and try doing excessive burns, you'll miss it. You want to be heading toward your target at roughly ~10 m/s.

11)When you are within 1km of your target, use your RCS thrusters to kill all of your relative velocity, then use them to nudge your ship forward at roughly 1m/s. When done correctly, the indicator that shows where your target is should be directly over your prograde indicator on your navball. Play with the RCS translation keys (IJKL + forward and backward, NH ??? someone correct me) to make the indicators line up on the navball. Gently inch toward your target.
Spoiler :
attachment.php


12)When you are within 100m, be prepared to stop nearly all your velocity if you need to and then align yourself with the docking port. You can kill all your velocity in your second ship and then switch to the first ship and turn it so that the docking port faces your 2nd ship, put on SAS and then switch back to the 2ndship to bring it in to dock. This is usually the preferred way to line them up instead of flying your 2nd around to line it up with the port on the 1st unless your 1st ship/station is so large that it's hard to turn.
Spoiler :
attachment.php


13) When lined up with the port, gently move toward it, very slowly, very carefully. Make small adjustments, not large ones and walk it in.

14) When within a meter or two, the magnets on the docking clamps should engage and pull them together. Watch your docking clamp and when you see your ship start to move on it's own, turn off A/SAS. If you have A/SAS on, even if the magnets are holding you together, the two docking rings will not lock and engage.

15)When your view switches and pulls out to show both ships, you are now docked!


Let me know if I need to clarify things.
 

Attachments

  • step 1.jpg
    step 1.jpg
    36.3 KB · Views: 189
  • step 3.jpg
    step 3.jpg
    50.4 KB · Views: 198
  • steps 4 and 5.jpg
    steps 4 and 5.jpg
    52.4 KB · Views: 197
  • step 8.jpg
    step 8.jpg
    52.8 KB · Views: 218
  • step 11.jpg
    step 11.jpg
    67.6 KB · Views: 220
  • step 12.jpg
    step 12.jpg
    81.2 KB · Views: 190
Thanks, I read through all that just now and every single part makes sense. This is in contrast to when I was starting out when I had to re-read some things you wrote a couple times and it still didn't make much sense ;)

I was hoping that learning how to rendezvous and dock would help me get better at using the maneuver nodes and intercepting orbits of other planets, such as Moho

but

5)Using the manuever mode, drag the different tabs around until the intersection marker shows that you will be within ~10km of your target in orbit.

is pretty much what I do when I try to get to another planet and it always works, except when getting to Moho or returning from Dres :lol: I think I just need a better handle on what exactly the pulleys do. I thought I kinda had a decent handle on that, but recently I discovered that I don't know as much as I thought I did. I think I need to watch a maneuver video/tutorial. Watching videos has helped me with a couple things - there's always something the guy does that I haven't been doing.

For example, I had no idea you could click the velocity and get the relative velocity between you and your target. It's little things like that that really help

Docking doesn't seem *that* bad, I was under the impression that you needed to make the orbits as possible in a h. orbit transfer type operation. That's how I got to Duna the first time ever and it was a pain. The way you outline above seems a lot simpler and very doable.
 
Thanks, I read through all that just now and every single part makes sense. This is in contrast to when I was starting out when I had to re-read some things you wrote a couple times and it still didn't make much sense ;)
I'm glad the USS Ballgoblin pointed you in the right direction! :lol:
(I know I'm an immature child)

is pretty much what I do when I try to get to another planet and it always works, except when getting to Moho or returning from Dres :lol: I think I just need a better handle on what exactly the pulleys do.
Er, I'm trying to look online. I have an idea what 4 (out of 6) of them do but I don't have the technical terminology and I'm not 100% sure on their purpose so I don't want to mislead you. Honestly, I just screw around with them.

I thought I kinda had a decent handle on that, but recently I discovered that I don't know as much as I thought I did. I think I need to watch a maneuver video/tutorial. Watching videos has helped me with a couple things - there's always something the guy does that I haven't been doing.
Videos are always helpful when they are done properly and don't incorporate mods. I hate when you watch a video only to find out halfway through that the way the video maker is doing things is impossible without XYZ mods. :mad:

For example, I had no idea you could click the velocity and get the relative velocity between you and your target. It's little things like that that really help
Oh hell yes, the little things make all the difference. You can do something similar when landing; clicking on the velocity while going in for a landing will show you your velocity relative to the planet as well as your adjusted heading instead of how fast you are going relative to space and the heading associated with that.

Docking doesn't seem *that* bad, I was under the impression that you needed to make the orbits as possible in a h. orbit transfer type operation. That's how I got to Duna the first time ever and it was a pain. The way you outline above seems a lot simpler and very doable.
It's weird for me because sometimes I nail a docking on the first try in less than 15 minutes (and half of my dockings were done bassackwards - see my posts on my space station construction where I added fuel tanks) and then sometimes I spend 3 or 4 hours on it. There is some luck involved - if the ships happen to be naturally lined up when you go in for a dock, you've saved a ton of effort and time right there.

Oh, but you do get more familiar with the RCS controls and once you've done that, it does get significantly easier. You have to learn to think about the different navball markers and how to move them to really master docking. Like most things in KSP, there is a steep learning curve.

But once you've done it a few times, it's like landing in that you intuitively know how to do it.

I don't find that docking is all that useful for lining up planetary encounters in that I have the angles already figured out for that and I know when to burn to get an encounter. But when switching orbits from one moon to another, it does help a lot. The more you use manuever modes, the easier everything gets.
 
Er, I'm trying to look online. I have an idea what 4 (out of 6) of them do but I don't have the technical terminology and I'm not 100% sure on their purpose so I don't want to mislead you. Honestly, I just screw around with them.

I thought I knew exactly what they do, but then I had an "oh.. wait" moment. I have a math background so I think I need to understand it in terms of vectors/linear algebra/etc.

What might be tripping me up is how they behave when you're still in an orbit around a planet and are doing a maneuver node that will send you in an orbit around something else. Pulling on 4 of the nodes makes the maneuver behave differently than if I was actually in orbit around that body already. Now, that seems obvious maybe, of course you'll see different results, but it's almost as if waiting until you are in orbit around the star before making maneuvers would make more sense. That's how I ended up getting to Eve for example.. I think. It was one of my missions anyway.

There's just a misunderstanding there somewhere and I want to track it down.

Videos are always helpful when they are done properly and don't incorporate mods. I hate when you watch a video only to find out halfway through that the way the video maker is doing things is impossible without XYZ mods. :mad:

I hate the ones where it's just music playing.. there seem to be too many of those out there - I prefer the geeky ones that are like 4 hours long and where the guy talks and talks and talks and talks and won't shut up.

Oh hell yes, the little things make all the difference. You can do something similar when landing; clicking on the velocity while going in for a landing will show you your velocity relative to the planet as well as your adjusted heading instead of how fast you are going relative to space and the heading associated with that.

Hmm.. my velocity seems to update automagically when I come in for a landing.

Oh, but you do get more familiar with the RCS controls and once you've done that, it does get significantly easier. You have to learn to think about the different navball markers and how to move them to really master docking. Like most things in KSP, there is a steep learning curve.

I suck at RCS and only really use it for positioning before a burn purposes - as well to keep my rocket stable when lauching into orbit. I suck at it because I haven't used it for anything else so I just have little experience with it.

I've updated my settings in the .cfg files - I changed two settings that are supposed to really help with maneuver nodes. I haven't checked yet if the changes are significant enough - they have to do with how your path is drawn. I forget what the variables are that I changed, still at work.

As for being childish, meh.. *fart*
 
I thought I knew exactly what they do, but then I had an "oh.. wait" moment. I have a math background so I think I need to understand it in terms of vectors/linear algebra/etc.
I haven't yet found a decent link, but I think the problem is more me poorly phrasing the search query than the info not being there. I know the pro- and retro-grade levers slow or speed you up. I thought I knew two others but obviously I don't now that I'm trying to write it out and failing. :lol:

What might be tripping me up is how they behave when you're still in an orbit around a planet and are doing a maneuver node that will send you in an orbit around something else. Pulling on 4 of the nodes makes the maneuver behave differently than if I was actually in orbit around that body already. Now, that seems obvious maybe, of course you'll see different results, but it's almost as if waiting until you are in orbit around the star before making maneuvers would make more sense. That's how I ended up getting to Eve for example.. I think. It was one of my missions anyway.
There will be differences because.........shoot I don't know why there is because I do not understand how the controls work to begin with. There is a difference, but I'm an artard Nevermind. :sad:

There's just a misunderstanding there somewhere and I want to track it down.
Let me know if you track it down!

I hate the ones where it's just music playing.. there seem to be too many of those out there - I prefer the geeky ones that are like 4 hours long and where the guy talks and talks and talks and talks and won't shut up.
Oh I agree with this totally. Even the ones where they have written instructions are usually confusing compared to when they speak them outloud for some reason.


Hmm.. my velocity seems to update automagically when I come in for a landing.
It does change automatically at some given altitude, but by clicking on it you can force the change while higher up. This can help you make velocity changes from the safety of 20km instead of racing to do them at 20m.


I suck at RCS and only really use it for positioning before a burn purposes - as well to keep my rocket stable when lauching into orbit. I suck at it because I haven't used it for anything else so I just have little experience with it.
Yeah, you're going to have to get comfortable with RCS unfortunately. There's no realistic alternative to RCS when it comes to docking. It can be a struggle at first, but you'll get it. Eventually. After many crashes. :lol:

Remember that AWSD are rotational commands, while IJKL are translational ones. You'll be using the translational ones much more during docking. Better yet, if you click on the 'docking mode' button (I think on the lower-left hand side of the screen) this will remap your AWSD keys to be translational ones. This way you can swap in and out of 'docking mode' with one click and avoid having to use two sets of keys.
(I am not sure what else, if anything, that docking mode changes)

_______
I haven't played since 18.2 came out, but docking could be painfully glitchy in 18.1. The magnetic clamps aren't particularly effective (which in some instances can force you to spend 20 minutes doing the last 5 seconds worth of docking), the clamps don't hold your ship securely (causing major wobbles), and I had one ship randomly blow up on me.

I had saved a mission right where I was coming in to dock, there was maybe 100m of seperation. When I reloaded, everything looked fine, and I went in to dock. But it wouldn't lock. I spent a good while backing my ship into the station over and over again before I realized the whole back end of my ship was gone. It had magically blown itself up while the game was turned off. :mad:

There are a lot of other smaller issues I can't think of off the top of my head, but docking is definitely the most frustrating thing to do IMO. It does lead to major '**** YEAH!!!!' moments when you pull it off. I'd compare it to the joy of your first Mun landing.

I've updated my settings in the .cfg files - I changed two settings that are supposed to really help with maneuver nodes. I haven't checked yet if the changes are significant enough - they have to do with how your path is drawn. I forget what the variables are that I changed, still at work.
Where did you hear about these setting changes?
 
Where did you hear about these setting changes?

On the official forums somewhere - I've only been there a couple times, maybe twice, and I just opened a bunch of threads that looked interesting into tabs.. Like 15 of them, with various mods, missions, questions, announcements, whatever. (I do this because from my experience, if I don't now much about something, a random cross-section of information will often give you a decent overview of what the F is going on) Then I closed the main forum and left the tabs open on my other monitor to look through whenever I had time. So I have no idea which section of the site even it came from, but here's the 2 things I changed:

CONIC_PATCH_DRAW_MODE = 0
CONIC_PATCH_LIMIT = 4

The draw mode seems to work better at a setting of 0 or 1 instead of the 18.2 default of 3. I found a bunch of posts from various people saying to change it to 0 or 1, but not much explanation of what it actually did.. until I got to a post that had each mode explained.

0 draws the path on the actual to body itself (a flyby around the mun actually shows up on the mun)
1 draws the path relative to where you enter each SOI (default in earlier versions)
2 draws the path relative to where you escape each SOI
3 draws the path entirely relative to your current SOI (currently default)

0 sounds kind of awesome in terms of making it easier to more accurately set up your maneuvers, but I haven't played the game with that setting changed to 0 yet.

One guy was using mode 6, or at least claimed to be, providing very weird screenshots of the maneuver node and orbit path doing very strange things..

The patch limit setting lowdown I found in another thread, randomly as well - if I'm understanding it correctly (and remembering everything correctly that I read), this value is how many future encounters your maneuver should consider. For example, if you have it set to 2, you could set up a maneuver to get an orbit around Duna and then right away an intercept with Ike. But if it was set to 1, that Ike intercept wouldn't show up.

The default is 3 and there seemed to be a small consensus in the thread I was in (I think I googled it as well, just in case, in any case there seemed to be some sort of consensus) that upping that to 4 was overall a good idea.

Mind you I have tested none of this, like I said

edit: the only other thing I've changed in my .cfg file is the debris persistance to delete all debris as soon as possible. It seems to be working right and everything is a lot less cluttered

There will be differences because.........shoot I don't know why there is because I do not understand how the controls work to begin with. There is a difference, but I'm an artard Nevermind. :sad:

I think what is happening is the context of the burn is changing when you zoom out to the solar system when you're orbiting a planet and a different context could mean different implications for the same burn. The prograde and retrograde pulleys work the same way in both contexts because they only work on the x and y dimensions (assuming you are orbiting Kerbin in a nice 0 degree orbit).. but the other pulleys affect dimension z, which changes the implications for the burn

Having said that, I don't really know what I'm talking about
 
FINALLY (again!)

I made it to the Mun, and back, successfully!

Spoiler :

Bing
67EC9DD49D9C0BE4AE3B186A2B41BF3C733BDC89


Bang
6A67400DADB4C287E41AEBCA80A37771558CE3D0


Boom
B18662A1ECF1D22FD27C730697243094A390F56E


Which means I can finally stop visiting that stupid orbital body and move onto bigger/better places!

Next in line, getting a satellite into orbit around Minimus. Should be good!
 
Good job!

BTW Kerbal Space Program devs launched a contest yesterday to give the winner $6,000 worth of tickets to be put into a draw to send someone into sub orbit! I think a lot more tickets than that are going to be sold by the company that's doing it, so chances are that the person who wins the KSP contest isn't going into "space", but... I'm totally entering something!

More info on their main page and the forums

edit: btw hobbsyoyo, I think you might be under the impression that my "rover return" missions returned the rovers.. Nah, they just included a lander, return vehicle, and a rover (and now an unmanned probe to land somewhere too). I blame my team's mission-naming committee for the confusion
 
Awesome work Joecoolyo!

BTW Kerbal Space Program devs launched a contest yesterday to give the winner $6,000 worth of tickets to be put into a draw to send someone into sub orbit! I think a lot more tickets than that are going to be sold by the company that's doing it, so chances are that the person who wins the KSP contest isn't going into "space", but... I'm totally entering something!

More info on their main page and the forums
Awesome, I'm going to sign up for it. Oh, and here is a very similary contest put on by Axe.

edit: btw hobbsyoyo, I think you might be under the impression that my "rover return" missions returned the rovers.. Nah, they just included a lander, return vehicle, and a rover (and now an unmanned probe to land somewhere too). I blame my team's mission-naming committee for the confusion
Oh I see now.

On the official forums somewhere - I've only been there a couple times, maybe twice, and I just opened a bunch of threads that looked interesting into tabs.. Like 15 of them, with various mods, missions, questions, announcements, whatever. (I do this because from my experience, if I don't now much about something, a random cross-section of information will often give you a decent overview of what the F is going on) Then I closed the main forum and left the tabs open on my other monitor to look through whenever I had time. So I have no idea which section of the site even it came from, but here's the 2 things I changed:

CONIC_PATCH_DRAW_MODE = 0
CONIC_PATCH_LIMIT = 4

The draw mode seems to work better at a setting of 0 or 1 instead of the 18.2 default of 3. I found a bunch of posts from various people saying to change it to 0 or 1, but not much explanation of what it actually did.. until I got to a post that had each mode explained.


0 sounds kind of awesome in terms of making it easier to more accurately set up your maneuvers, but I haven't played the game with that setting changed to 0 yet.

One guy was using mode 6, or at least claimed to be, providing very weird screenshots of the maneuver node and orbit path doing very strange things..

The patch limit setting lowdown I found in another thread, randomly as well - if I'm understanding it correctly (and remembering everything correctly that I read), this value is how many future encounters your maneuver should consider. For example, if you have it set to 2, you could set up a maneuver to get an orbit around Duna and then right away an intercept with Ike. But if it was set to 1, that Ike intercept wouldn't show up.

The default is 3 and there seemed to be a small consensus in the thread I was in (I think I googled it as well, just in case, in any case there seemed to be some sort of consensus) that upping that to 4 was overall a good idea.

Mind you I have tested none of this, like I said

edit: the only other thing I've changed in my .cfg file is the debris persistance to delete all debris as soon as possible. It seems to be working right and everything is a lot less cluttered


I think what is happening is the context of the burn is changing when you zoom out to the solar system when you're orbiting a planet and a different context could mean different implications for the same burn. The prograde and retrograde pulleys work the same way in both contexts because they only work on the x and y dimensions (assuming you are orbiting Kerbin in a nice 0 degree orbit).. but the other pulleys affect dimension z, which changes the implications for the burn

Having said that, I don't really know what I'm talking about

Ok thanks for the .cfg info.

BTW, here is my best guess on the manuever mode handles: I know the triangular ones will change the inclination of your orbit, but they also speed you up. I *think* the other handles (not the pro- and retro-grade ones) will change your inclination while slowing you down. Not sure though
 
The purples adjust the inclination of the orbit (tilt of your orbit around the body).
The blues are aligned with the gravity vector of the body (i.e. liftoff direction and descent).
The greens are along prograde and retrograde orbits (i.e. the direction you burn to make orbit after liftoff).

If you are on a different inclination and do not plan your maneuver at one of the nodes, then I think all of the handles can affect your relative inclination to a target.


When docking, I get a small orbit first with the space station nearby, then I set the space station as a target, then I plan a maneuver at the ascending/descending node between the two orbits (there will be a dashed line). I adjust the purples first to match the inclinations--now I'm in the same plane as my station. Then, I adjust the greens to get close to an intercept, and the blues only if necessary (to adjust the point of intercept slightly).

I forgot to mention above my lunar lander started with one kerbal, but it docked with my space station to pick up another two and take them to the Mün, and then it flew home to Kerbin. It was a fun trip.
 
What say all that about the handles again with video tutorials or pics if possible!
Please. :)
 
Sorry, don't have access to graphics/video-making stuff right now. To describe the handles if you were using them throughout the liftoff made sense to me, so I'll add a little on that, hopefully it will help.


You are sitting on the launchpad, but instead of doing the obvious thing and blasting off you want to plan a maneuver to get into orbit. If you were to plan a maneuver on the launchpad, the prograde blue vector would be pointing straight up into the sky and the retrograde blue straight into the ground (i.e. the direction of the gravity vector).

Now, say you lift off, and you want to go into an orbit around the equator. From prior experience before this stuff was added, you will want to start tilting towards 90°. That's the pro-grade green handle. If you were going into a retrograde (270°) orbit, you would use the retrograde green handle. Once you are in a pro-grade orbit, the pro-grade green handle corresponds to your velocity vector, and the retrograde green corresponds to burning against your velocity vector (i.e. de-orbiting).

Say instead of going into an equatorial orbit, you wanted to go into a polar orbit. You would use the purple handles instead. I think the prograde purple is towards the north pole and the retrograde purple is towards the south pole, but it's pretty obvious if you tilt the camera right on the map screen which one is which.

Regarding inclinations, if you plan a maneuver directly over the equator, the purple handles will not affect your orbit whatsoever, just the inclination. If you are not directly over the equator, just like if try to burn at N or 180° off the equator, your orbit will shift a little bit as well. EDIT: Also, need to mention, if you plan the maneuver directly over the equator, the opposite is true for the blue and green handles--they will not affect your inclination, only your apoapsis and periapsis.

When I talk about nodes, I'm referring to the imaginary line stretching out from the equator and touching both your orbit and your target's orbit. You want to correct your inclination here because at that moment you are in the same plane as the target. Once you burn so that your ascending/descending node is 0.0°, then you are in the same plane for the entire orbit. When you are in map mode and select a target orbiting the same body, there will be a faint grey dashed line that corresponds to the imaginary line I described above. Plan your maneuver there.
 
Hmm that helps me. I'm going to do some digging too. I get the node stuff now, but the handles are a bit hazy.
Thank you!
 
Hmm that helps me. I'm going to do some digging too. I get the node stuff now, but the handles are a bit hazy.
Thank you!

I think if you just remember a liftoff is pro-grade blue, then a transition to pro-grade green, and the orbital tilt involves purple, you'll have that eureka moment where it all makes sense. Just keep that last post in the back of your head next time you launch your rocket. ;)
 
I think what trips me up is that when you are orbiting a planet, and zoom out onto the solar system, the pulleys have a different effect, because most of the implications that are described above happen in the context of the planet.. In the context of the solar system, the implications will be slightly different.

Does that make sense? Or am I way off..
 
You're right, but I don't think there's an easy way to simplify it. Interplanetary-scale physics are complex, man.

Basically it depends [among other things] on your escape angle from Kerbin and where Kerbin is relative to Sol; you could be retroburning relative to Sol to escape Kerbin, or vice verca. Does that help any?
 
Back
Top Bottom