According to the Shaw website you linked:
And it says it's a hardwood, rather than an engineered wood. It says that
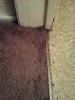
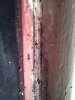
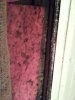
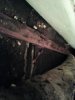
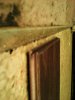
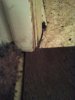
As to the floor, I think you need to go with the floor leveler. Use the self leveling option if you don't have anyone who can do the other. If you think it's possible that you'll need moisture barriers, see if you can do it with paint instead of an under layment.
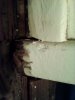
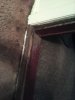
For floor height, what's your difference between how high this flooring will be compared to the flooring in adjacent rooms? Also, I'm not sure if I understood you concerning the trim pieces, but if you are putting down flooring, look to remove the base trim from the walls, and put your new flooring all the way up to the walls, not up to the existing trim. And then replace the base trim pieces. That looks much better as a finished job than adding trim to the bottom.
Installation Method
With hard surfaces flooring, you have several different installation options: Nail Down, Staple Down, Glue Down, and Floating. Some Shaw hard surfaces can be installed using more than one of the techniques described below.
NAIL
This installation technique is required for SOLID HARDWOOD construction. Using pneumatic or manual nailers, you or a professional installer will project cleats through the wood, fastening it directly to a suitable subfloor. SOLID construction, like it sounds, is milled from a single 3/4" thick piece of hardwood. Because of its thickness, a solid hardwood floor can be sanded and refinished over several generations of use. One of the characteristics of solid wood flooring is that it expands and contracts with changes in your home's relative humidity. Normally, installers compensate for this movement by leaving an expansion gap between the floor and the wall. Base molding or quarter round is traditionally used to hide the extra space.
This installation technique may also be applicable for ENGINEERED HARDWOOD construction, including EPIC, depending upon the product. ENGINEERED wood is produced with three to five layers of hardwood. Each layer is stacked in a cross-grain configuration and bonded together under heat and pressure. As a result, engineered wood flooring is less likely to be affected by changes in humidity and can be installed at all levels of the home.
STAPLE
This installation technique is an optional installation technique that can be used for both SOLID and ENGINEERED HARDWOODS. Using pneumatic staplers, you or a professional installer will project staples through the wood, fastening it directly to a suitable subfloor. This method is slightly simpler than the nail-down method.
GLUE
This installation technique is an optional technique that that can be used for ENGINEERED HARDWOODS. You or a professional installer will use an acrylic-based or urethane adhesive to adhere your new hardwood to a suitable subfloor. After applying the adhesive with a trowel, you should also use adhesive between the seams of your hardwood floor to complete and stabilize the installation.
This installation technique may also be applicable for dry-back RESILIENT TILES. You or a professional installer will use a special adhesive to adhere your new resilient tiles to a suitable subfloor. Some resilient tiles may be grouted, depending on the design of the product.
Standard RESILIENT SHEET vinyl requires the application of a full-spread adhesive that firmly secures the floor in place onto the subfloor. Expect moisture testing and some preparation of subfloors, according to their condition.
FLOAT
This installation technique is an option on certain ENGINEERED HARDWOODS. Rather than being attached directly to the subfloor with an adhesive, the flooring "floats" over an underlayment placed between the wood and the subfloor. Shaw floating engineered wood floors must be glued together at the tongue-and-groove joint to complete and stabilize the installation. This installation technique allows the floor to expand and contract. Shaw offers a variety of underlayment options for your specific installation.
This installation technique is also applicable for LAMINATE flooring, plank construction in tile or wood designs. This type of "floating" laminate floor is engineered so that the edges of the planks fit together and lock into place without glue or hardware. (Note: Some products require adhesive on the end seams of the first row only.) Since those floors are "floating", proper expansion space must be maintained at all vertical surfaces. Expect moisture testing and some preparation of subfloors, according to their condition.
Shaw also has a floating version of RESILIENT LVT flooring. Our StaTite planks and tiles stick to each other, not the floor. Expect moisture testing and some preparation of subfloors, according to their condition.
And it says it's a hardwood, rather than an engineered wood. It says that
So you need to get the question answered, is this a solid hardwood or an engineered wood?NAIL
This installation technique is required for SOLID HARDWOOD construction
As to the floor, I think you need to go with the floor leveler. Use the self leveling option if you don't have anyone who can do the other. If you think it's possible that you'll need moisture barriers, see if you can do it with paint instead of an under layment.
For floor height, what's your difference between how high this flooring will be compared to the flooring in adjacent rooms? Also, I'm not sure if I understood you concerning the trim pieces, but if you are putting down flooring, look to remove the base trim from the walls, and put your new flooring all the way up to the walls, not up to the existing trim. And then replace the base trim pieces. That looks much better as a finished job than adding trim to the bottom.