IOT Developmental Thread

Sone, I really don't see any benefits having a religion gives someone other than the ability to holy war, which should be balanced out by getting holy warred. Priests and guys will just give everyone crap for not having enough temples that don't pay tax to the kings who build them.
 
Sone, I really don't see any benefits having a religion gives someone other than the ability to holy war, which should be balanced out by getting holy warred. Priests and guys will just give everyone crap for not having enough temples that don't pay tax to the kings who build them.

Sharing a religion with the smallfolk lowers peasant revolts. The lack of religion shared between liege and smallfolk increases the chance. Since the chance of peasant rtherevolt isn't based at zero, you'll want an easy way to lower it.

Likewise, the cost of certain holdings go up as they're bought more in comparison to others, meaning you'll build the temples for that reason and the fact bishops still have to provide levies, which are actually rather decent. You'll also want temples for tech reasons since they're the biggest tech producers early on.

Therefore, if you treat religion for what it is, a tool for political and social control and a useful source of traits, you'll go far.
 
Does anyone have a world map with provinces in it, like the ones in older IOT games?
 
The Major Religions of Ilducia (I'll come up with a better name for a planet later):
Spoiler :
a607366e70c0f1bca0732c97e295288b.jpg

Yizongism: Founded by the ancient philosopher Yi Zong, it started more as a philosophy then an actual religion. Yi Zong, who lived most of his life during a massive civil war, believed that stability was the main goal for government. The followers of this philosophy would end up bringing peace to the Empire of the 3 Kingdoms that lasted for almost a thousand years.
Countries practising Yizongism gain a stability bonus.
Nervism: Founded by the ancient philosopher Nerva, this is religion with the most influence in the east. Nervists have been prosecuted by Yizongists for the last few hundred years, but despite this, this sect has continued to grow. Followers of Nerva believe hours of meditation each day is required to reach enlightenment, which should be the goal of all of humanity.
Countries practising this religion gain a defensive bonus in combat.
Harmanism: Founded at the crossroads between the eastern and western continents, this religion has incorporated deities from multiple different religions.
Hamanist countries do not loose stability for controlling lands belonging to another religion.
Allamism: One of the two largest monotheistic religions. Unlike the other religions of the past and present, Allamism has emphasized trade and growth, both in life and after life.
Followers of this religion gain a bonus to trade.
Carpism: A monotheistic religion based primarily on Allamism. This was the state religion of the Ancient Myman Empire, and because of the missionary policies of the Myma Government, this religion is presently the largest religion in the world.
Persecutions conducted by Carpists have a higher chance of success.
Gods of Souse: The harsh tundra lands of the Soud people brought about a religion that emphasizes war and pillaging. The followers of this religion believe that only glory and death in battle can bring one to paradise in the afterlife. The gods of the Souse religion are identical to the gods of our Norse religion.
Countries with this belief gain a bonus to attacking. They also get food as well as gold from pillaging enemy territories.
Minor Pagan Beliefs: The Northern Continent has various insignificant Pagan religions present.
Followers of Minor Pagan religions will tech slower then those of other religions.
Create your own: Dissatisfied with all the major religions present in the game? If you start in one of the pink territories you can create your own custom religion. The benefit of having your belief will be based on the description of your religion provided when you create it.

All religions provide a stability and income bonus (some more then others). All bonuses only apply if the religion is your state religion.
 
Hmm... it reminds me of Mesoamerica, but with more lakes.
 
I like the thought that went into the descriptions and naming, and the map looks fine too, but what is the point of Minor Pagan Religions if they just generate penalty? It wouldn't be so bad if it didn't effectively block claiming for a large part of the map.
 
I've sorta developed a EUIII-CivIV-IOT crossbreed.

I'd rather everyone starts in a rather consolidated spot of the map, to open the rest of the map (including a hidden new world), to colonization later.

The long continent is an Africa like continent. While the rest is a Eurasian like continent. I may chose to reconsider that later, depending on how I feel during later stages of development.
 
It turns out that for me drawing maps is relaxing and is the best way for me to cope with stress and depression, so for me it doesn't feel like work at all :3

I know that feel, bro.

Also Ilduces map is good, since I usually look at the map before the rules when joining a game, Im satisfied and I like the religions idea, so count me in.
 
I know the feel Nedim. While for IOTs I have focused on rules not maps (since more IOTs use the same maps), for Civ 4, I enter world builder at the start of every game to see if I like the look of the map. 19 times out of 20 I will quit and try for a better looking map.

When it comes to fictional maps, I am very fussy.
 
Seriously ilduce, I miss you, I remember in a lot of IOTs (the early ones, when I just joined) you were my main ally.
 
I'm glad someone remembers me fondly.

Terrain:
Spoiler :
xFBKzL4.png

I'm not completely satisfied with this, so I may change it later
Each territory has a different terrain which both has combat and economic benefits.
Different Terrains are:
Grassland/Plains: +2 Food, combat bonus to cavalry
Forrest: +1 Production, +1 Food, combat bonus to defense and infantry
Hills/Mountains: +2 Production, combat bonus to defense
Jungle: -1 production, combat bonus to defense and infantry, higher chance of disease killing soldiers
Desert: -1 Food, combat neutral
Floodplains: +3 food, -1 production, combat bonus to infantry
Tundra: -1 food, combat bonus to defense, higher chance of disease killing soldiers
 
Here is my desired rules for combat, if people feel this is too complicated please say so:

Combat Part 1: Unit movement
For every army you need to enter a set of orders, which need to last 5 phases.

The orders:
Combat Readiness:
1) Passive: Passive increases moral overtime, however cannot engage in combat. Passive requires 25% of the supplies of active. Passive units will not be shown on the map (but will be recorded off map).
2) Garrison: Garrison can increase the defence of a specific territory, they can only defend. Garrison mode increases moral over time, but at half the rate of passive. Garrison requires 50% of the supplies of active.
3) Active: Active units lose moral over time, but can actively attack enemies.

Passive and Garrisoned units require no further orders. However If Active then there are 4 combat types they can use:
Siege: Slowly occupy a territory.
Assault: Faster then siege, but at the cost of moral and strength.
Engage: If possible, attack nearby enemy units.
Defend: Acts like a garrison unit, except it can transition to offence more easily.
To give orders indicate where you want the unit to move and what type of combat that will be conducting.

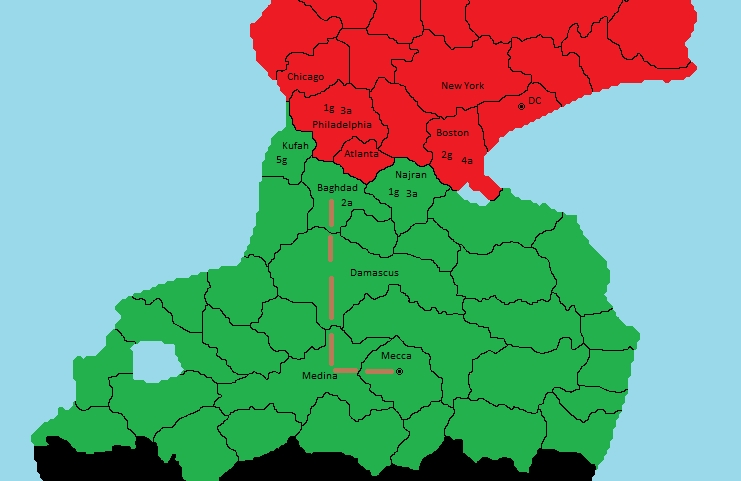
Below is an example of entering orders. We are playing the Arab Empire (Green) and fighting a war against American Empire (red).
Spoiler :
d75wtia8.jpg


We have 5 armies, 1st army is garrisoned in Najran (represented by 1g), 5th is garrisoned in Kufah (5g), 2nd is active in Baghdad (2a), and 3rd is active in Najran (3a). 4th army is passive, and thus not shown on the map.

The enemy has 4 armies, 2 in Phily and 2 in Boston. 1 active 1 garrisoned in both.

In actual gameplay, cities wont be named on the map as such, however they have been added for this tutorial as that will make it easier to explain what each unit is doing.


Spoiler :
6fus6emz.jpg

This is what entering orders should look like, just a simple map. Explaining it may be more confusing then just showing on the map. I used the text tool in paint, it should be that easy.

1st army is garrisoned at Najran. (Indicated by 1g) He will remain there for the rest of the round (since 1 has no other orders, it is assumed)

3rd army is to attack an army in boston (indicated by 3 a e, a indicates this is his first objective, e indicates he is engaging). Once boston is free of enemy armies, he will move to DC where he will lay siege (indicated by 3 b s, b indicates this is his second objective, s represents its a seige). Once the siege is complete, he will then go to New York to engage potential enemies.

4th army is currently passive, he upgrades his readyness from passive to garrison (Since he was passive, he is moved to our capital, Mecca) and then active. Now ready for combat he moves out first moving to Damascus, gaining double movement thanks to the roads connecting the two provinces and then moves to Baghdad to engage potential enemies. Finally he moves to Atlanta where he lays seige.

2nd army is currently in baghdad, now because baghdad has an important strategic resource, before moving out, 2nd army wants to wait for reinforcements, in this case 4th army. (Indicated by 2 a d, a indicated this is his objective for phase a, and the d indicating defense. Since he has no orders for phase b or phase c, he will remain on defense until phase d). Afterwards he will move to Philadelphia where supported by 5th army (indicated by the 2+5), will engage nearby enemy units. Following that he will lay siege to Phily.

5th army is garrisoned in Kufah, he switches to active in phase c, supports 2nd army in an attrack on Philadelphia, before moving to Chicago to lay siege.

Americas orders:
Spoiler :
combatexamplepart2.jpg

See if you can make our Americas orders without detailed explination. Just to see if you understand combat.


Combat results:
Phase A
Arabian 3rd army and American 4th army engage on the Boston-Najran border. (keep in mind I haven't provided any details about the combat strength of each unit, but I would provide those numbers to human players. I will detail that in Combat Part 2).

In this case, the American 4th army is victorious. Normally the Arabian army would be forced to retreat, but in this case it was such a crushing defeat, that the Arabian 3rd has routed and forced to become a passive army while it regroups.

No other battles this phase:

Phase B
4th army arrives in Najran and assaults the city. The Garrison in Najran emerges victorious and the 4th army is forced to retreat. It retreats backwards 2 territories into DC.

Phase C
4th and 3rd American armies where meant to attack Baghdad together, but the 4th army is no longer in position.

Since the 4th army was the primary attacker (indicated by the number being first), the order is cancelled.

Since it was an engage order, the unit looks for active enemy units nearby. The only one is the Arab 2nd army stationed in Baghdad. However this army vastly outnumbers American 3rd army. As a result the general (automated) chooses not to engage.

Phase D:
2nd and 5th army attack 3rd army in Philadelphia. Since there is a garrisoned unit in Philly, the general can chose to support the defence, or hide behind Philadelphia's walls.

The general decides the best case of action is to assist the defending army. 2nd army, with 5th supporting it, attacks 3rd army, with 1st supporting it.

3rd army is completely wiped out in the battle, while the 1st army retreats. Since its a garrisoned unit, it retreats behind the walls of Philadelphia.

Phase E:
No battles. Atlanta, Philadelphia and Chicago are seiged by Arabia. However none of the sieges are over at the end of the round.

At the end of the round, here is what the map looks like
Spoiler :
k99tmvmp.jpg

Notice how the Arab armies that are in American land are Green, to make it easier to see the difference between them and the American ones.

This is the end of the first round of the war between Arabia and America.
 
Very interesting.
 
Interesting, but it would be even nicer if it would be easier to recognise which army belongs to whom. Maybe not only colouring text, but making it appearing on background of different colour?
 
War and Sieges

Wars don't last several turns like the usual IOT, because making each war multigenerational with CBs are usually attached to individual characters would break half the mechanics of the game. So, the workaround I came up with is partially what most GMs do now in a way, post combat results before the actual update.

Except, instead of posting combat results, it would be combat updates.

Once you declared war and raised your levies (which must be done in that order), the game continues as normal. Players get in their usual orders, or also join a side and raise levies, and wait until orders locked and the first combat update goes up. From the combat update, warring characters can command and move their levies on the map (which, because mix-n'-matching units between levies is a no-no, is actually pretty easy to track). Levies are raised where they are being raised from, and each holding provide its own levy. I'll get into the levy system later.

The first combat update basically shows where the levies are, which armies need generals, which levies can combined with main armies, etc.

Orders during combat updates are strictly military movements and military-related plots. Those not in the war can set back and enjoy the show, or take a side and declare war.

Movement and Land Combat Phases

Each army has two movement, slowed over rough terrain. This how many hexes the army moves a click, not per combat update! Your army could move clear across the update in one combat update if everything went well! The combat updates appear when A.) Someone's armies ran out of move orders, B.) A skirmish begins, C.) Siege starts, or D.) Battle starts.

When two hostile forces enter adjacent hexes, there is a skirmish battle. A Skirmish is a combat phase where archers and horse archers dominate.

When two hostile forces enter the same hex, they into a melee, where melee units and cavalry rule. If an army is attacked from multiple directions, it is being flanked. The first army to engage is considered the "center". If an army is attacked from "behind", it incurs even heavier morale losses. If a flanking army is attacked by another army, it disengages from the flanking attack to attack its new enemy.

Being the first to disengage from melee triggers a pursuit, in which once again cavalry rule, especially light cavalry. Until the routed army flees behind the walls of a holding, all skirmish battles it engages in are replaced by pursuit battles. A routed army loses morale faster while an army that gives chase loses morale at a slower rate.

When an army falls below 25% morale in melee, it automatically disengages and flees to the nearest allied holding, taking a straight line to its destination. An army with morale below 25% is for all intents and purposes useless outside holdings, for any battle will instantly force it to rout.

Each time a routed army is forced into a pursuit battle, there is a chance the general is killed or capture. Likewise, each time an army is in melee, there is a chance the general is killed. Depending on the general, the army goes berserk and fights beyond morale breaking or it disengages and flees to the nearest allied holding.


Sieges

Each holding has a garrison, which consists entirely of light infantry. Holdings with fortification levels increase the power of the garrison in its ability to resist attacks, and increase in the technology "Siege Defense" increases its ability to prolonged a siege.

When a hostile army besieges a holding, the holding is locked down and won't allow any armies in (but will allow a defending levy to sally forth).

Besieging forces have two technologies that are vitally important to sieges: Siege Engines and Siege Tactics.

Siege Engines is the ability of the army to attack a fort. The higher this technology, the stronger it is attacking a holding.

Besides attacking the holding, there is also investing the holding until the garrison and defending levies surrender. Siege Defense is the ability of the holding to resist morale lost and increase morale lost in the enemy, while Siege Tactics increases morale lost in the defenders and decreases it in the siege camp.


Fall of a Holding

If the siege garrison surrenders, it is on the basis that the attackers will not pillage or sack the holding. All characters of the holding are imprisoned and money is gained from treasuries and banks.

However, if the attackers have to attack the city, the city is either pillaged or sacked. Pillaging a city increases the amount of money gained, but increases the chance that a holding characters are killed and and destroys buildings.

A sack works differently. Sacks can last several turns and seeks to gain every possible slave, cent, and worth from the city. The chance of holding characters being killed while attempting capture is increased and money is gained each turn of the sack until it is devalued.

A pillaged holding has an increased chance of peasant revolt, decreased tax income for five turns, and decreased levy replacement rate for five turns. A sacked holding has an even higher chance of peasant revolt, produces hardly anything in taxes for five turns, and barely repairs its levy for five turns.

After the War

At any point during the combat updates, leaders on both sides can come to a peace agreement based on the casus belli. If the leader of one side is captured by the enemy, the war is automatically ended as either a victory or defeat depending on who is captured.

If neither side of a war is able to continue (levies depleted, neither is hiring mercenaries, etc), the war ends with a stalemate UNLESS the attacker controls the holdings the war was declared over. This means it is easier to war and stalemate to victory over baronies than it is to war and try to stalemate to victory over a kingdom.

Important to note is that levies take several actual turns to return to full strength depending on how depleted they were. Castle levies can return to full strength quicker than cities, which themselves can return to full strength faster than temples. However, a castle with a completed depleted levy can take up to five turns to return to full strength.

In other words, wars are huge commitments. Victory can be extremely rewarding, gaining you new land, money, and a trait for winning a war or battle. Your generals will gain experience as well. However, screwing up and making mistakes can put you in a situation where your levies are so depleted, you can expect a war from a neighbor while you're down or a mistimed peasant revolt to spiral out of control.


Rules on Joining a War

When taking sides in a war, there are a few things to take into account.

1.) You can only jump in on someone's side in a war if you have an alliance with them, or it is a holy war. Alliances are created between dynasties when rulers and their dynasties marry into other dynasties. If King Albert is married to the daughter of King Tom of France, Tom can join in on the side of King Albert. There is a limit to the umbrella dynasty though. The relation must be within two steps. If Albert is married to King Tom's sister, Tom can join. If Albert is married to King Tom's sister's daughter, Tom can join. If Albert is married to King Tom's sister's daughter's daughter, he can't join.

2.) You can't join a war against your liege. If Queen Alice and King Albert are at war, Duke John under Queen Alice can join King Albert's side. Even through marriage alliances. The only time a vassal can join a war against his or her liege is during civil wars, like independence wars, lower crown authority wars, succession wars, etc.

3.) Crusades work differently. If Pope Jeho declares a crusade against Patriarch Mosher to take the title Kingdom of Denmarj, any character following Pope Jeho's religion can join on his side, and any following the Patriarch's religion can join on his side.


Peasant Revolts

Sometimes, it is easy to forget that the smallfolk exist, but they do. Occasionally, they'll rise up in anger against a liege and, since they're mostly light infantry, they'll fail to make an impact at all besides get a few members of your levies killed.

However, sometimes it isn't that easy. When a peasant revolt is successfully rolled, all other holdings are rerolled to check for a successful peasant revolt. This can, and probably will, cause a chain reaction, so try to keep revolt risk down.

Each peasant army raised is led by a peasant character, and the rebellion is led by whichever peasant character has the highest stats.

The peasants really can't be negotiated with, since their demands usually end with catching nobles, imprisoning them, and sorting it out later while replacing these nobles as the new rulers of the land. At best, if you're captured by a successful peasant rebellion, you can hope to be banished and become a courtier with a grudge in some king's court, waiting for that king to give you the money to hire mercenaries and take back what is yours. At worst, the nobles execute you, your children, and anyone else who can launch claims wars against them. It really depends on how cruel the peasant rebellion leader is.

Depleted levies, wrong religions, heresy, and a slew of other factors increase revolt risk while the opposite decrease revolt risk.

An incredibly successful peasant rebellion has a habit of ignoring borders, since anger against the nobility and merchants exists everywhere. Successful peasant rebellions that succeed in the civil war have a habit of declaring war on neighbors using a special "Peasant Uprising" casus belli, which forces a peasant revolt check in the defender.

The peasant rebels won't settle down until they're defeated (there is no stalemate option). If a peasant rebellion surrenders, all peasant leaders are imprisoned by the victors.
 
Back
Top Bottom