Hey Clanky, I was taking a look at your starcraft units and realized that you used the nextwar node (skeleton) to import the Assault viking. From what I can understand it should be possible to copybranch one nif to another, then you can spell ->attach kf; so I open the nextwar mech folder and try to attach the first kf on the list : idle.kf...but I get error
"The following controlled nodes were not found in the nif:"
"Editable Poly"
"Object01"
I couldn't find any tutorial explaining the process in detail and I hope you can help
Those warnings are just stating that the kf is just trying to reference those nodes but they do not exist. Its not a big deal though, it looks like they are just mesh nodes.
I've always assigned the vertices to individual bones manually. I know that there is a way to get around doing so but it requires having the vertices for one mesh very close to where the vertices for the already rigged mesh are.
Post the files as an attachment and I'll take a look at them.
I guess the nif file with copied branch on the assault mech skeleton is the file you seek, I know I'm missing steps here but really don't know how to solve the problem, I'm fairly certain that the model is rigged properly and the animation prt should be possible in nifskop but no clue...
I guess the nif file with copied branch on the assault mech skeleton is the file you seek, I know I'm missing steps here but really don't know how to solve the problem, I'm fairly certain that the model is rigged properly and the animation prt should be possible in nifskop but no clue...
I appears as though your mesh was not rigged onto the skeleton. I rigged it for you though.
Enclosed Instruction Book
Spoiler:
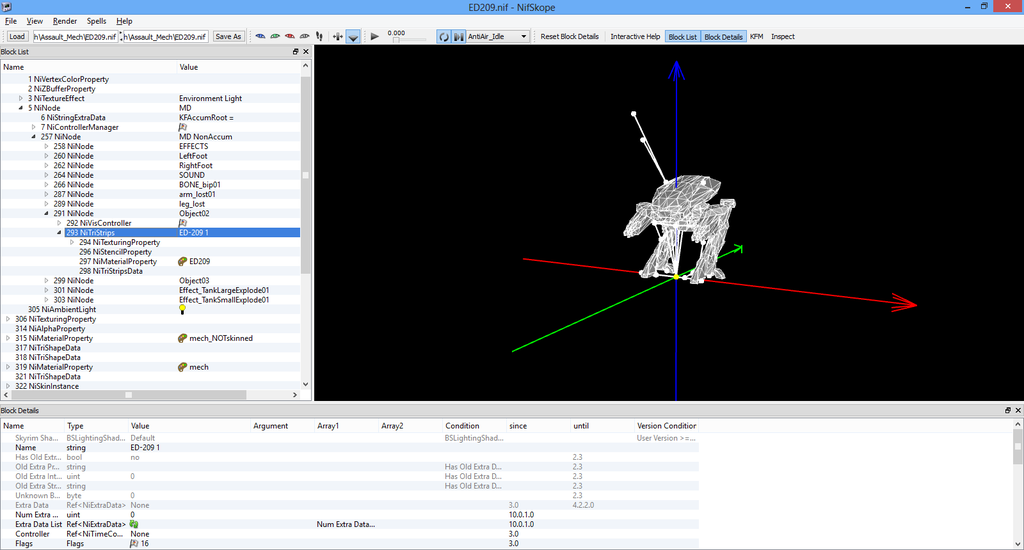
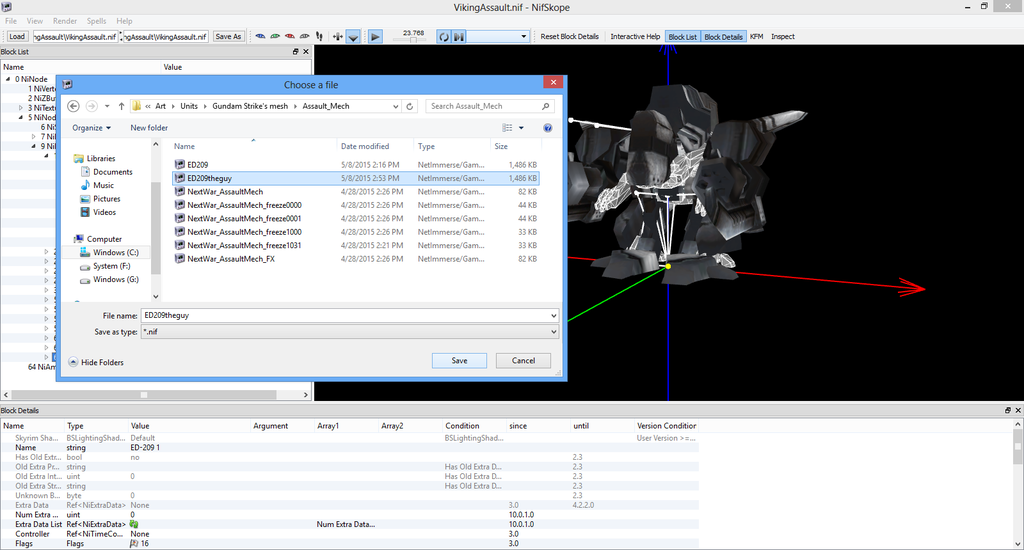
1.) Note that your mesh does not have a NiSkinInstance node, meaning that it does not have its vertices assigned to any bones.
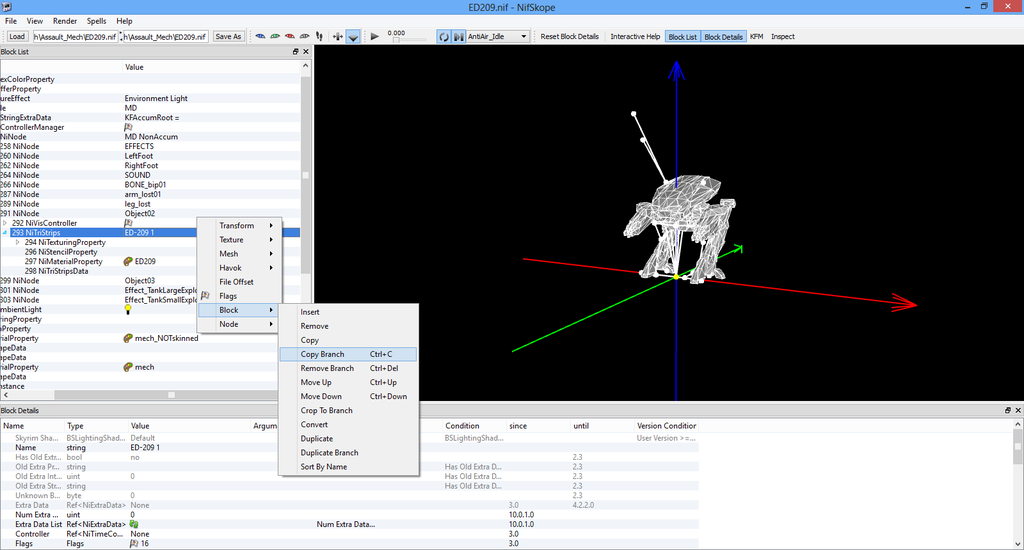
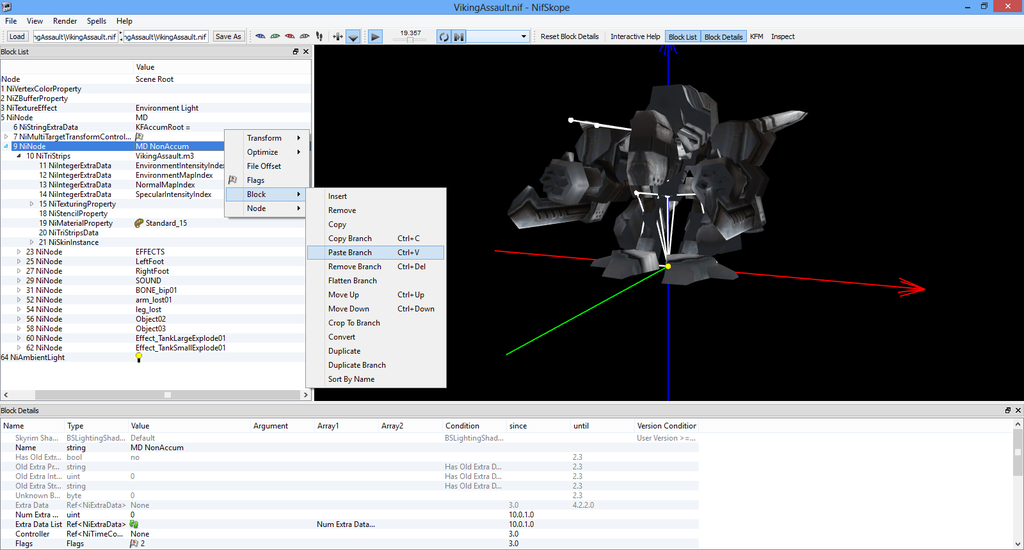
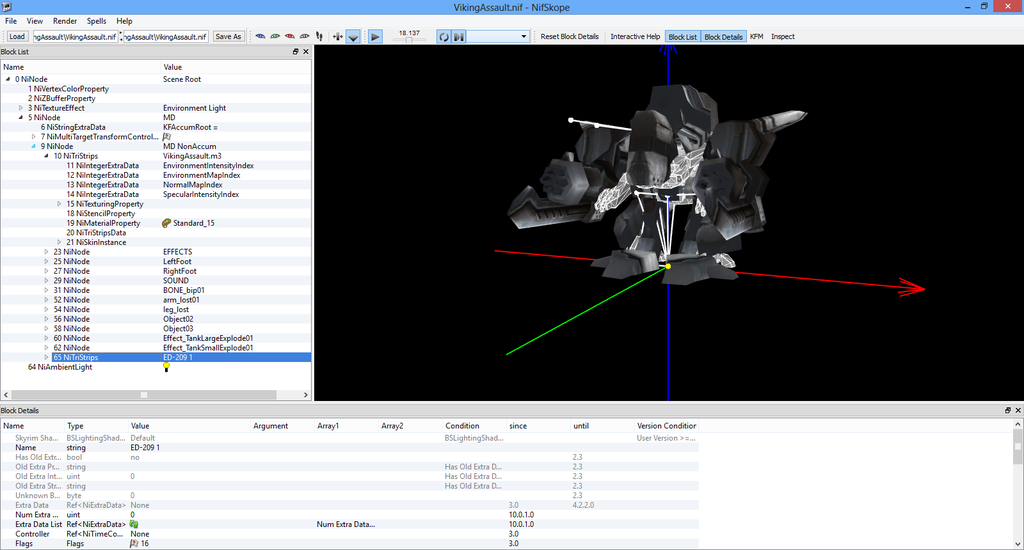
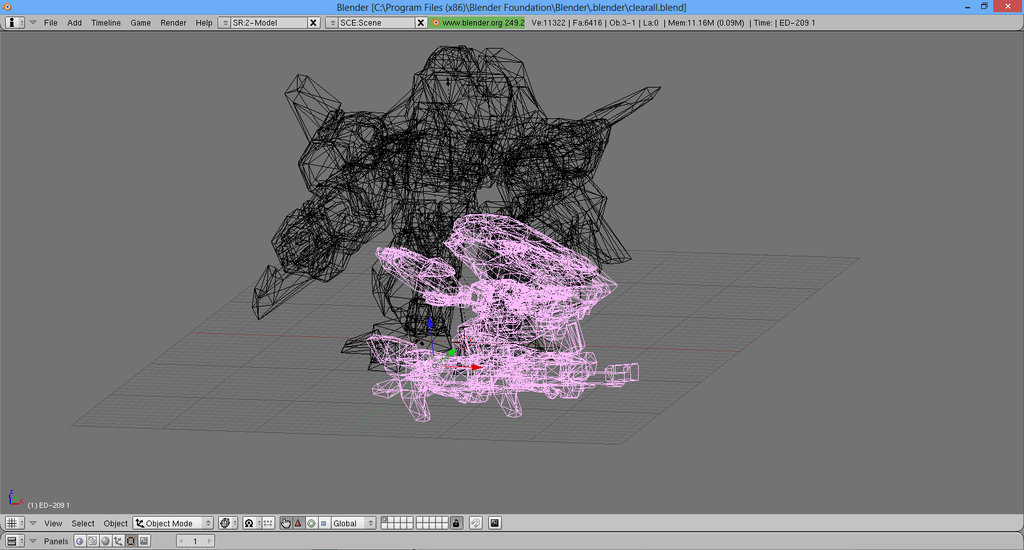
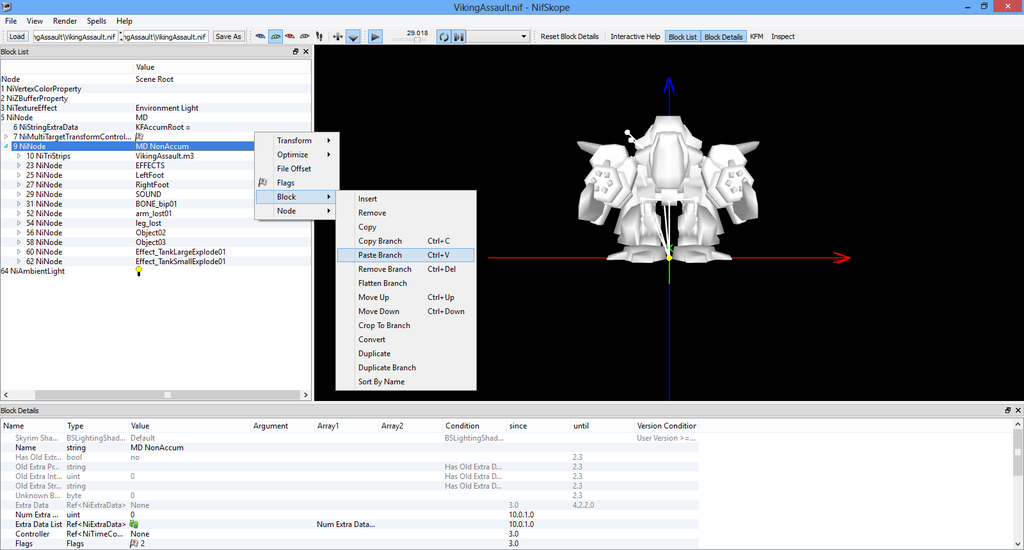
2.) Copy your static mesh, by right clicking it and selecting "Copy Branch", and paste it over to the nif file which has the skeleton you want it to use. Note: it HAS to be a desecendent of MD NonAccum, the you had it would have worked but this was just a clean nif.
3.) Your mesh will now be be in the "clean" nif file. Save it as, I'm gonna save it as ED209theguy, sounds like a radio station.
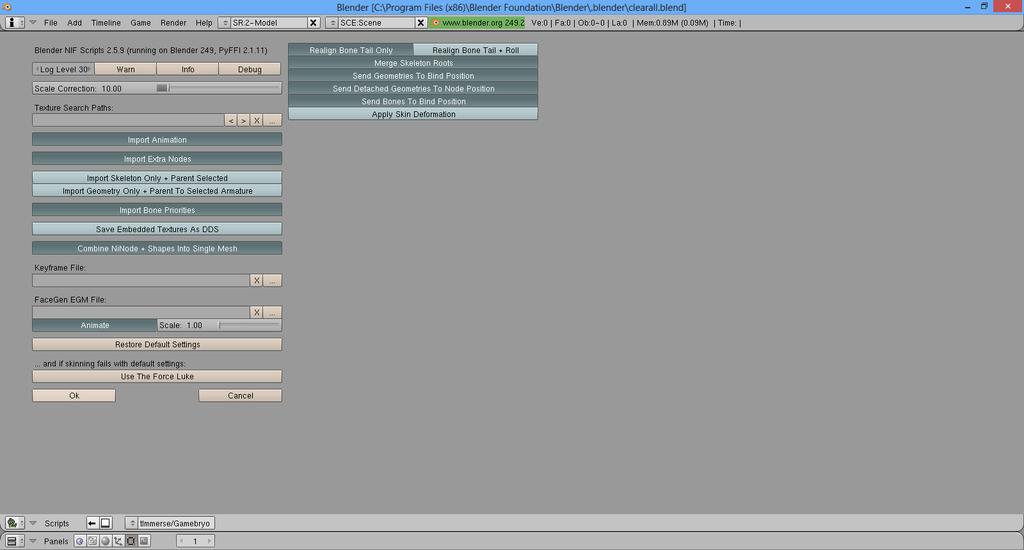
4.) Open up Blender and import your "new" nif.
5.) Your nif will now appear on screen in Blender. I have also noted all of the keyboard shortcuts on Blender I will be using throughout the remainder of whatever this is.
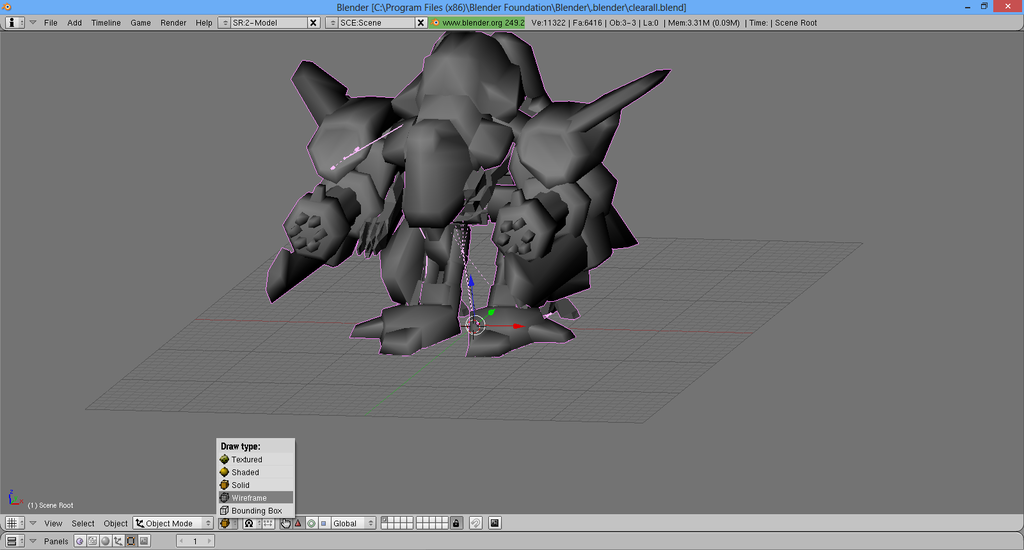
6.) Change the draw type to wireframe, it will make it far easier to see what we are doing.
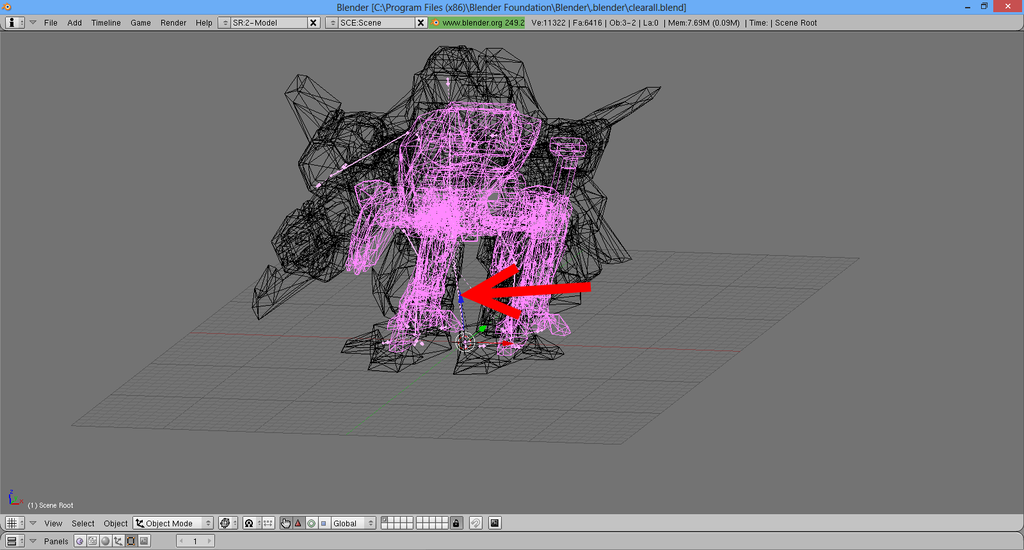
7.) Now select our static mesh, its the smaller one, by right clicking it.
8.) Now hold shift and select our armature, not sure if that is the right word to be honest, by right clicking it.
The armature is the skeleton of the nif, its represented in Blender by thin black lines with small nodes.
9.) it is very important that you selected the mesh before the armature for this next part to work, just make sure you did so in the proper order.
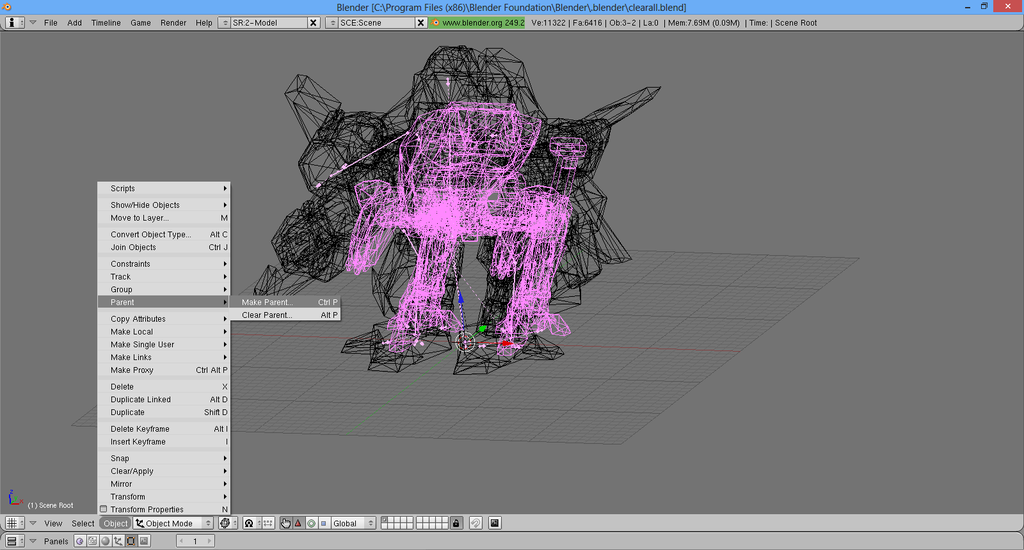
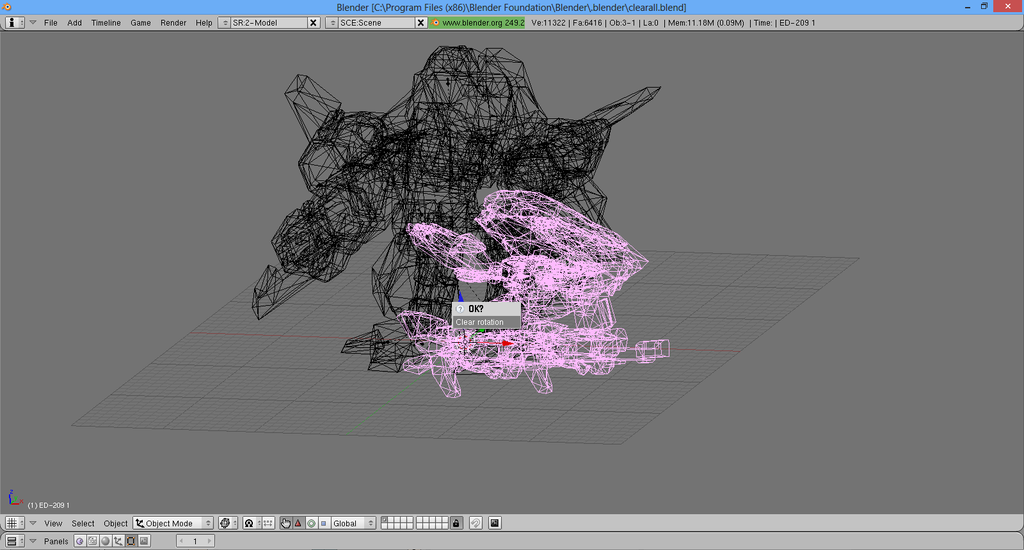
Select the object menu, parent button, then select make parent.
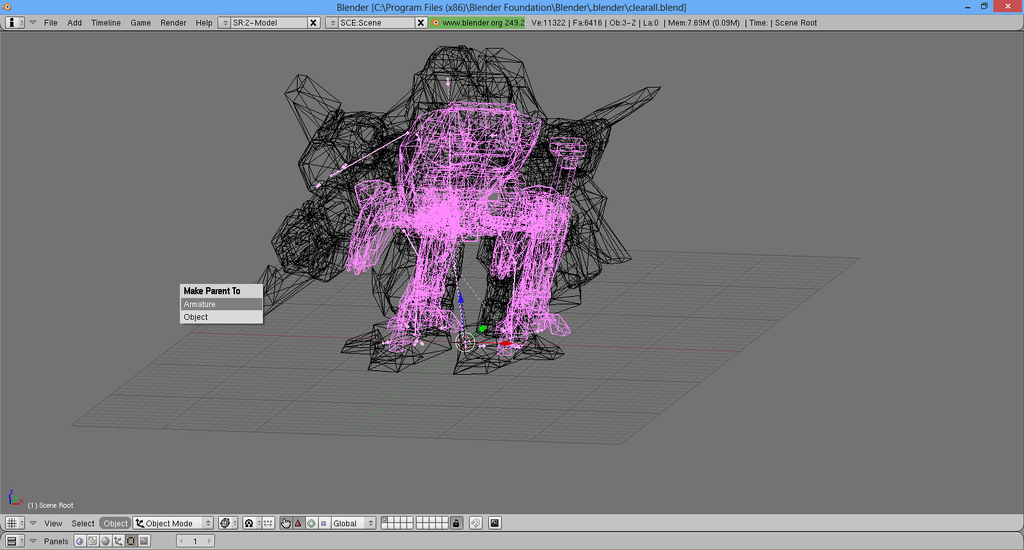
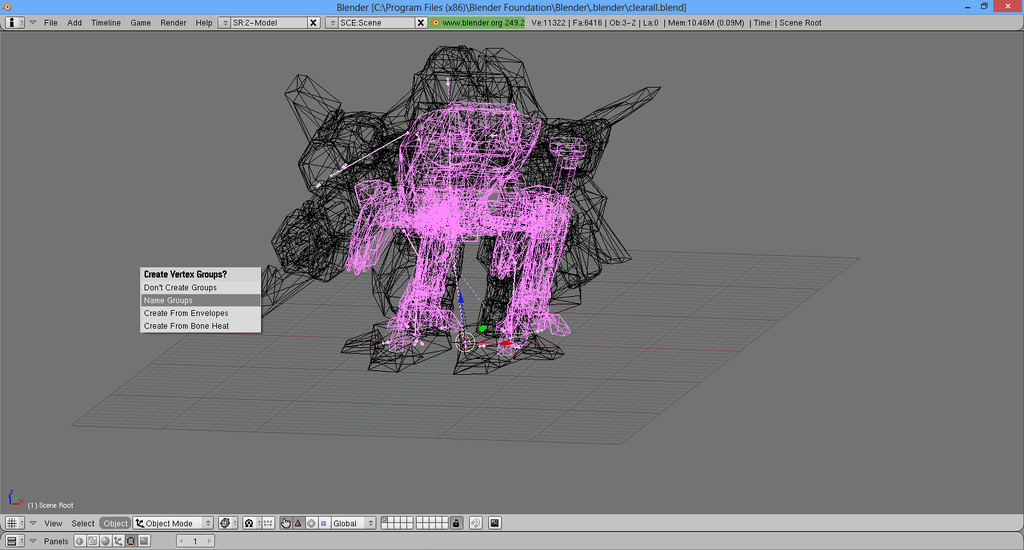
10.) On the little popup menus that come up select: Armature, Name Groups
11.) Your mesh will then get down on itself and spaz out to some random point. Thats all apart of the grieving process. It is also why it is important to try to make sure your mesh's location is 0,0,0. In this case it is.
12.) With your mesh selected press Alt+G then Alt+R to clear the location and Rotation respectively.
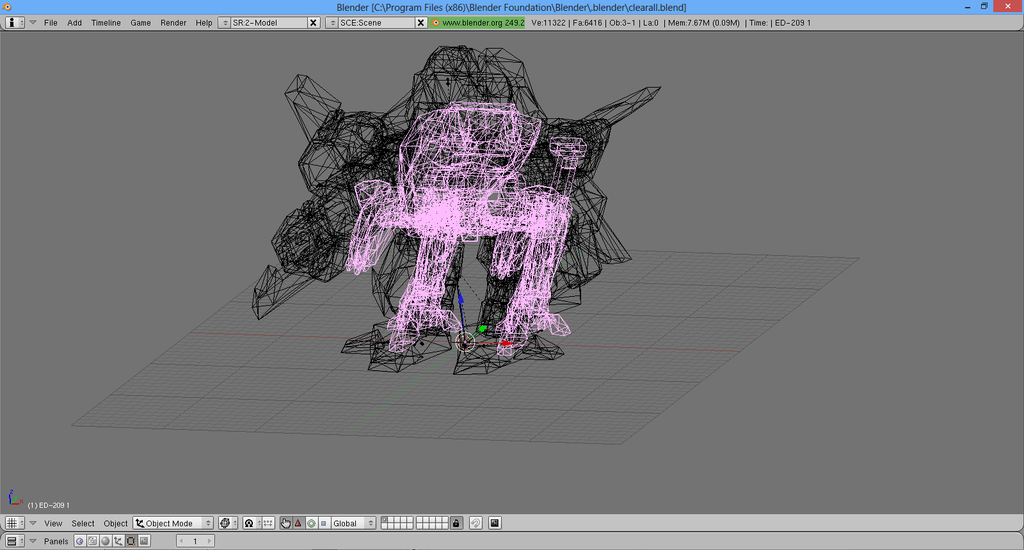
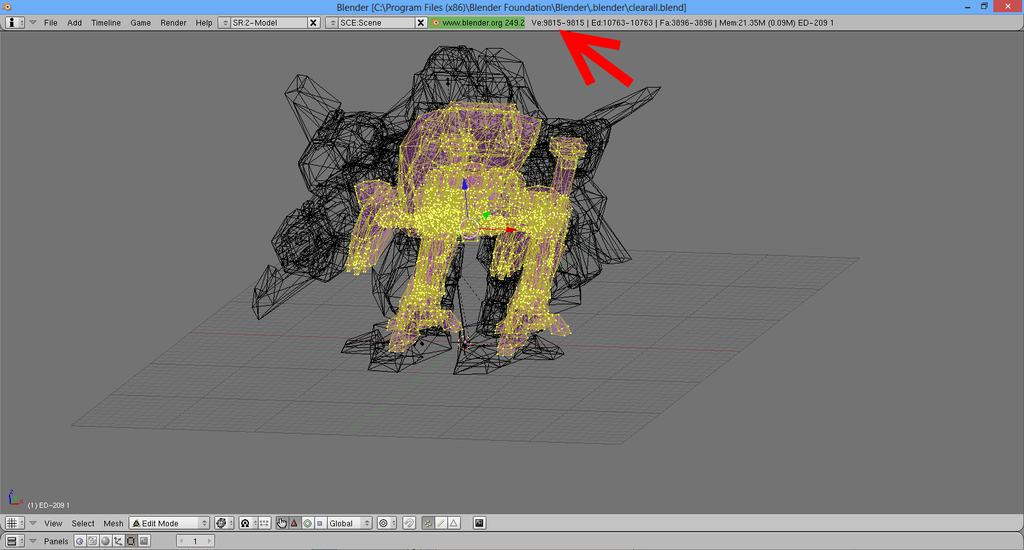
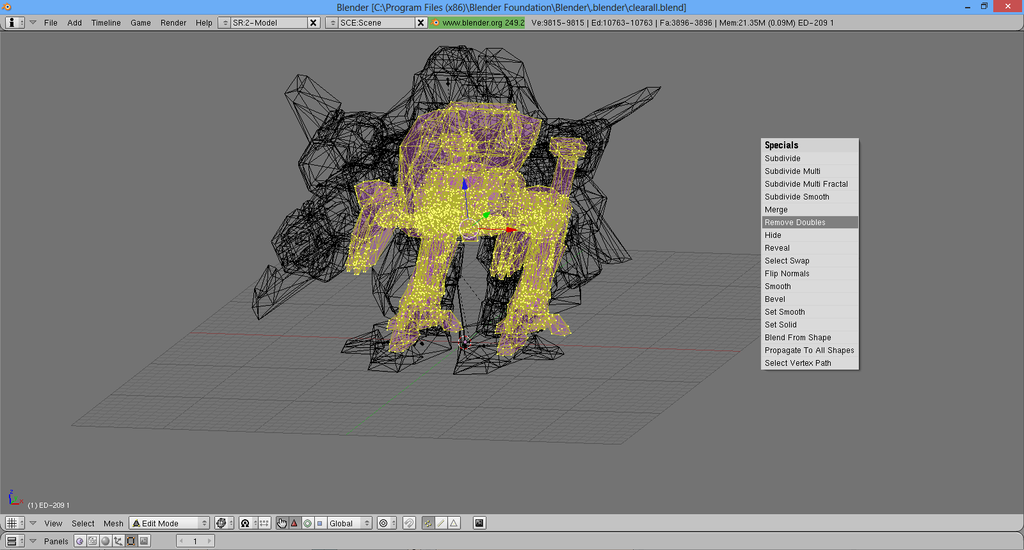
13.) Now that the mesh is properly parented go into edit mode.
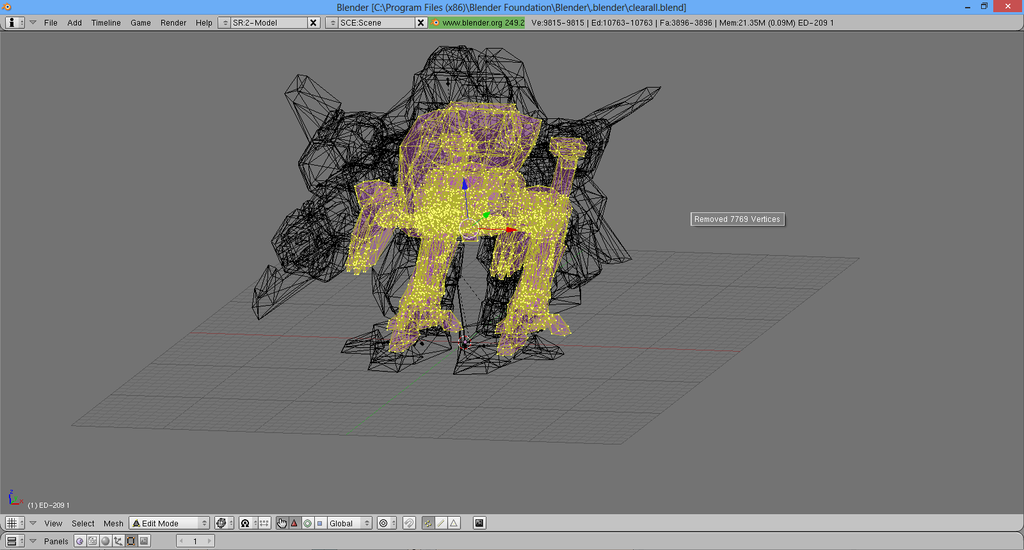
15.) Press W to open the Specials menu, and press "remove doubles", note that there were over 7000 vertices which were not needed and thus merged.
For the most part most mesh will not need doubles and it is a good idea to get rid of them it decreases the size and strain of your model. There are some case, mainly in which a mesh has flat parts which require a face on two sides, in which a few doubles will be necessary.
16.)Now that the mesh is less resource intensive lets line up our mesh about as much as it can be lined up with the skeleton.
Note for this skeleton the only moving parts we can realistically get working are the legs. Each one of those black lines with the node at the end represents a node. The base or start of the bone is where it bends at, while the end is where the next bone bends at. If you need better reference for exactly where the bones are then you can shift over to object mode, select the armature, go into edit mode, and then select the individual bones from in there.
17.)I found that moving this particular skeleton about -6.5 along the Y axis provided the best possible results. We weren't able to get an exact fit, far from it, but it should be close enough that it look acceptable in game.
18.)Now deselect all vertices by pressing A
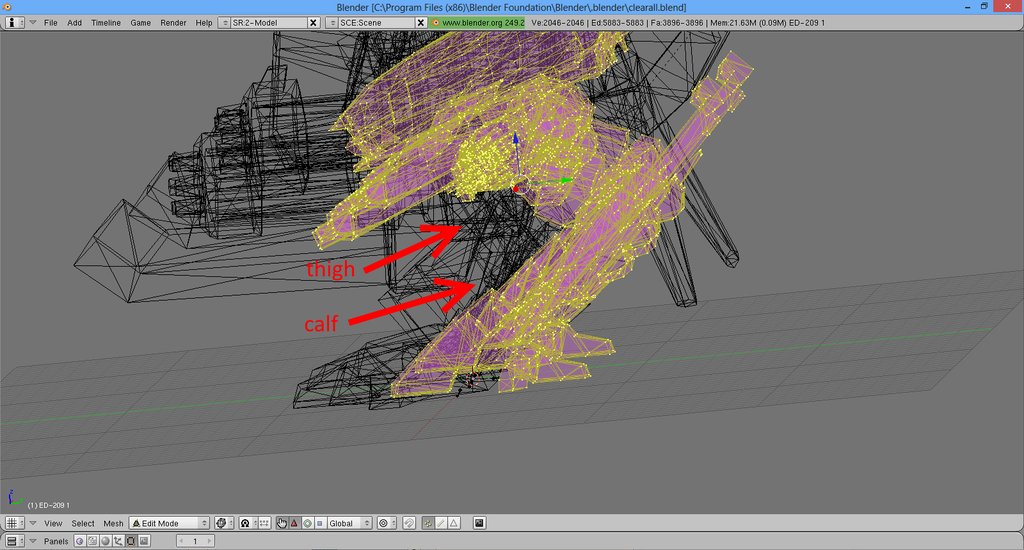
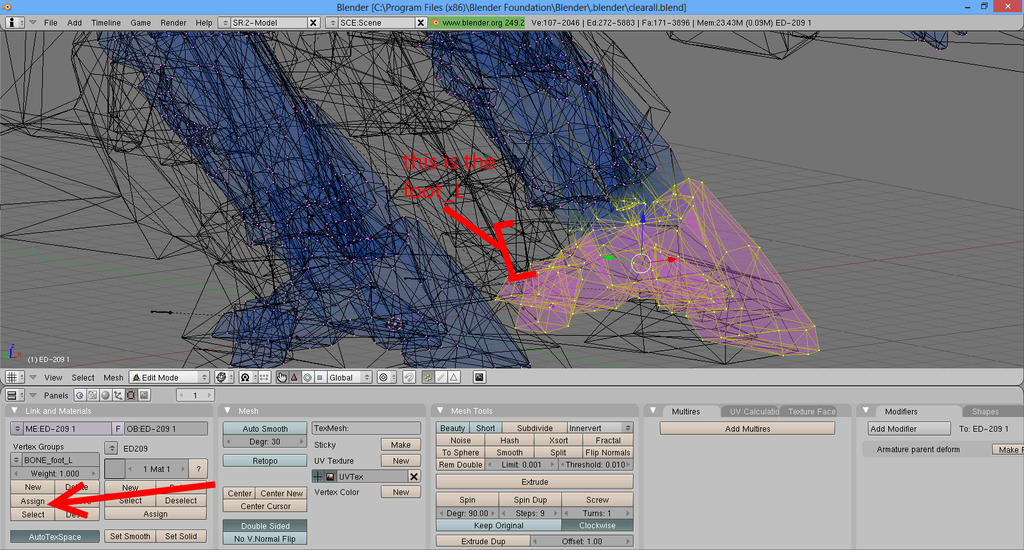
19.)Lets start the actual process of rigging the bones to the individual vertices. Lets start with the left foot. In the Vertex Group subgroup change selected bone to "Bone_foot_L"
Keep in mind when rigging that the side, whether left or right, is in reference to the mesh. That is it is the mesh's right, not necessarily our right
20.) the next few steps are the most time consuming and tedious part of rigging a mesh onto an armature. We have to select each individual vertice that we want to move with the bone Left foot. To do this, while holding shift, right click each individual vertice.
A way to save A LOT of time is to press B twice to use the area paint tool. It allows you to select multiple vertices at the same time by simple holding down the left click. It can also be used to deselect vertices by pressing the mouse wheel. To exit area paint tool right click.
21.) Now that you have all of the vertices selected that you want to assign to L_foot bone press the assign button in the vertex subsection.
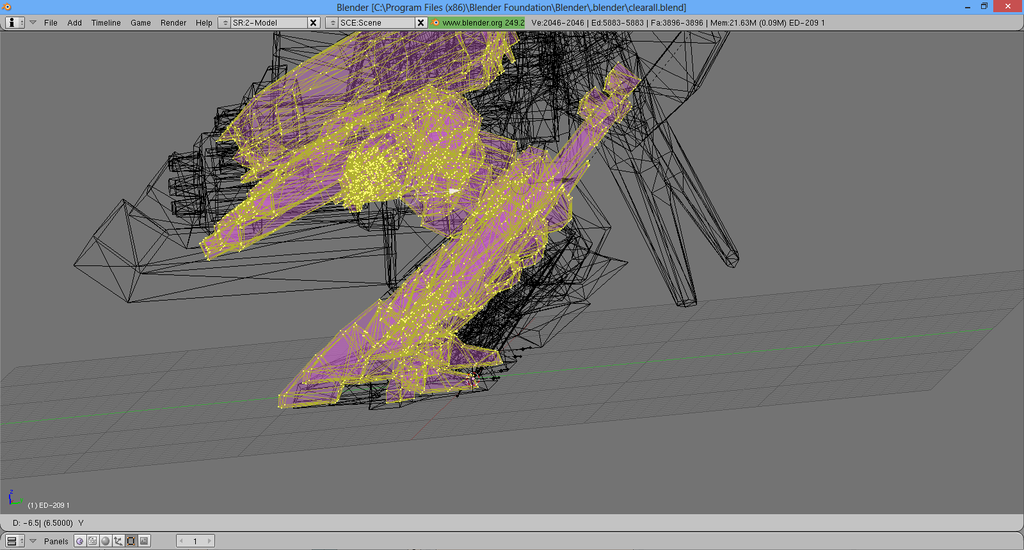
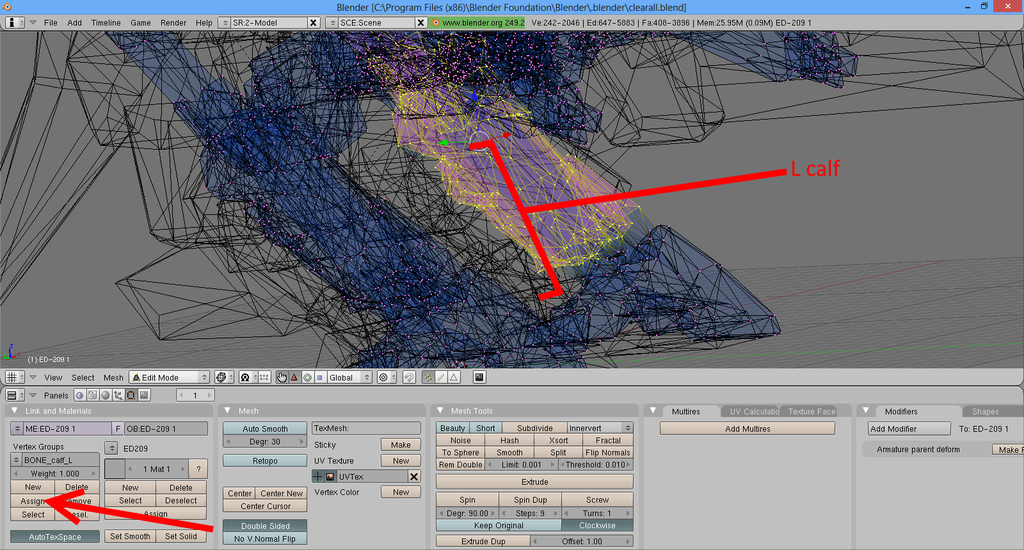
22.) Press a to deselect all. In the Vertex Group subgroup change the selected bone to "Bone_calf_L" Now select all vertices that you want to assign to the L_calf bone and then press the assign button.
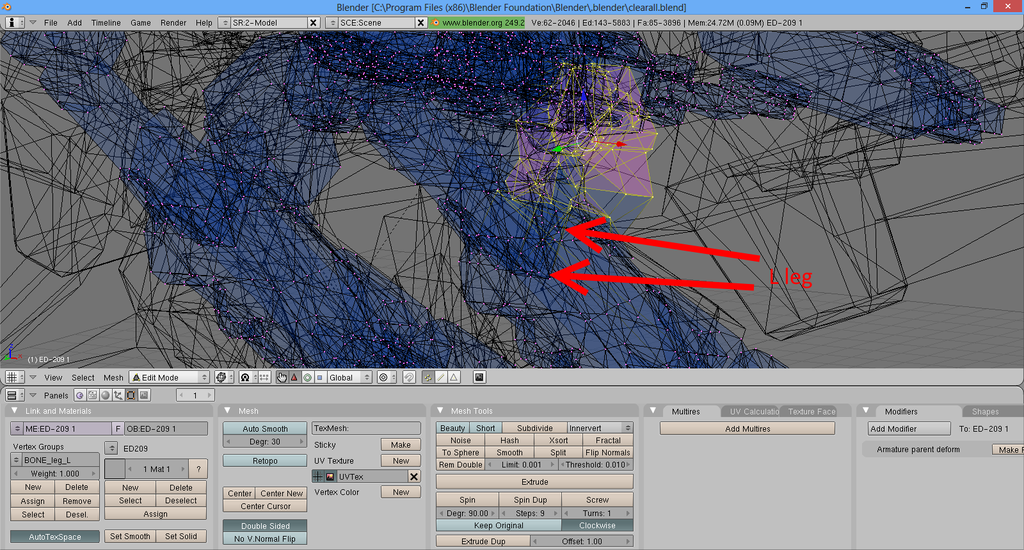
23.) Press a to deselect all. In the Vertex Group subgroup change the selected bone to "Bone_leg_L" Now select all vertices that you want to assign to the L_leg bone and then press the assign button.
24.) Repeat steps 19-23 except do so for the right leg. It is the same exact process except on the right side.
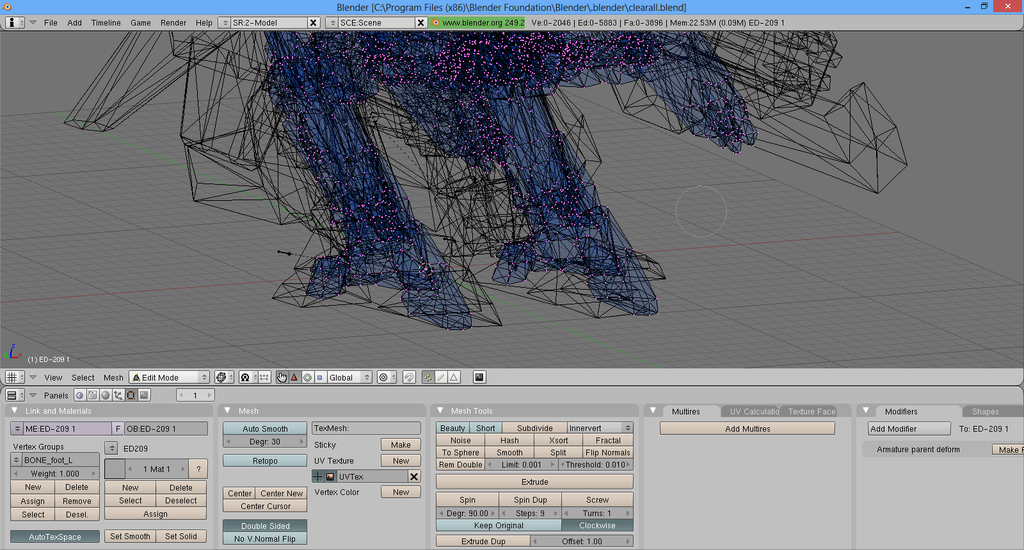
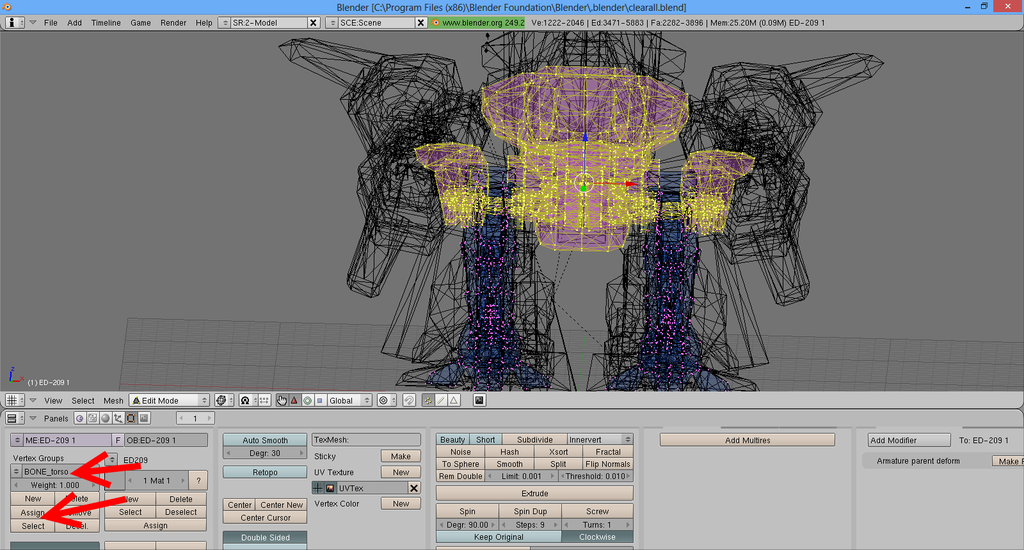
25.) Now that the legs are rigged lets rig the torso. In the Vertex Groups subgroup change selected bone to "Bone_torso" Press A to deselect all vertices, select all vertices that are not the legs, and press assign in the Vertex Groups.
An alternative yet complicated way is to select all vertices, change the vertex groups to the individual bones for the legs: leg, calf, foot that you already assigned vertices to, and press the deselect button on each one. Which will leave only the vertices in the torso. It'll also show you if you have an stray vertices that SHOULD be apart of a leg bone but aren't.
26.) Alright now that the vertices are all assigned to a bone in the armature switch over to object mode, and press a to select all.
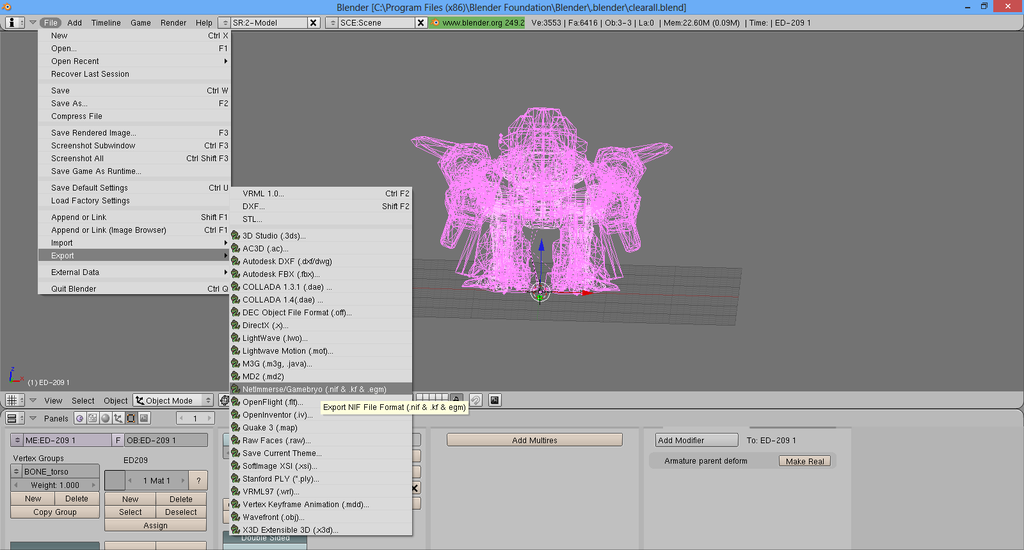
27.) Now lets export this nif already. Press file, export, NetImmersion/Gamebyro
28.) Export the nif where you want.
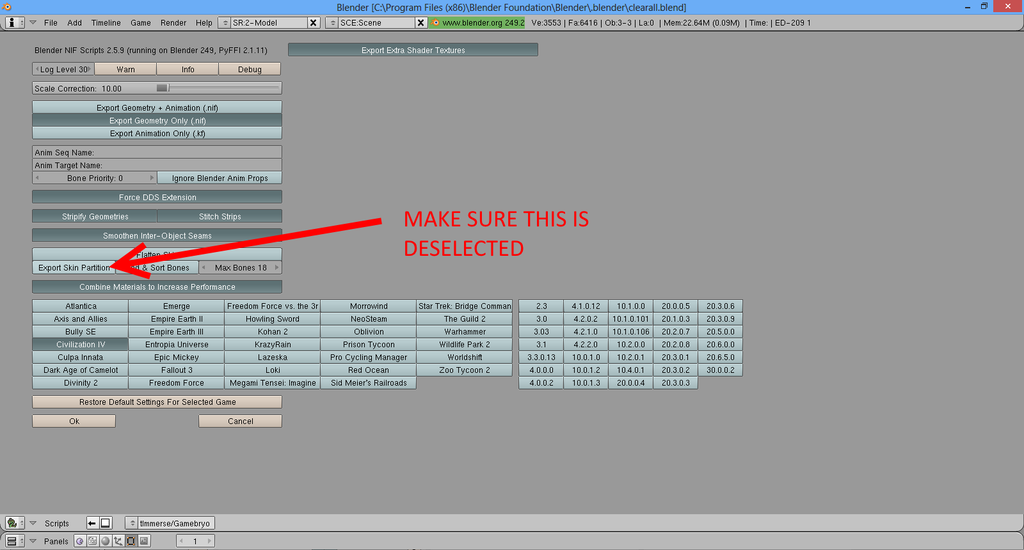
In case something is amiss your exporting for civ4, restore default settings, and MAKE SURE EXPORT SKIN PARTITIONS IS DESELECTED. I don't know why it is a default setting. Your mesh WILL NOT work in game if you export it with skin partitions. Oddly exporting them with skin partitions is the only way to get them to work in civ4:colonizations. But don't worry about that.
Note blender won't export nifs with unweighted vertices if you parent a mesh to an armature it HAS to have all of its vertices assigned to one bone or another.
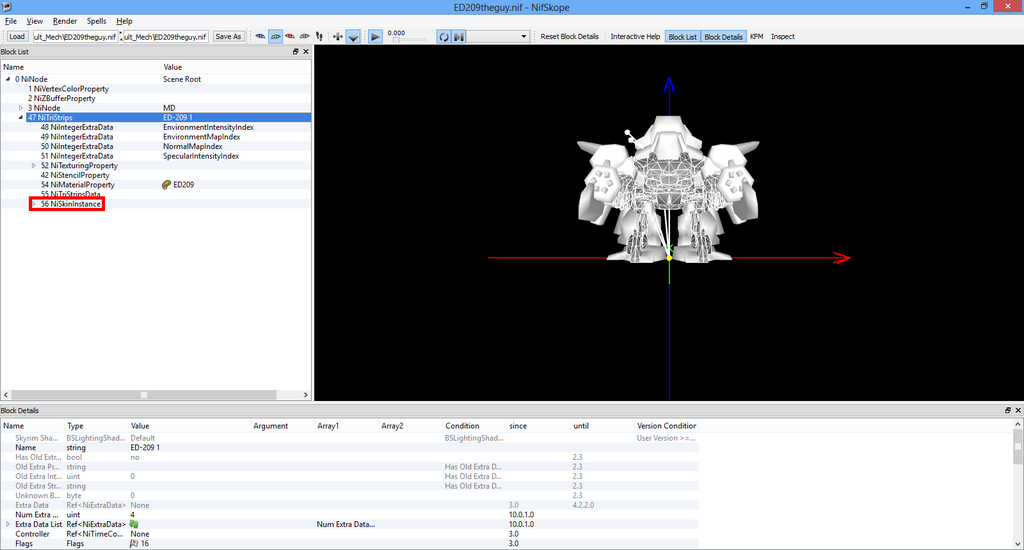
29.)Alright we are done with Blender now. Open up your "newer" and blenderer nif in nifskope. Note that your mesh has a NiSkinInstance node now, as well as a few other new random nodes that really don't matter. That means that the mesh will move with your skeleton now!
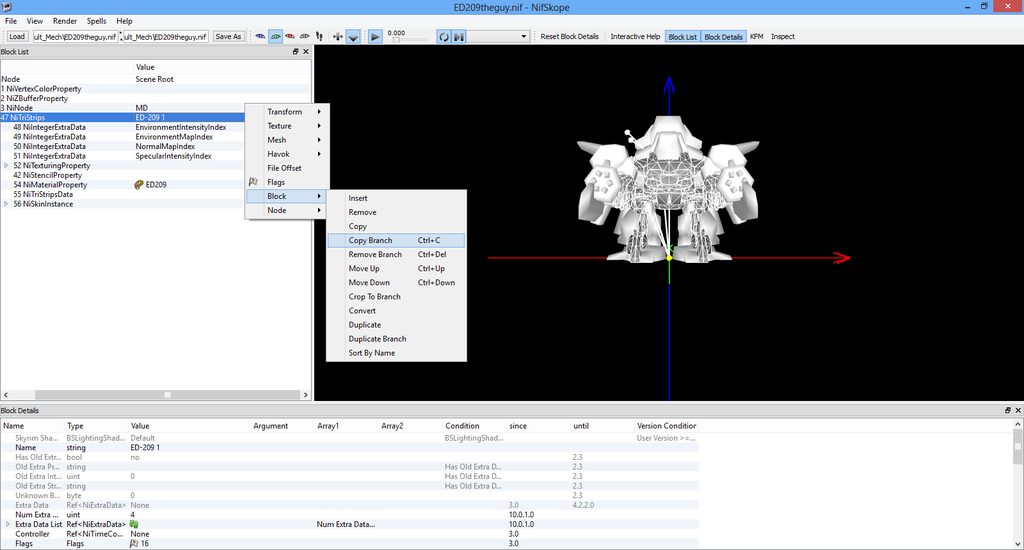
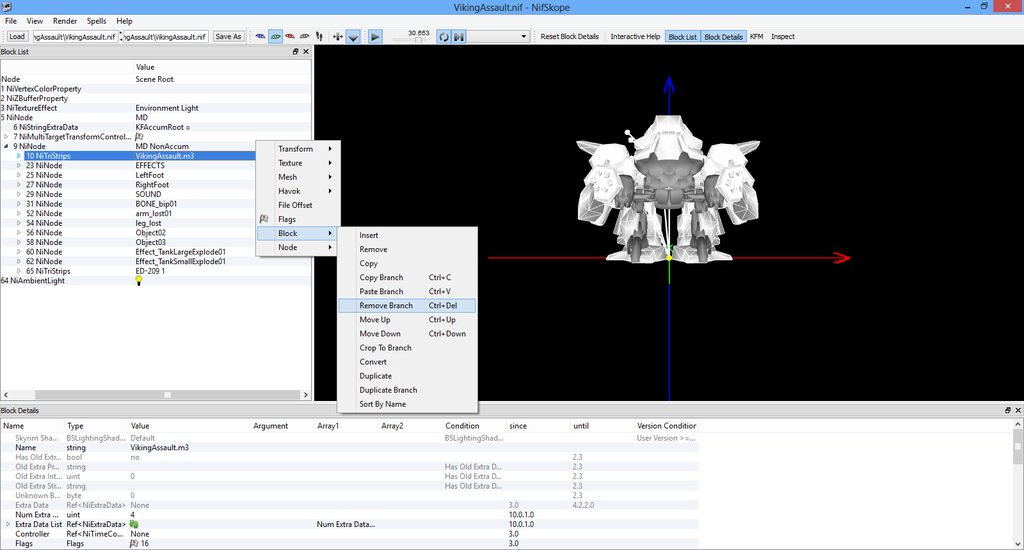
30.) Blender has a way of messing up nifs though. Some nifs will still work in game while others will just act weird. Lets copy your mesh over to a "clean" nif. Right click your mesh and click "copy branch"
Then past your mesh into our original "clean" nif.
Note that there is no undo button in nifskope
31.) We really don't need that star craft thing hanging out anymore feel free to delete him now. Go ahead and save your nif and we are done.
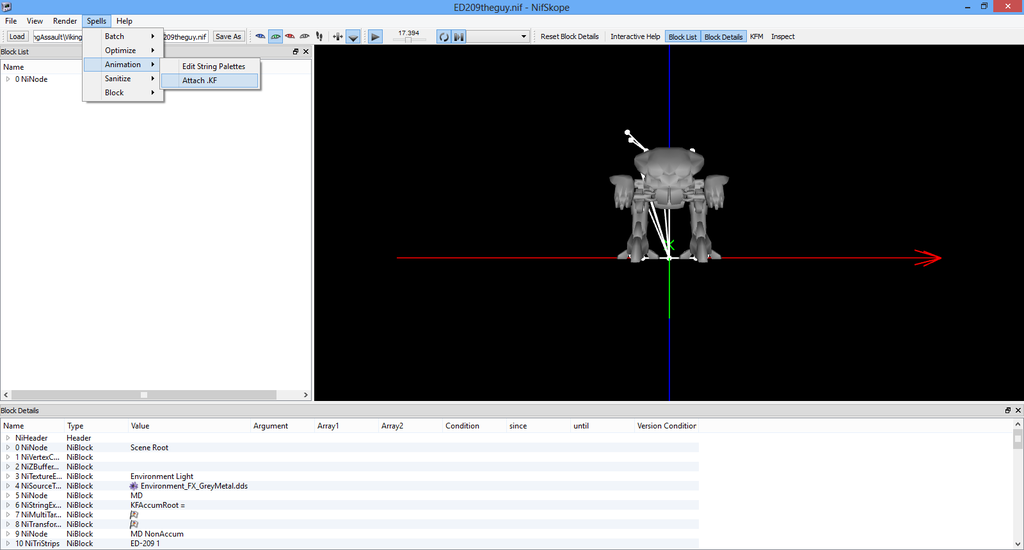
32.) Lets test to see how this guy works by attaching a kf. I find that the run and death animations are great "stress test" kfs.
Try to avoid saving your nif with a kf attached. If you do so its no big deal it just makes it more difficult to work with but will still work in game.
Thanks a lot man! With the fixed nif and instructions, you've given me a solid base to work with now; tried to to the rigging part from scratch using weight painting..kinda of worked but yeah lol, let's forget about the animation, that's even harder.
I'll put your tutorial to good use, look forward to the units I'll bring to the community, got quite a few static meshes: Crysis nanosuit, MasterChief, couple of humanoid gundam etc
Conversions from Civ V to IV have been done successfully by some of you guys, so let me request thesethis not particularly spectacular but archaic, convincing and well crafted medium infantrymen. The first ones are Hypomeiones, Spartans who either lost their full citizenship because they sank into poverty (or didn't act Spartan-like in other ways) or moved closely to full citizenship up from lower social ranks. The second ones I want to use as Messene perioikoi main infantry in a new ancient scenario.
Edit: Found something appropriate for the Messenian.
I have another request, for some animations. I found this Onager some time ago, I do not know who originally create it. If it is used with catapult animations, the stone moves, but not the arm of the onager. I wonder, if someone could change the animations, so the model has sufficient attack (and maybe die) animations.
In addition, also a while ago, someone made the attached catapult unit for me. This one is also not animated, but I think it is a bit harder to work with it, as it has no skeleton yet. But if someone could make some animations for it, it would be great.
@clanky4: Would you mind if I add your Motorbike and your Ballista to the download-Database, so everyone can use it? I think, it is , so the other user should have the possibility to find it easily.
@clanky4: Would you mind if I add your Motorbike and your Ballista to the download-Database, so everyone can use it? I think, it is , so the other user should have the possibility to find it easily.
Just out of curiosity, anyone made a windjammer? Windjammers were the last commercial sailing ships and had steel hulls. They could reach a pretty good speed and were able to compete with powered ships for a while, only ending their commercial runs in the 1950s. In-game, they'd be great for transport if somebody cut you off from the oil or uranium needed to power transports.
I've had an idea for a unit for a while which I would find quite useful - could someone possibly get the Holy Roman Landsknecht and give it the Marine's machine-gun as a sort of modern swiss gaurd? I'd certainly find it useful in a couple of projects i'm making at t' moment...
I don't believe so. But you could ask one of the unit makers if they would be interested in such a project.
I requested some future ships along time ago which the good GeneralMatt made. He was a very talented guy who loved making ships. He no longer posts here unfortunately, but you can search the database for his work.
This site uses cookies to help personalise content, tailor your experience and to keep you logged in if you register.
By continuing to use this site, you are consenting to our use of cookies.
")


 ! With the fixed nif and instructions, you've given me a solid base to work with now; tried to to the rigging part from scratch using weight painting..kinda of worked but yeah lol, let's forget about the animation, that's even harder.

 ,
,  is Tone.
 , so the other user should have the possibility to find it easily.
